All the Latest from Tangie Baxter & CO
Art Journal Emporium - Gallery Gems April 05 2018, 0 Comments

Greetings and Salutations to you. Spring has Sprung in part of the world. The weather is warming up and the birdies are singing all day. It's once again time for a look at some of the goodness to seen in the past couple of months at this year's Art Journal Emporium.
Our first bit of goodness is from Barb N. Her Alice in Wonderland page is just darn cute. I adore the fish reading to Alice and her rooster.

Supplies used various collections including The Vault by Tangie Baxter.
Feast your eyes on the rich, vibrant hues of this wonderful page by Cheryl using the March Challenge goodies included in the Art Journal Emporium. I love everything about this page.

Supplies used March Random 10 Challenge goodies (subscription based) by Tangie Baxter, Fairlee by Rebecca McMeen, NBK brushes and an overlay by Amanda Rockwell.
Next up is a bold, fun page by Cindy. I love all the colors and random elements scattered across her page. If you have never tried out filters you should give them a whirl.

Supplies used March Random 10 Challenge by Tangie Baxter along several filters.
Our last bit of goodness is by Liz with the reminder to Aim High!
 Supplies used collaboration kit titled "Of Wishes, Hopes and Dreams." Contributors:Little Butterfly Wings, Nancie Rowe Janitz Designs. Lynne-Marie Designs, Tangie Baxter, Paislee Press, Just Jaimee, Dawn Inskip, and Rebecca McMeen.
A Big Thank you to Barb, Cheryl, Cindy and Liz for sharing their wonderful pieces with all of us! Please leave them some love.
For more information on the Art Journal Emporium visit Art Journal Emporium - Tangie Baxter & CO.
Thanks so much for allowing me to share this week’s highlights with you... See you next time...
[Posted by: Susan]
The Vault Adventures: Tangie's Creative Crew "Keep Moving Forward" March 30 2018, 0 Comments
Hi, Everyone. It's time for another Vault Adventure!
This week we gave the Creative Crew the following products available in "The Vault":
"Keep Moving Forward"

"Merrie Birdie"

"Charming Children"

"Drafts & Blueprints-Bundle Eight"

The Creative Crew's Creations:

Credits: Keep Moving Forward (additional font: Great Vibes from Pic Monkey)

Credits: Keep Moving Forward

Credits: Keep Moving Forward

Credits: Keep Moving Forward

Credits: Keep Moving Forward, Merrie Birdie (additional font: Brushtip Texe from Pic Monkey).

These wonderful pages were created with just these 4 products included in "The Vault" unless otherwise notated. Currently there are well over 500 products in "The Vault" for you to download (including over 100 kits)!
When you purchase "The Vault" you have access to download & use all of Tangie's RETIRED products from 2007-2015. When more products are added there is no additional cost once you have access to "The Vault".
ART JOURNAL CARAVAN EXPEDITION ARCHIVES - ON SALE NOW! March 28 2018, 0 Comments
|

|
Art Journal Emporium Mixed Media Project: Sunday Morning Walk Altered Tin March 22 2018, 2 Comments
Hello, my name is Katrina and I am a member of Tangie’s Creative Team. Each month I show you my mixed media project created using Tangie’s wonderful products.
Today I have gone back to my mixed media roots. I have been a mixed media addict for many years now. I fell in love with it way back in the day, before it was called mixed media or had specific products we were supposed to use. We just used what we had to hand or could find ourselves, because of that, we called it Altered Art.
I admit there are things I miss from back then, not sure I personally like all the expensive mixed media products that they say you have to have to be called a mixed media Crafter but I do love all the digital products that makes it so much easier to make the creation you dream up in your head.
So, here is my mixed media creation, an Altered sardine tin!
As I was working on my altered tin, snow was falling outside. I live in the south west of England so that is quite rare, especially so late. So I felt the need to use spring like colours and here it is.....

As I said I used a sardine tin but you could use any tin you have.
WARNING!! - I must warn you though, if you start making things with tins and bottles you will start wandering around the supermarket not looking for what you need to buy for you weekly shop but looking for interesting tins and bottles that you could alter, never mind what is inside 😁
So now you know the side effects let’s begin

To start with I printed off the following -
As your tin will be different to mine, you need to print these out in a size that will fit your tin. I took the collage sheets into my photo editing software and made them the rough size I needed.
I took "ARTist Collage Sheet #853" into my photo editing software and just cropped out the White Rabbit I needed. I made him the size I needed for my tin.
Everything else came from "Wonderland" which is available in The Vault.
I thought it would be easier to build the background up on a piece of card cut into the size and shape of my tin. So, I drew around my tin onto a piece of scrap card and cut it out.

You may need to trim your shape a little untill it fits into the inside of your tin.

I then just played about with the collage pieces I had chosen from the Wonderland kit to make a fun background.
Once I was happy with it, I glued it all down and used some coloured pencils to outline my images.
My main focal pieces, the White Rabbit and a piece of grass, I wanted to stand out from the background to make it 3D. I glued them to some scraps of card and cut them out. That made them more robust to play about with.

To make my rabbit and grass stand out from the background I used some strips of card folded to form a sort of pop out. The strips need to be wide enough to support the collage piece but not be visible from the front.
As you can see from the photo, the White Rabbits strip is longer than the piece for the grass because I wanted the rabbit to stand in front of the grass.
Play about with your strips until you have your pieces where you want them.

Then stick the strips to the backs of their pieces.
Before I put everything together I decorated my tin.
I covered mine with strips of background paper from the "Wonderland" kit and a couple of the Zettie style swirls, also from the "Wonderland" kit.
I wanted my tin to stand on something and decided on round feet.
I cut 2 strips of corrugated card, the sort that is used in packaging and rolled them up to make 2 feet.

I then covered them with another of the background papers from the "Wonderland" kit. Then, I painted the ends with red acrylic paint.

Then it was time to put it all together.
I glued the background into the tin and then using a wet glue, to give you a bit of wiggle room, glued the main images onto the background. I made sure they were in the right place and that the rabbit's feet touched the floor.

I used a hot glue gun to attach the feet to the bottom of the tin, making sure it would stand up.
It then just needed some finishing touches.
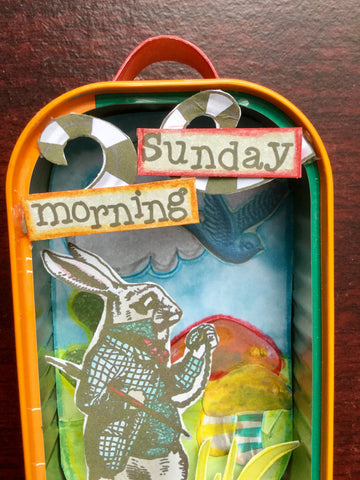
I used the words from "ARTist Collage Sheet #820" which I outlined with coloured pencils and glued to card before I cut them out.
I attached them to the tin using 2 of the Zettl style swirls, from the "Wonderland" kit, which I also glued to card before cutting them out.
The little handle at the top was made from a strip of card covered on both sides with the same paper as I used for the outside of my tin. Then I glued it to the top of the tin. I then added a couple of dots of coloured PVA glue to look like pearls.

I stuck the final word to the tin using hot glue and also added a couple of orange buttons to the feet, again with hot glue.
I used a little Pom Pom cut from a pompom trim for the White Rabbits tail.
There we have the finished tin.

Well, I hope you like my Altered Sardine Tin and will have a go yourself. The tin can be any size or any shape.
I would love to see how you alter your tin. Why not put them up on our Facebook page!
If you have any questions about my project I will be more that happy to answer them. Just ask your question below.
I will be back again next month with another mixed media project, until then take care.
Love Katrina x
Tangie's Creative Crew Vault Explorations: In Search of Spring March 14 2018, 0 Comments
This week the TB&CO Creative Crew entered "The Vault" in search of Spring.
Here's just a sample of products they found:
"Oh What Rapture!"

"Glamour Set One"

"Bling Spring"

"Silver Lining"

"Easter Words"

And here's what the Creative Crew created with this small sampling of products available from "The Vault".

(additional font: Ferrum from Pic Monkey)

(additional gesso elements from other Tangie kits available at TB&CO)

(additional font: Ferrum from Pic Monkey)

"March Love" by EHStudios

"Springtime" by Jan N.

(additional kits: Fashion Bee Insect Art Dolls, Industrial Velvet & Compendium Dreams)

"Bliss Joy Heaven" by penelope h.

"Me and My Bunny" by Jan N.
These wonderful pages were created with just these 5 products included in "The Vault" unless otherwise notated. Currently there are well over 500 products in "The Vault" for you to download (including over 100 kits)!
When you purchase "The Vault" you have access to download & use all of Tangie's RETIRED products from 2007-2015. When more products are added there is no additional cost once you have access to "The Vault".
Tangie's Creative Crew Takes a Walk through The Vault March 07 2018, 0 Comments
This week the TB&CO Creative Crew entered "The Vault" and was given a group of products to let loose with and create.
This week's products are:
"Fashion Bee Insect Art Dolls"


"Apothecary"

"Day Dreamer Alpha"

"Mystery Case March 2009: Oh My Spring"

Now it's time to show off what the Creative Crew created with this small sampling of products available from "The Vault".

"Imagine" by EHStudios


Journal Page by Carolyn W.

(also used Virtuosity, Oh What Rapture & Tempest Tossed)

"Love Bugs" by jan n.


"Warm Weather" by penelope h.

"Bliss" by jan n.
These wonderful pages were created with just 4 of the products included in "The Vault" unless otherwise notated. Currently there are well over 500 products in "The Vault" for you to download (including over 100 kits)!
When you purchase "The Vault" you have access to download & use all of Tangie's RETIRED products from 2007-2015. When more products are added there is no additional cost once you have access to "The Vault".
Art Journal Emporium Gems March 03 2018, 0 Comments

A big Hello to all my fellow art lovers and creators. It's time for a look at some of the goodness to seen in the past couple of months at this year's Art Journal Emporium.
First up this lovely page by Liz and her word for 2018.
 Credits: Various collections by Tangie Baxter and Rebecca McMeen's Riven.
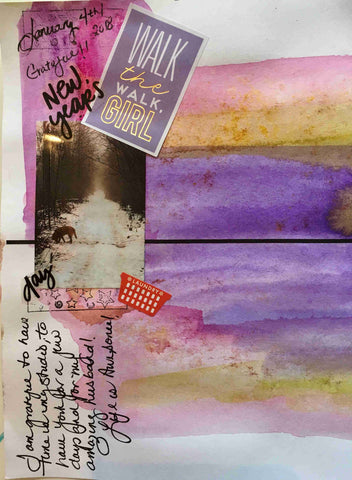
 Our next bit of sparkling goodness is by Cheryl. Lovely color choices, lots of journaling and I especially love the tag saying walk the walk.
Lin's Edith Head quote caught my eye. Her page is filled with all kinds of wonderfulness and lots of word art.
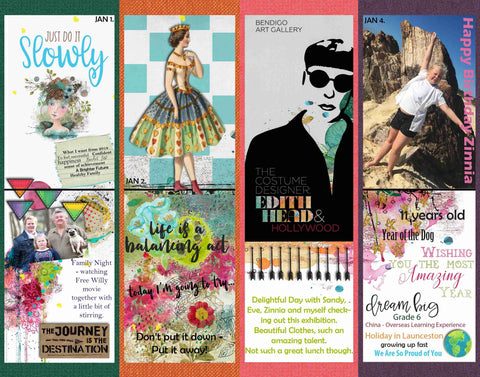 Credits: Various collections by Tangie Baxter and Rebecca McMeen.
 Check out this beautiful cover page for the Time Lines Project by Sarah.
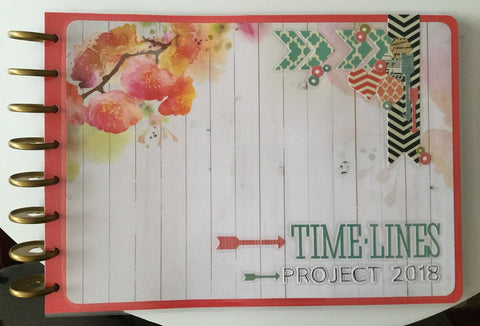
A Big Thank You to Liz, Cheryl, Lin and Sarah for sharing their amazing works with us. Please stop by the Art Journal Emporium and leave some love.
Till next time,
Susan
[Posted by: Susan McCarley]
"Art Journal Emporium & Time∙Lines Subscription"
Art Journal Emporium Mixed Media Art Journal Page: Felicity February 25 2018, 0 Comments
Hello, my name is Katrina and I am a member of Tangie’s creative crew. Each month I write a mixed media blog post showing you my mixed media projects.
This month I want to show you my art journal page inspired by the February "15 Minute Flash" inspiration page and one of February’s collage sheets included in the Art Journal Emporium.

To start I chose acrylic paints in the colours shown in the colour palette provided in the "15 Minute Flash" inspiration page: pale pink, dark cerise pink and a blueish grey, I didn’t have any grey paint.
I chose pencils, markers and acrylic ink’s in similar colours. That way I could then play around with all sorts of mediums.
I also printed off one of the background collage sheets from February’s collage sheet set, part of February's Art Journal Emporium content included as part of the monthly subscription.
To make the background I first protected my journal with wax paper and applied a lot of water to my page.
I then painted some of the pale pink acrylic paint into the water at the top and some cerise pink paint at the bottom.
I took my spray bottle and liberally sprayed the light pink paint with water so it ran down into the cerise paint.

If you are going to do this make sure you have some kitchen paper ready to catch the drips.
I did the same with the purple paint over the top.
Now for the focal points:
I cut several circles in different sizes out of the collage sheet and tried them out on the page to see what I liked. Once I was happy I glued them down.

Using some of the acrylic paint I had used for the background I painted around the circles, not looking for an accurate line.
I did the same with some markers and pencils.

I also stamped some of my hand carved stamps in grey ink on to the background and added more lines and drips with acrylic ink.
For the word Felicity I wrote it first in a blue acrylic ink with a dip pen then when dry, went over the top with the sliver blue acrylic ink, again using a dip pen.
So there we have it my finished page.
The "15 Minute Flash" inspiration page can be used in so many ways, I chose to use the colour palette and one of the words. Even though I chose to spend longer than 15 minutes on my page it is still a great place to gain inspiration for your art journal pages.
What will you choose to use?
Well, until next month, take care, Love Katrina x
[Posted by: Katrina Rollings]
Art Journal Emporium - February Artist Sheets Assemblage February 21 2018, 0 Comments
The monthly Artist Sheets included in the Art Journal Emporium are always so inspiring, but I sometimes have trouble deciding just what to do with them. This month I decided to try a “glue book” type of page.
I have been working almost exclusively in digital lately, but love those torn edges. Fortunately, I found a template over at The Lilypad "A New Chapter Paper Tears" by Dawn Inskip. Now I can get those cool torn edges without the glued-together fingers.
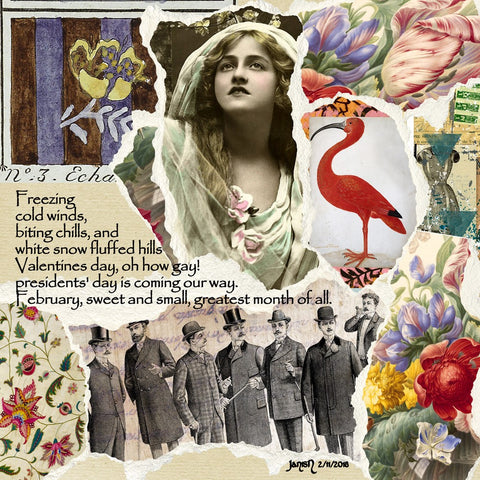
It’s important to have a focal point - I used the lady. Remember to leave some blank space to put your journaling, quote or poem. Give it a go. We would love to see what you have created.
[Posted by: Jan Nicholas]


