Art Journal Emporium Mixed Media Project: Sunday Morning Walk Altered Tin March 22 2018, 2 Comments
Hello, my name is Katrina and I am a member of Tangie’s Creative Team. Each month I show you my mixed media project created using Tangie’s wonderful products.
Today I have gone back to my mixed media roots. I have been a mixed media addict for many years now. I fell in love with it way back in the day, before it was called mixed media or had specific products we were supposed to use. We just used what we had to hand or could find ourselves, because of that, we called it Altered Art.
I admit there are things I miss from back then, not sure I personally like all the expensive mixed media products that they say you have to have to be called a mixed media Crafter but I do love all the digital products that makes it so much easier to make the creation you dream up in your head.
So, here is my mixed media creation, an Altered sardine tin!
As I was working on my altered tin, snow was falling outside. I live in the south west of England so that is quite rare, especially so late. So I felt the need to use spring like colours and here it is.....

As I said I used a sardine tin but you could use any tin you have.
WARNING!! - I must warn you though, if you start making things with tins and bottles you will start wandering around the supermarket not looking for what you need to buy for you weekly shop but looking for interesting tins and bottles that you could alter, never mind what is inside 😁
So now you know the side effects let’s begin

To start with I printed off the following -


As your tin will be different to mine, you need to print these out in a size that will fit your tin. I took the collage sheets into my photo editing software and made them the rough size I needed.
I took "ARTist Collage Sheet #853" into my photo editing software and just cropped out the White Rabbit I needed. I made him the size I needed for my tin.
Everything else came from "Wonderland" which is available in The Vault.


I thought it would be easier to build the background up on a piece of card cut into the size and shape of my tin. So, I drew around my tin onto a piece of scrap card and cut it out.

You may need to trim your shape a little untill it fits into the inside of your tin.

I then just played about with the collage pieces I had chosen from the Wonderland kit to make a fun background.
Once I was happy with it, I glued it all down and used some coloured pencils to outline my images.
My main focal pieces, the White Rabbit and a piece of grass, I wanted to stand out from the background to make it 3D. I glued them to some scraps of card and cut them out. That made them more robust to play about with.

To make my rabbit and grass stand out from the background I used some strips of card folded to form a sort of pop out. The strips need to be wide enough to support the collage piece but not be visible from the front.
As you can see from the photo, the White Rabbits strip is longer than the piece for the grass because I wanted the rabbit to stand in front of the grass.
Play about with your strips until you have your pieces where you want them.

Then stick the strips to the backs of their pieces.
Before I put everything together I decorated my tin.
I covered mine with strips of background paper from the "Wonderland" kit and a couple of the Zettie style swirls, also from the "Wonderland" kit.
I wanted my tin to stand on something and decided on round feet.
I cut 2 strips of corrugated card, the sort that is used in packaging and rolled them up to make 2 feet.

I then covered them with another of the background papers from the "Wonderland" kit. Then, I painted the ends with red acrylic paint.

Then it was time to put it all together.
I glued the background into the tin and then using a wet glue, to give you a bit of wiggle room, glued the main images onto the background. I made sure they were in the right place and that the rabbit's feet touched the floor.

I used a hot glue gun to attach the feet to the bottom of the tin, making sure it would stand up.
It then just needed some finishing touches.
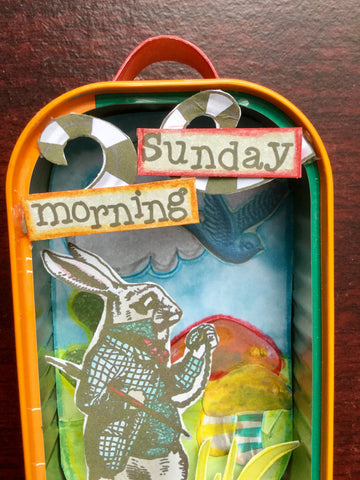
I used the words from "ARTist Collage Sheet #820" which I outlined with coloured pencils and glued to card before I cut them out.
I attached them to the tin using 2 of the Zettl style swirls, from the "Wonderland" kit, which I also glued to card before cutting them out.
The little handle at the top was made from a strip of card covered on both sides with the same paper as I used for the outside of my tin. Then I glued it to the top of the tin. I then added a couple of dots of coloured PVA glue to look like pearls.

I stuck the final word to the tin using hot glue and also added a couple of orange buttons to the feet, again with hot glue.
I used a little Pom Pom cut from a pompom trim for the White Rabbits tail.
There we have the finished tin.

Well, I hope you like my Altered Sardine Tin and will have a go yourself. The tin can be any size or any shape.
I would love to see how you alter your tin. Why not put them up on our Facebook page!
If you have any questions about my project I will be more that happy to answer them. Just ask your question below.
I will be back again next month with another mixed media project, until then take care.
Love Katrina x

Comments
Katrina Rollings on April 06 2018 at 05:24AM
So glad you liked it Susan.
susan on April 03 2018 at 09:00PM
this turned out wonderfully and know I know how to make one of these! thank you….