
A big Hello to all my fellow art lovers and creators. It's time for a look at some of the goodness to seen in the past couple of months at this year's Art Journal Emporium.
First up this lovely page by Liz and her word for 2018.

Credits: Various collections by
Tangie Baxter and Rebecca McMeen's Riven.
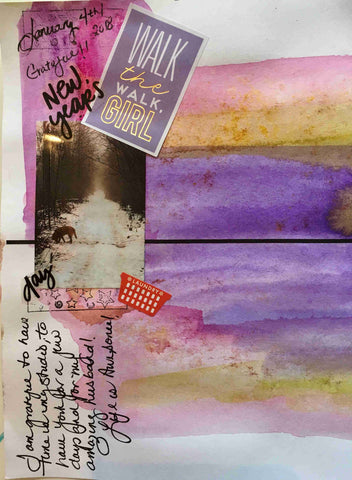
Our next bit of sparkling goodness is by Cheryl. Lovely color choices, lots of journaling and I especially love the tag saying walk the walk.
Lin's Edith Head quote caught my eye. Her page is filled with all kinds of wonderfulness and lots of word art.
Credits: Various collections by
Tangie Baxter and Rebecca McMeen.
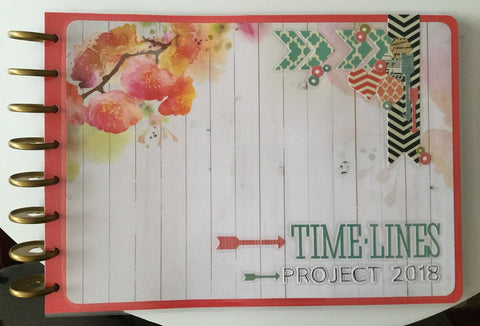
Check out this beautiful cover page for the Time Lines Project by Sarah.
A Big Thank You to Liz, Cheryl, Lin and Sarah for sharing their amazing works with us. Please stop by the Art Journal Emporium and leave some love.
Till next time,
Susan
[Posted by: Susan McCarley]
"Art Journal Emporium & Time∙Lines Subscription"
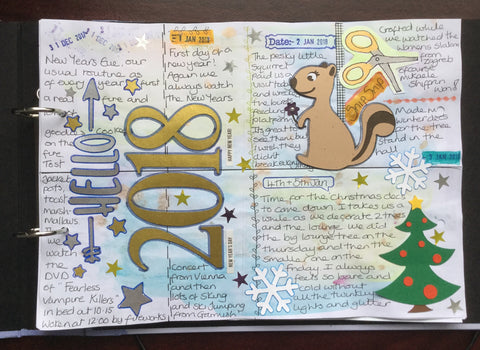
The monthly Artist Sheets included in the Art Journal Emporium are always so inspiring, but I sometimes have trouble deciding just what to do with them. This month I decided to try a “glue book” type of page.
I have been working almost exclusively in digital lately, but love those torn edges. Fortunately, I found a template over at The Lilypad "A New Chapter Paper Tears" by Dawn Inskip. Now I can get those cool torn edges without the glued-together fingers.
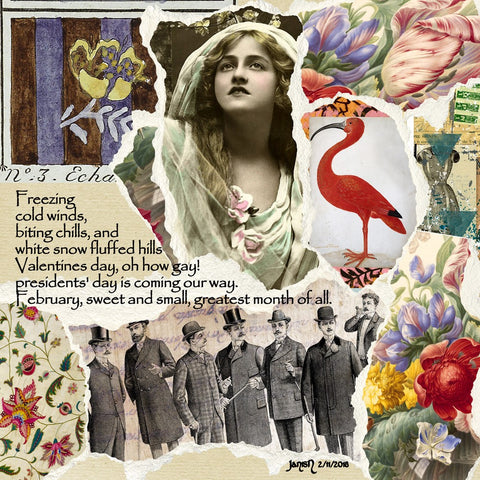
It’s important to have a focal point - I used the lady. Remember to leave some blank space to put your journaling, quote or poem. Give it a go. We would love to see what you have created.
[Posted by: Jan Nicholas]

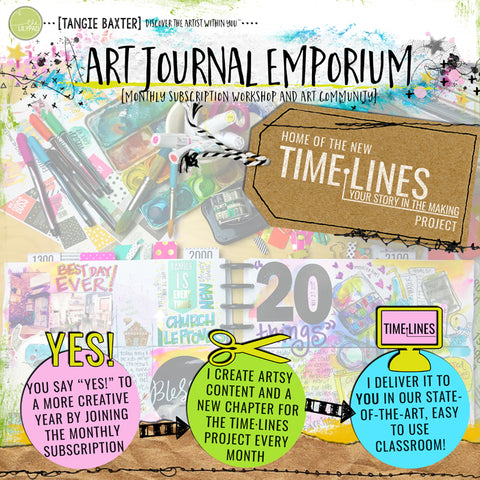
Art Journal Emporium 2018 has begun! This year Tangie has created an exciting new project: Time∙Lines! Each month you receive a new chapter to our exciting 2018 Time∙Lines project, including special EXCLUSIVE products and videos! Each month Tangie will record a Vlog, sharing insights and ideas on the prompts and monthly themes. Each month you will also receive 10 digital Artist Sheets (collage sheets) ready for you to print; cut them up and use them as artwork in your art journals (or you can use them digitally too). You'll also get a "15 Minute Flash" worksheet to jumpstart your creativity in 15 minutes or less Other exciting surprises along the way!
Katrina has a great tutorial for converting a portrait orientated binder into a landscape oriented binder. Enjoy!
---------------------------------------------------------------------------------
Hello, my name is Katrina Rollings and I am a member of Tangie's Creative Crew. Each month I write a mixed media post bringing you ideas on how you can use Tangie's wonderful products.
This month I have been having fun with the new Time∙Lines project and have been thinking about how to store them. Tangie has given us lots of different ideas but I wanted to use a ring binder. I chose to use a ring binder because they are cheap, easy to get hold of and use. The major problem with them is they are mostly found in A4 portrait and I needed mine to be A4 landscape. I did look online for a landscape binder but they were a lot more expensive then the portrait ones. So I decided to make a portrait binder into a landscape one!
This is how I did it.
First of all I needed a ring binder. I found a beautiful duck egg blue one in my local high street stationers quite cheaply. I rushed home to my craft room and began its transformation.

The first thing I had to do was to cut the front and back covers of my file. The front was easy but the back was a little trickier as it has the ring binder part on it. I just cut as close as I could to the metal part.
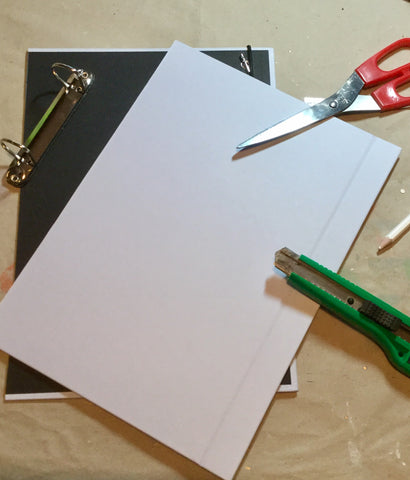
I then had two separate covers. As they were not quite the same size as each other I re-cut them so they matched.
I cut the ring binder part out of the spine part of the folder, cutting as close to the metal as I could.
Now I needed to make a new spine for my file to re-attach the ring binder to.

I used a piece of thick board from the back of a watercolour paper pad. You need it to be roughly the same thickness as the file folder you started with. You can always stick layers of card together until you have the right thickness.
I cut my card so it was the same height as my covers and wide enough to take my ring binder piece. Everyone's file will be different so the size you think you need will be the right size.
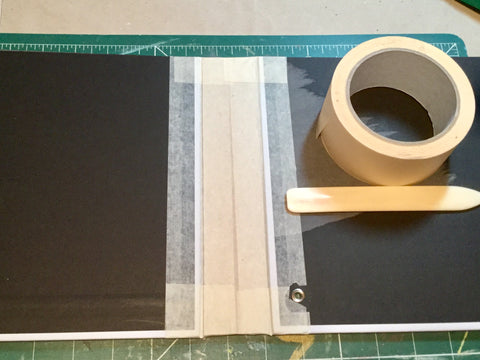
I needed to put it all back together again and for that I used masking tape. I have used masking tape for this sort of project many a time and find it works really well. I like to use the wide tape for this type of project.
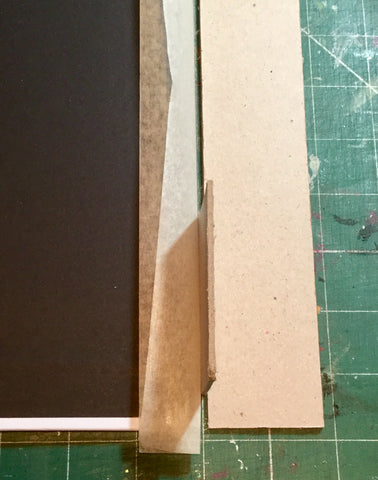
I wanted to make sure my file will open and close nicely and for it to be able to do that I needed to leave a tiny gap between the cover and the spine.
I find the easiest way to do that is to use a scrap of the card you are using for your spine as a spacer. As you can see in the photo I use my spacer to get the right amount of space between the front cover and spine.
I cut a piece of tape slightly longer than I needed and folded it in half lengthwise with the sticky side on the outside.
I placed the fold of the tape into the gap and then smoothed out the tape onto both sides.
I like to burnish the tape down with a bone folder or the back of a spoon so it is stuck down well. I then trimmed off the tape top and bottom.
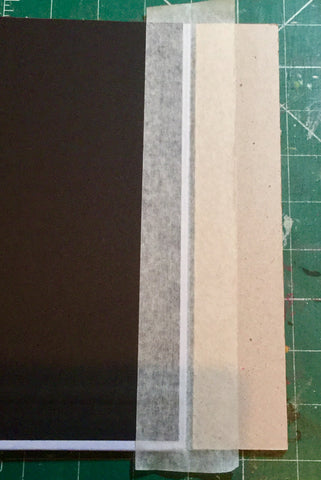
I needed to do the same thing on the other side so I turned it over and cut a second piece of tape and again folded it in half sticky side out.
This time I wanted to put the fold into the little gap and stick it to the tape on the back, so I gently ran my bone folder or you can use the back of a knife, down the little gap so that it gently sticks the tapes together but doesn’t tear them.
Once I had done that I could smooth the tape out on both sides and burnish them again.
I also like to put a piece of tape over the top from front to back to stop the tape from lifting up. I do this top and bottom of the spine.
I wanted to cover up the tape so it looks nicer. As my file folder had a black inside I just used some black card to cover up the tape. You can use what ever you like to make the inside look nice. Just remember to do it before you glue in the metal ring binder in place.
You will be left with the tape showing in the folds. Don’t try and cover then with card or paper it doesn’t really work and looks messy over time. I use a felt tip pen to colour in the little gaps. If you haven’t got the exact colour then just go with one that looks nice with the paper you have chosen.
The edge of my file which had been cut also needs attention. I painted mine the same colour as the file but you could use tape or coloured paper or colour it with your felt tips.
Of course if you had chosen to cover the outside of your file with paper then you can cover up the raw edge with that.

I needed to put the ring binder back into the file. I peeled any paper off the back of my ring binder to give a nice rough surface for the glue to get in to. I applied wet glue to the back of the ring binder and stuck it down on to the spine. It needed to be left to dry so I put something on top of it to weigh it down and left it to dry over night.

Now the inside of my file was finished so I could turn to the outside.
I chose a nice paper that matched the colour of my original file and cut the paper into strips the size I needed for the spine and to cover up the tape on the front and back.
Don’t try to go over the folds it just doesn't work. I used a felt tip again to colour in the tape in the folds and also coloured the edge of the paper with ink. I then stuck the paper into place.

This is what the front looks like. The original file had an elastic piece to keep the file shut so I kept that. Originally it went down the side but now it goes along the bottom.

So there we are, all ready for my pages!
If you have any questions about making the file I will be only too happy to help.
I will be back next month with another Mixed Media idea to share with you, until then take care,
Love Katrina
"Art Journal Emporium & Time∙Lines Subscription"
I love Tangie’s "{Tangie Bundle No. 15} Sweet Harmony" which is also available in her shop at The-Lilypad.
The large flowers and muted colors are so dreamy. I drew a face for January, scanned it into my computer and then digitally added elements from "Sweet Harmony" in Adobe® Photoshop Elements.
I hope you enjoy this art.
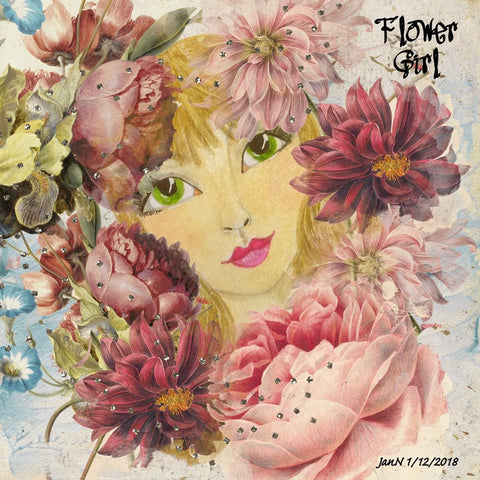
{Tangie Bundle No. 15} Sweet Harmony

[Posted by: Jan Nicholas]
Hello, I’m Katrina Rollings, a member of Tangie's Creative Crew.
Each month I bring you a Mixed Media project using Tangie Baxter products.
Can you believe it is almost time to bring out the advent calendars and count down to the big day, Christmas Day!
I love advent calendars, you can never have too many. So I have a countdown style advent calendar to show you today.
It very easy to make. I used things you would find around the house plus many of Tangie Baxter’s Christmas kits.
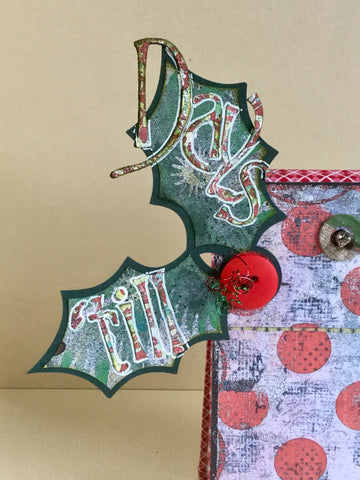
To start with we need to make the stand for the countdown pages.
I used some cardboard box card for the sides and a strip of normal card to join them together.
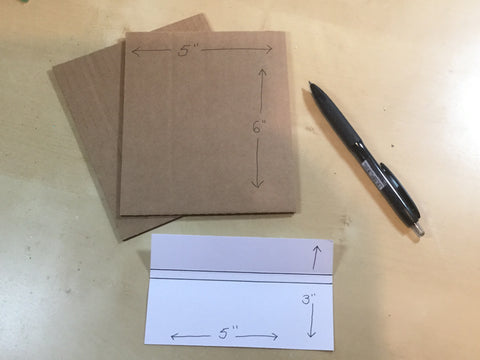
You will need to cut your cardboard pieces to the size of the pieces in the photo.
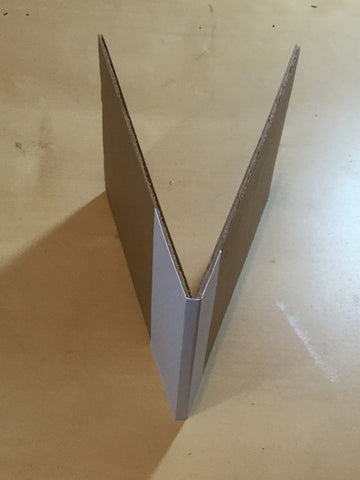
Now we need to join the pieces together to make the stand. The size of the spine on your joining piece will depend on the thickness of the card used for the side pieces.
Glue one half of the joining piece to the top of one of your side pieces. Then with the second side piece held on top of the first fold your joining card piece over them to give you the thickness of your spine.
Make the folds neat and then glue the second side in place to look like this
We now need to think about the countdown pages themselves. Mine are 4” square. They all need to be punched in exactly the same place so they stack nicely.
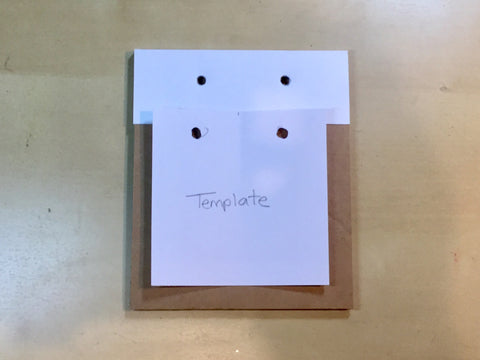
To achieve that I made a template, a 4”square with the holes in the top. We can then use this to make sure all the holes in the project are in the same place.

The first thing we need to use our template on is our stand. Apply the template to your stand and mark the spot for the holes then punch them. You need to mark and punch both sides as we are going to use book rings to hold the pages in place. These will be the holes that will hold them.
As I had used corrugated box card I wanted to cover the edges to make them look neater. I used some Christmassy washi tape to cover the edges. If you want to do this it’s best to do it now before we decorate the stand.
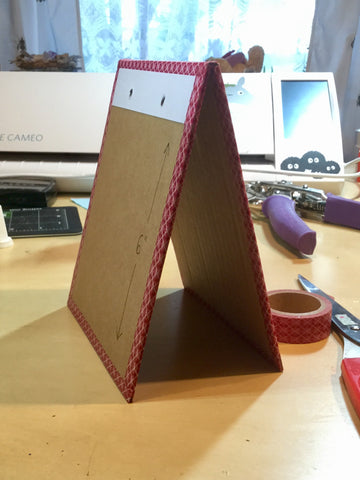
Now you can use some of the wonderful papers from the Quickity Split Joyous Noel Collection to decorate your stand. You can use all kinds of embellishments on your stand to liven it up.
You will also need to add something to stop the stand from doing the splits when the weight of the countdown pages is added. I decided to use some red twine to brace the stand. Cut two pieces of twine and knot one of the ends. Make two holes on each side of the stand and thread the twine through until the knot holds in the hole. Then thread it through the other side and knot it again. Repeat on the other side.
My finished stand looks like this.
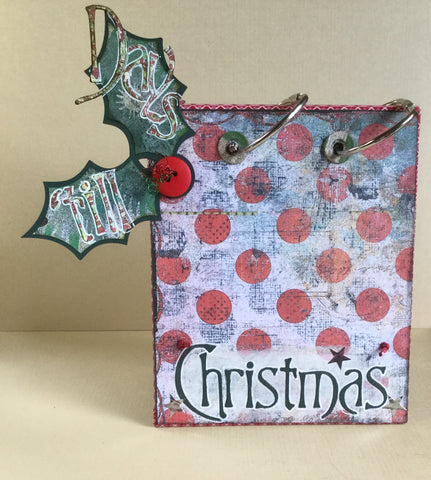
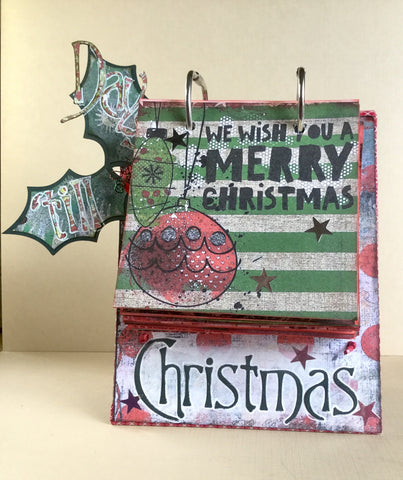
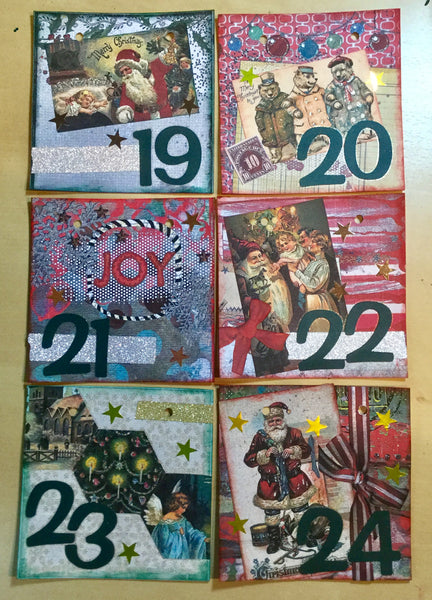
Of course you can’t have a countdown calendar without the countdown pages.
You will need to cut 26 4”squares of card and collage one side of them, I also covered the backs as well. I used more of the Quickity Split Joyous Noel papers as well as Artist Trading Card Super Saver Bundle #2, Christmastime, For The Hex of It No. 3 and For The Hex of It No. 5 as well as the family and baking Christmas kits from The Vault.
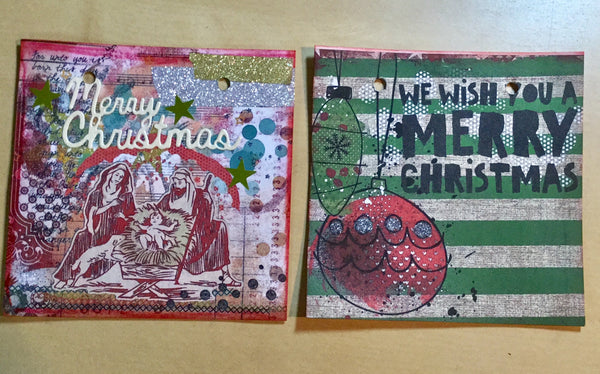
Once you have collaged them, add the numbers (I added the countdown from 25 - 1, then a Merry Christmas page and a cover page), punch holes in each page using your template.
Of course you can add all sorts of things to your page. They do need to be flat though. I used some sparkling washi tape and some star stickers.
Here are my finished pages pages -
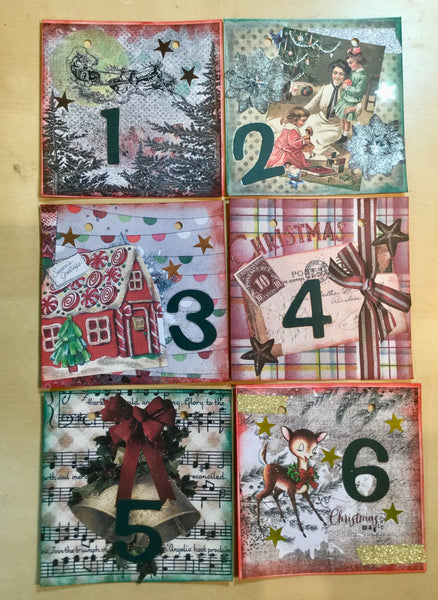
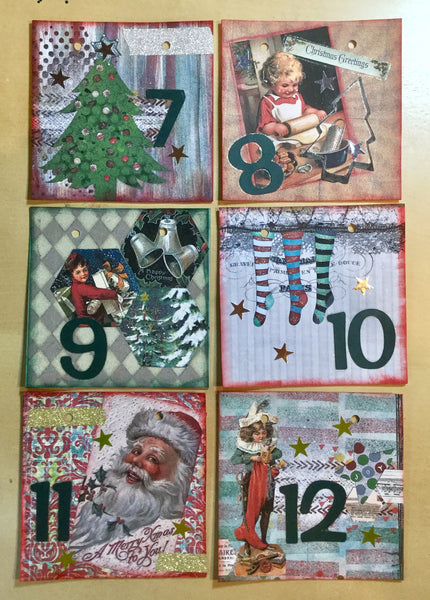
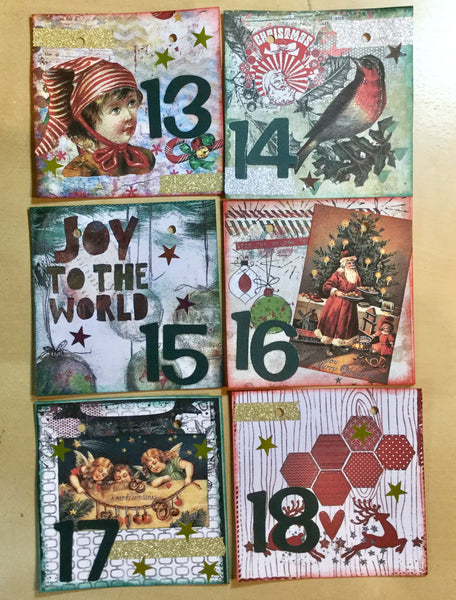
Some of the pages just needed a few stars and their number. When you have that many to do it’s nice to have some simple ones.
If you prefer digital art you could always make you countdown pages digitally and then print them out and cut them to the right size.
Here's the page for Christmas Day and the cover page I made..
Once you have them all finished you can attach them to the stand using book rings.
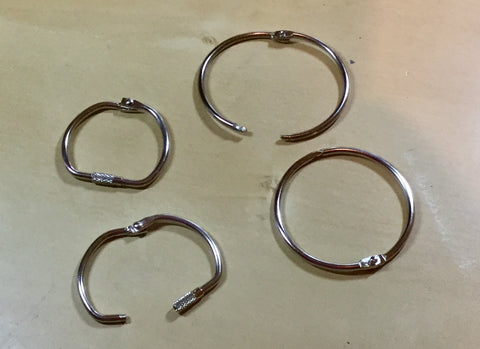
Bookrings come in all shapes, sizes and often colours. You will need either a 1.5 inch or a 2 inch ring. I chose a D-ring as I had some handy.
Thread then through your stand first and then add your pages and snap them shut.

The idea is that each day you flip a page over counting down to the big day!
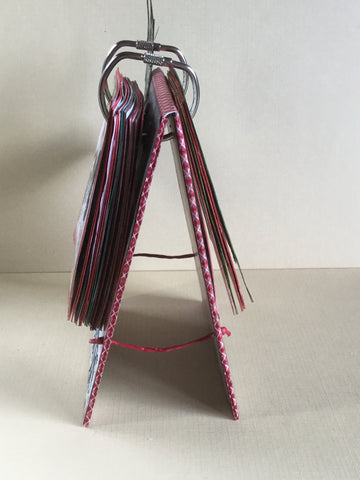
Then when it’s time to pack them away it will fold down flat.
Well I hope you enjoyed looking at my Christmas countdown advent calendar. If you have any questions about it them I would be only too happy to help.
Untill next month when I will be back with another Christmas project.
Take care, love Katrina x
[Posted by: Katrina Rollings]
"Quickity Split Refill {Joyous Noel Collection}"

" Artist Trading Cards Super Saver {Bundle No. 2}"

"Christmastime"

"For the Hex of It No. 5"

Greetings & Salutations on this wonderful fall day. November is the month we celebrate and give thanks for blessings and goodness in our lives. Today I challenge you to focus on the little beautiful moments in life.

I used Autumn's Poetry, Abounding, Oli And Phaunt and Industrial Velvet (the Vault) by Tangie Baxter along with Rebecca McMeen's Em and Tari Tinkerton.
[Posted by: Susan McCarley]
" Autumn's Poetry w/ BONUS Add Ons"

"Abounding"

"TAD {Tangie Bundle No. 01} Oli and Phaunt"

"The Vault"
"TAD {Rebecca Bundle No. 01} Em"

"Tari Tinkerton"

I found this poem and wanted to share it with you.
Thanksgiving
The year has turned its circle,
The seasons come and go.
The harvest all is gathered in
And chilly north winds blow.
Orchards have shared their treasures,
The fields, their yellow grain,
So open wide the doorway ---
Thanksgiving comes again!
Old Rhyme.
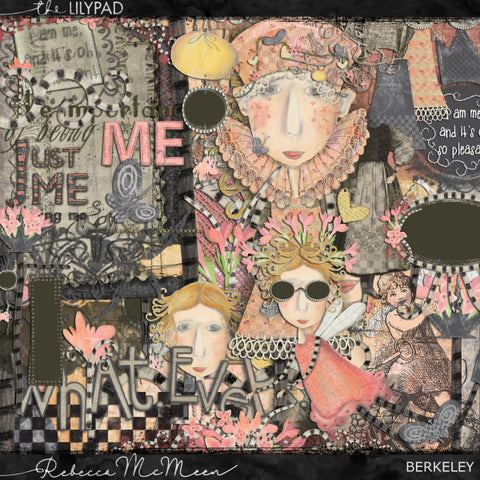
Once again, I used my hand drawn face (November Girl) and digitally added elements from my ever growing stash of images. It is so much fun searching for just the right enhancements / decorations / details for these images. I am sharing two Thanksgiving fairies with you and I used Tangie’s Spinning Daydreams , Bountiful, and Abounding; and Rebecca McMeen’s (from The Lilypad) Maple, Rhodes, and Berkeley for the elements.

Hope you enjoy these images and have a great Thanksgiving Holiday!
[Posted by: Jan Nicholas]
"{Tangie Bundle No. 14} Spinning Daydreams"

"Bountiful"

"Abounding"
"Maple"
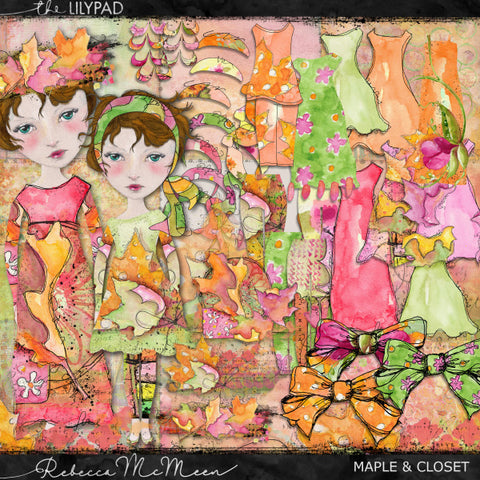
"Rhodes"

"Berkeley"
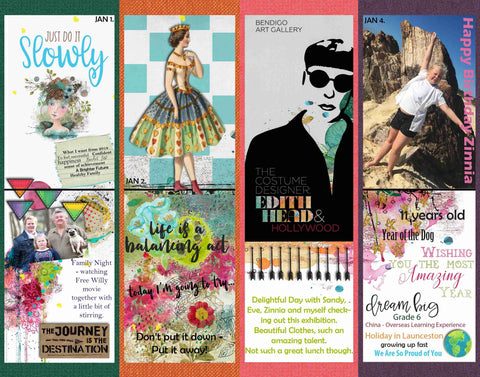
As a personal challenge, I have been working on drawing and painting faces. Last year I incorporated parts of the monthly collage sheets from the Art Journal Emporium into a face and was quite pleased with the results. I decided to try this again with the August collage sheets. I used sheet #2 for the “hair” and the scallops from the bottom of sheet #5 for the neckline of dress. I sketched then painted the face with watercolors and used pieces of the collage sheets, Caran d’Ache crayons and gesso to create the background.
I hope you are inspired to use the collage sheets in new and varying ways.
[Posted by Jan Nicholas, AJE Crew]
Do you love collage sheets? Every month in the Emporium you receive 10 brand new digital sheets ready to print! Plus much, much more!
4th of July Banner
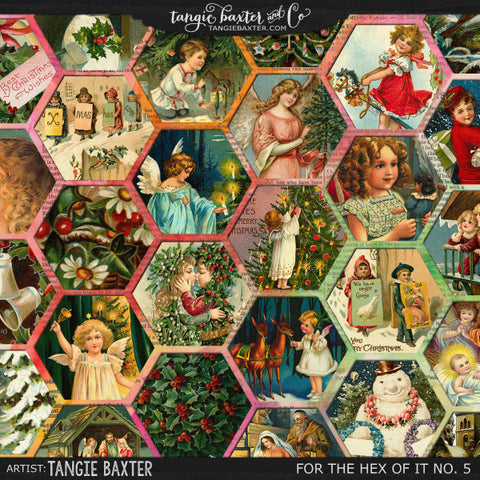
This banner was created to celebrate the United States’ Independence Day. I used Tangie Baxter’s Hexofit No 9 July 4.
Since the shape is hexagonal, it was easy to turn the images into stars. I used red, white and blue scrapbook paper for the “star” part and glued the hexagonal shape onto center. Then I used jute for the string.
(yes that is London Bridge and Eiffel Tower - part of my Lego collection)

Closer views of the 8 stars:


For the Hex of It No. 9

I hope you enjoy this idea. Happy 4th of July!
[Posted by: Jan Nicholas]
Hi, Everyone. I'm happy to announce the May & June Brushes are in the TB&CO Shop!
"2017 Brush of the Month Club -May Brushes"

"2017 Brush of the Month Club -June Brushes"

Do you want all 12 Brush of the Month packs for one amazing price? Get these brushes and more in the 2017 Brush of the Month Club.
ARE YOU A MEMBER OF TANGIE'S "ART JOURNAL EMPORIUM"? If you pay monthly for Subscription B or C, these brushes are NOW INCLUDED in your membership!
Also NEW in the TB&CO Shop:
"Graffiti Infrastructure No. 1 (Layered Files, Brushes & pngs)"

"Aviary Grunge Overlays & Bonus Papers"

Hope you enjoy these new releases!
[Posted by: Joy]


 Credits: Various collections by Tangie Baxter and Rebecca McMeen's Riven.
 Credits: Various collections by Tangie Baxter and Rebecca McMeen.


