Art Journal Emporium - Time∙Lines Project - Creating a Landscape Oriented Binder January 21 2018, 3 Comments
Art Journal Emporium 2018 has begun! This year Tangie has created an exciting new project: Time∙Lines! Each month you receive a new chapter to our exciting 2018 Time∙Lines project, including special EXCLUSIVE products and videos! Each month Tangie will record a Vlog, sharing insights and ideas on the prompts and monthly themes. Each month you will also receive 10 digital Artist Sheets (collage sheets) ready for you to print; cut them up and use them as artwork in your art journals (or you can use them digitally too). You'll also get a "15 Minute Flash" worksheet to jumpstart your creativity in 15 minutes or less Other exciting surprises along the way!
Katrina has a great tutorial for converting a portrait orientated binder into a landscape oriented binder. Enjoy!
---------------------------------------------------------------------------------
Hello, my name is Katrina Rollings and I am a member of Tangie's Creative Crew. Each month I write a mixed media post bringing you ideas on how you can use Tangie's wonderful products.
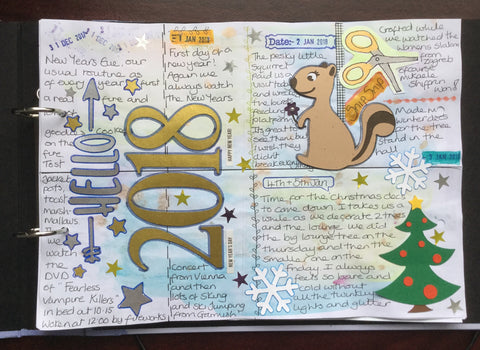
This month I have been having fun with the new Time∙Lines project and have been thinking about how to store them. Tangie has given us lots of different ideas but I wanted to use a ring binder. I chose to use a ring binder because they are cheap, easy to get hold of and use. The major problem with them is they are mostly found in A4 portrait and I needed mine to be A4 landscape. I did look online for a landscape binder but they were a lot more expensive then the portrait ones. So I decided to make a portrait binder into a landscape one!
This is how I did it.
First of all I needed a ring binder. I found a beautiful duck egg blue one in my local high street stationers quite cheaply. I rushed home to my craft room and began its transformation.

The first thing I had to do was to cut the front and back covers of my file. The front was easy but the back was a little trickier as it has the ring binder part on it. I just cut as close as I could to the metal part.
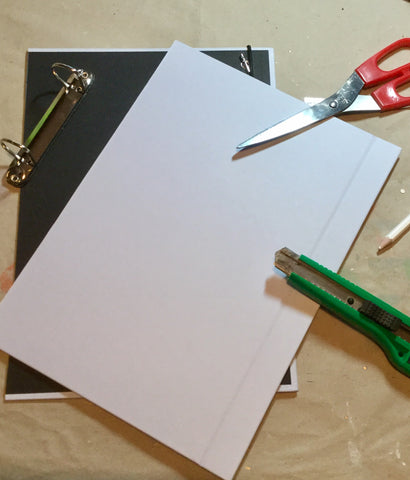
I then had two separate covers. As they were not quite the same size as each other I re-cut them so they matched.
I cut the ring binder part out of the spine part of the folder, cutting as close to the metal as I could.
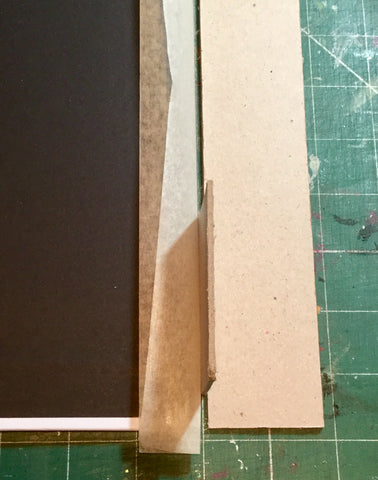
Now I needed to make a new spine for my file to re-attach the ring binder to.

I used a piece of thick board from the back of a watercolour paper pad. You need it to be roughly the same thickness as the file folder you started with. You can always stick layers of card together until you have the right thickness.
I cut my card so it was the same height as my covers and wide enough to take my ring binder piece. Everyone's file will be different so the size you think you need will be the right size.
I needed to put it all back together again and for that I used masking tape. I have used masking tape for this sort of project many a time and find it works really well. I like to use the wide tape for this type of project.
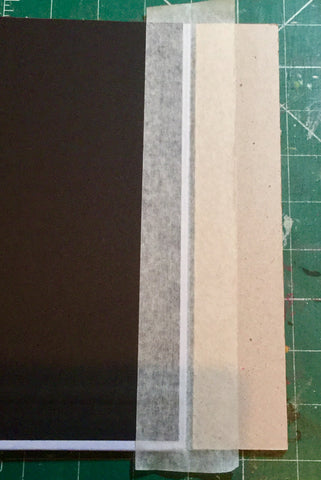
I wanted to make sure my file will open and close nicely and for it to be able to do that I needed to leave a tiny gap between the cover and the spine.
I find the easiest way to do that is to use a scrap of the card you are using for your spine as a spacer. As you can see in the photo I use my spacer to get the right amount of space between the front cover and spine.
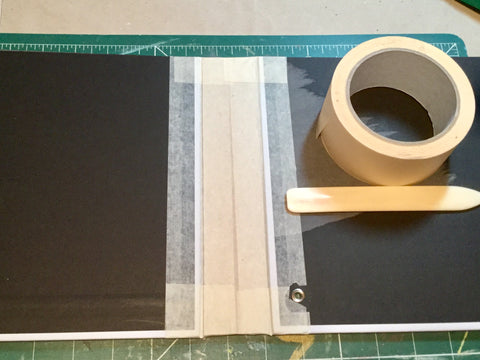
I cut a piece of tape slightly longer than I needed and folded it in half lengthwise with the sticky side on the outside.
I placed the fold of the tape into the gap and then smoothed out the tape onto both sides.
I like to burnish the tape down with a bone folder or the back of a spoon so it is stuck down well. I then trimmed off the tape top and bottom.
I needed to do the same thing on the other side so I turned it over and cut a second piece of tape and again folded it in half sticky side out.
This time I wanted to put the fold into the little gap and stick it to the tape on the back, so I gently ran my bone folder or you can use the back of a knife, down the little gap so that it gently sticks the tapes together but doesn’t tear them.
Once I had done that I could smooth the tape out on both sides and burnish them again.
I also like to put a piece of tape over the top from front to back to stop the tape from lifting up. I do this top and bottom of the spine.
I wanted to cover up the tape so it looks nicer. As my file folder had a black inside I just used some black card to cover up the tape. You can use what ever you like to make the inside look nice. Just remember to do it before you glue in the metal ring binder in place.
You will be left with the tape showing in the folds. Don’t try and cover then with card or paper it doesn’t really work and looks messy over time. I use a felt tip pen to colour in the little gaps. If you haven’t got the exact colour then just go with one that looks nice with the paper you have chosen.
The edge of my file which had been cut also needs attention. I painted mine the same colour as the file but you could use tape or coloured paper or colour it with your felt tips.
Of course if you had chosen to cover the outside of your file with paper then you can cover up the raw edge with that.

I needed to put the ring binder back into the file. I peeled any paper off the back of my ring binder to give a nice rough surface for the glue to get in to. I applied wet glue to the back of the ring binder and stuck it down on to the spine. It needed to be left to dry so I put something on top of it to weigh it down and left it to dry over night.

Now the inside of my file was finished so I could turn to the outside.
I chose a nice paper that matched the colour of my original file and cut the paper into strips the size I needed for the spine and to cover up the tape on the front and back.
Don’t try to go over the folds it just doesn't work. I used a felt tip again to colour in the tape in the folds and also coloured the edge of the paper with ink. I then stuck the paper into place.

This is what the front looks like. The original file had an elastic piece to keep the file shut so I kept that. Originally it went down the side but now it goes along the bottom.

So there we are, all ready for my pages!
If you have any questions about making the file I will be only too happy to help.
I will be back next month with another Mixed Media idea to share with you, until then take care,
Love Katrina
"Art Journal Emporium & Time∙Lines Subscription"

Comments
Anne Lou (Nan) Robkin on February 18 2018 at 05:18PM
Kay, this is for Art Journal Emporium, which is a monthly subscription. Only $10/month, a real bargain!
kay on February 08 2018 at 05:11PM
is this the art journaling for scaredy cats that I paid for? No online session?
Stacy on January 25 2018 at 12:27AM
Great project Katrina! Thanks for sharing!