I am spooktacularly excited to share with you the third October Girl. For the past year, my personal creative project has been working on drawing faces.
I drew a face for the October Girls, scanned into computer and then digitally added elements in Adobe Photoshop®.
For this October Girl, I tinted her skin green (scarier and witchy), and I used a plethora of digital elements from my stash: Tangie’s "Mercado Salvage", Rebecca McMeen’s "Essie and Esmerelda" and Alcyon (no longer available) and finally from Tangie’s 2016 Halloween Party Treats Package (no longer available).
I hope you enjoy this art.

[Posted by: Jan Nicholas]
"Mercado Salvage"

"Essie and Esmerelda"

Happy October everyone! This is one of my favorite times of the year and it's finally starting to feel like fall with cold mornings and cooler nights. Today's project is a Shrine made using Tangie's Día De Los Muertos Collections and Midnight Mischief Collab along with a few paints, glitter and glue sticks.
Día de los Muertos {DOS}

Día de los Muertos {TRES}

Día de los Muertos {CUARTO}

Midnight Mischief {Bundle}

You will need the following items to make a shrine: small empty box, acrylic paints in your favorite colors, glue stick, watercolor paper, printed background papers and an assortment of elements.

Let's get started by printing out your favorite background papers and any elements that you want to use.

My box was a leftover from assembling a small table. I filled the dip at the bottom of the box with scrunched papers so there wouldn't be a such a big divot, moderate success ended up with a small sunken area.

My box after getting a touch of paint and gluing down a few background papers.

The next step was making a crown of sorts for the top of the Shrine using a piece of watercolor paper, blue paint and and a bit of glitter.

After the crown dried it was glued along the front top of the box with the ends tucked into the slits at the top and taped. I painted over the tape and then began adding my cut out embellishments. This is when I decided to add my Mr. and Mrs. Skeleton.

They are attached with small strips of sturdy paper bent in two places and glued to the bodies and box for a 3D effect. After the glue dried I added the last of the cut out flowers inside the box as well as the outside of the box.


Thanks so much for joining me today with this tutorial.
We have a Facebook group where you can show off your wonderful creations. Please join us.
[Posted by: Susan McCarley]
I was so excited to see Tangie’s latest release "**NEW** This is Halloween [Mega Collab!]" So many spooky and thrilling concoctions to spark the creative juices!
"**NEW** This is Halloween [Mega Collab!]"
![**NEW** This is Halloween [Mega Collab!]](https://cdn.shopify.com/s/files/1/0580/2661/products/rebecca_tangie_Halloween_MassivePreview_large.jpg?v=1507837040)
Here is my rendition of the 13 Days of Halloween (think 12 Days of Christmas and make it creepy). I used Tangie’s "**NEW** This is Halloween [Mega Collab!]" almost exclusively. Plus I finally got to use a collection I bought a while ago because I love bats so much - Rebecca McMeen’s "Count Floyd and Countess Gerty" (Day 10).
"Count Floyd and Countess Gerty"

I also searched my stash and used a couple of elements from Tangie’s 2016 Halloween Treats. Hope you enjoy.


[Posted by: Jan Nicholas]
Hello, I’m Katrina Rollings and I am here to show you my Project for October, of course it had to be a Halloween project!
So here she is, my hanging witch decoration.

She is made using card, paper, paint and glitter. Any of Tangie's Halloween kits would be ideal for her, I used Tangie's Spooky Hollow backdrop papers for my witch. They are available in The Vault.
"The Vault"

As well as your card and papers you will also need -
* Wet glue to stick her all together
* A hot glue gun to make the broomstick

You will need to print out your chosen papers as well as the template I have made for you that you can find below. Also any collage pieces you would like to use. You will also need to find her a face.

Print this template out in A4.

Use my template to cut out each piece of your witch 4 times, except the arms, boots and buckle. The arms and boots only need to be cut out twice and the buckle once. You need to cut out so many in order to build them up on top of each other to make her nice and sturdy.

Once you have all your pieces cut out you can begin to cover them. I like to cover the back as well as the front so she looks nice and neat when she is finished.
The arms and neck pieces I painted with a flesh coloured paint. For the bat wings I used a black paint.

I then built up her dress pattern. I started by covering the whole dress with the orange spiderweb paper and then drew over the spiderweb lines with a clear glitter pen.
I cut strips of patterned paper and stuck them over the top. For the orange glitter stripes I applied strips of narrow double sided tape and sprinkled glitter over the top.
To her hat I added a strip of card which I covered in double sided tape and glitter then cut the buckle out in silver paper and glued them both on to the hat.
Her arms I covered with the same stripey paper I had used on her dress to make her sleeves and added little cuffs of the purple star paper.
For her legs I used a stripe paper so they looked like striped stockings and her boots were glittered in the same way as her dress stripes.

To give the bat wings more texture I used a black glitter paste through a spiderweb stencil. Then on reflection I decided to remove part of the wing shape as shown.

Now we have all the pieces ready we can build her up.
I layered up her arms first and stuck them in place on her dress. Only glue the top part of her arm down if you want her to hold her broom.
I then glued the front painted bat wing to one of the plain layers and the back bat wing to the remaining plain layer. Put the back bat wing piece aside for later.
Glue the front of the dress to one of the plain dress shapes. Then the back of the dress with the remaining plain layer. Put the back of the dress aside for later too.
Do the same with the neck and the face.
Glue the wings in place over the top of the arms onto the dress.
Glue the neck to the face and then glue them in place on the back of the dress as shown in the picture.
To make my witch even stronger I glued a wooden coffee stirrer in place as shown and then glued the back parts in their correct places sandwiching the wooden stirrer in between. You might need a few clothes pegs to help hold things together while they dry.

Now we can make her broomstick. You will need some thin twigs and a thicker twig for the handle. Cut your thin twigs to roughly the same length and heat up your glue gun.

Add dabs of hot glue one at a time around the handle of your broom and press the twigs into the glue keeping them as level as you can at the top of your broom. Keep adding twigs until you have a nice broom shape. Remember you want a flat back so you don’t need to add any twigs to the back.

When you are happy with your broom wrap some garden twine around the top and use hot glue to secure it at the back. You can then trim the twigs to neaten them up.

To make it easier to glue the broom in place, shave off the back of you handle so it is flat and then hot glue it in place on your witch.
Now all you need to do is add any finishing touches you would like. Punch two holes in her wings and thread through some wire or ribbon for her to hang from. Now she is all ready for Halloween!
Here are some close ups of my witch


Don’t you just love those boots!!
Well thank you so much for sticking with me through to the end of this long tutorial. I had so much fun making her and would love to see how you have dressed up your witch, why not show them off on our Facebook group!
If you have any questions feel free to ask and I will try to help.
Until next month, take care,
Love Katrina x
[Posted by: Katrina Rollings]
I am happy to share with you the second October Girl. October is my birthday month!
For the past year, my personal creative project has been working on drawing faces. I drew a face for the October Girls, scanned into computer and then digitally added elements in Adobe Photoshop®.

For this October Girl, I used a plethora of digital elements from my stash: Tangie’s Alice’s Winter Wonderland for the gifts.
"Alice's Winter Wonderland"

Rebecca McMeen’s (from The Lilypad and also Tangie’s Mom) Maple for the leaves collage and her Kaleidoscope Hearts for the heart collage.
"MAPLE"

"KALEIDOSCOPE HEARTS & COLLAGES"

I also used Deviant Scrap’s Fantastical Tea Party for balloons, cupcake and crown.
I hope you enjoy this art.
[Posted by: Jan Nicholas]
For the past year, my personal creative project has been working on drawing faces. As an Art Journal Emporium Crew member, I have been trying to incorporate Tangie’s digital art into my faces.
In the last two months I used collage sheets to add to my face drawings. This month I decided to draw a face, scan into computer and digitally add elements in Adobe Photoshop®. It has been a lot of fun.
For the first October Girl, I used Tangie’s Wondrous Autumn Graffiti Collages for the foot of the page and Rebecca McMeen’s Aspen Autumn Art Dolls & Closet for the headpiece.
I hope you enjoy this art.

Wondrous Autumn Graffiti Collages

Aspen Autumn Art Dolls & Closet

[Posted by: Jan Nicholas]

Hi, my name is Katrina Rollings and I am part of Tangie's Creative Crew. Each month I bring you some mixed media inspiration for using Tangie's products.
I am what you could call seriously addicted to crafting. I can barely go a few days without having to doing something creative, I know, I've got it bad! So when we go off on holiday I have to take a project with me to work on. I have a little book I use as a take away art journal. I take it along with some leftover scraps of paper and odd bits of leftover collage sheets. I add glue and scissors, a set of water soluble crayons and a black pen and paintbrush and I'm happy playing away when we get back from our hikes or days out.
Then Tangie came up with her "Mini Zines" (part of the Loyalty Rewards included in the Art Journal Emporium) made from a sheet of A4 paper, which I loved to make. That got me thinking, if I made one out of an A3 sheet of watercolour paper it would make a perfect sized little book, slightly bigger than the original and perfect to play with on holiday. My first book was a Wise Woman themed book I did while we were on holiday in the mountains in Söll, Austria in June. The region has a Witchy theme, they are thought to bring luck in Austria.
Last week we were on holiday in Vienna Austria and as I am a huge fan of the film "The Third Man " which is famously set in Vienna, I chose that as my theme this time.
This is the story of that book and what I took with me to create it.
Before I went on holiday I prepared my book by folding and cutting the paper. I also painted the background using my Gelli® plate.
I made myself a stamp using a scrap of cardboard for the base and then cut brick shaped pieces out of Funky Foam which I stuck to the base in the form of a wall. I was amazed how well the background came out!
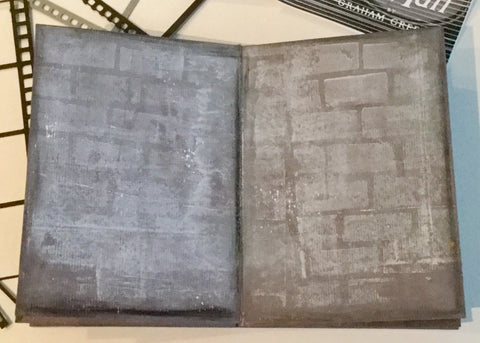
I use my Gelli® plate to paint the hole sheet flat then folded the book up. I then added some edging with the same paint to the individual pages.
What to take with me is always difficult, you also have to think about what you are allowed to take, especially if you are flying, as we were. So I had a pack for the hand luggage and then a pack for the hold luggage. The reason I split them was weight, the budget airlines are red hot on weight of your hold luggage, so I put the heavy thing in the hand luggage which has no weight limit. I was not able to put the scissors or glue or even my water brushes in the hand luggage as they would not have got through security. They were ok in the hold luggage though. Just be sure of what you can or can't take with you, it seems to vary so much from airline to airline and country to country too. It would be horrible to have your beloved and often expensive scissors taken off you at security, so be sure to check.
I took the following (just between you and I, I only used half of the pens in the end but don't tell my hubby).

I just worked on the book in the evening or after we got back to the hotel in the afternoon. We took my almost finished book out to the Prater park in Vienna to photograph it in the sunshine. For those of you who know the film you will recognize it as it makes quite an impact in the film. Thanks to my dear hubby for his help in holding my book for me.

The cover, I made a stencil out if one of the die cuts that I cut on my Silhouette CAMEO® machine. I used acrylic paint through it. I just added some of the Tim Holtz®Washi Tape and used a black pen for the lettering.

The first two pages show Vienna, which is the back drop of the film and one of the main characters, Harry Lime, played in the film by Orson Wells.

Pages 3 and 4 show the heroine Anna Schmidt, who is in love with Harry Lime. Played in the film by Alda Valli. Holly Martins, played by Joseph Cotten, is Harry Limes's childhood friend and an author. He has been promised a job by Harry but when he arrives in Vienna he finds Harry Lime has disappeared. Also a very important character in the film, the little cat, who only likes Harry.

I had so many wonderful stills from the film that I decided to add in an extra page by attaching one of my die cuts with some of the washi tape. The first page in this photo Show Major Calloway played by Trevor Howard, he is chief of the army police who are looking for Harry Lime. The extra page was not finished at the time of taking the photo, I finished it on the flight on the way home. This little boy again has an important part to play in the film.

As you can see by the film still on the right page the wonderful Prater is such an important backdrop for the film. It was one of the first things I wanted to do the first time we visited this beautiful city. It is still the same Prater, almost 200 year old and still looking beautiful against the blue sky.

Then the final back page. The end of the film takes you into the Vienna sewers, something you can also do on the Third Man tour apparently!
So, there it is, my Third Man Fan book. If you would like to make books about your favourite films or television programs then Tangie's "FANGIRL! I'll take it all! {Kit & Workshop}" is perfect.
"FANGIRL! I'll take it all! {Kit & Workshop}"

I have taken the class myself and loved it. It's a great way to celebrate your love of a film or a TV program, with lots of tips and ideas as well as a purpose made digital kit for the Fangirl class too.
For this little book I used Tangies "Read all about it " kit available in "The Vault "
"The Vault"
Before I go though I thought you might like to see the Prater without my book in front of it:

Vienna is such a beautiful city to visit if you ever get a chance. This was our third visit in 18 months and we are thinking about the next one already.
If you haven't seen "The Third Man " I can thoroughly recommend that too.
I would love to know if you too take your art on holiday with you and what you take with you?
Well, until next month when I will be back again with more mixed media inspiration, take care,
Love Katrina
[Posted by: Katrina Rollins]
[DOWNLOADS HAVE NOW EXPIRED, THANKS FOR VISITING]
Thanks for visiting my blog during TLP's Treasured: The Things freebie hop.
You can download my contribution <<<HERE>>>.

I'm also excited to be hosting Rebecca's amazing contribution too! You can download her portion <<<HERE>>>. Join Rebecca's newsletter too!

Now continue on to the next stop at DAWN INSKIP'S blog.

Remember, the freebies for Part 1 are only available through October 5th at 5 pm EDT. Look for Treasured: The Places and Treasured: The People in the shop as Free with Purchase kits during our Digital Scrapbooking Day celebrations, from October 6-9th.
As a personal challenge, I have been working on drawing and painting faces. Last year I incorporated parts of the monthly collage sheets from the Art Journal Emporium into a face and was quite pleased with the results. I decided to try this again with the August collage sheets. I used sheet #2 for the “hair” and the scallops from the bottom of sheet #5 for the neckline of dress. I sketched then painted the face with watercolors and used pieces of the collage sheets, Caran d’Ache crayons and gesso to create the background.
I hope you are inspired to use the collage sheets in new and varying ways.
[Posted by Jan Nicholas, AJE Crew]
Do you love collage sheets? Every month in the Emporium you receive 10 brand new digital sheets ready to print! Plus much, much more!
I was inspired to create this page by one of the questions in week 31 of the Art Journal Emporium: “What is your favorite word?”
I used products from TB& CO:
"Mint To Be"

"Groundwork No. 3: Have Courage (with bonus collage sheet)"

I loved the elements in Groundwork No. 3 and used them randomly. Then I felt that something black and white was needed to balance the page. I found these two black and white animals - zebra and rabbit in Mint to Be. Finally, I like to add a heart to my pages - I used a heart from Rebecca McMeen's Kaleidoscope Heart Collages & Papers which can be found at The Lilypad.
My Favorite Word:

[Posted by: Jan Nicholas]


