A few years back we had a feature called "Art Travels with Rain". Rain did a wonderful series on sewing that we are reposting in our Flashback Fridays segments. Please note these may be altered from the original posts to update links, provide information on newer programs, etc.
In case you missed earlier posts in the series:
Art Journaling Sewing Lessons 101
Lesson One: Making Borders and Pockets Using Automatic Machine Stitching
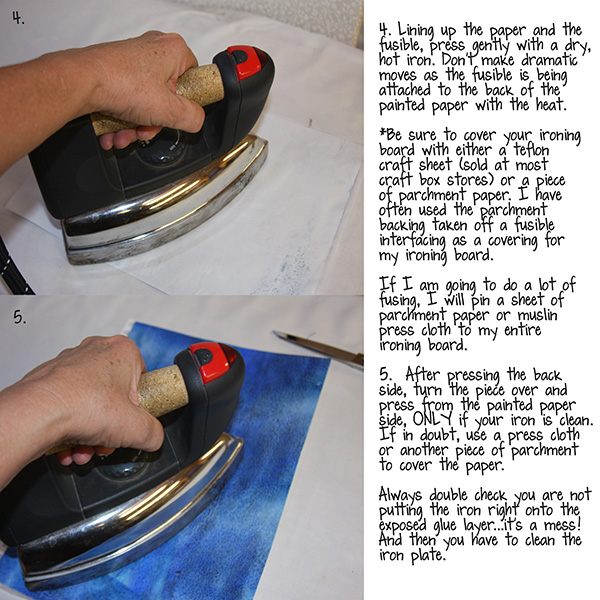
Lesson 2: Using Fusible Interfacings to Attach and Glue Papers and Fabrics
Enjoy!
Lesson 3: Thread Painting and Interlacing, Part 1 of 2
This is one of my all time favorite techniques with a sewing machine or hand stitching…layers of luminescent threads reflecting light just thrills my soul. For the Art Journal and Mixed Media artist, thread painting is a major part of the tool box, and is so rich with possibilities it will take years to fully explore all the options.
First, let’s look at a few of my new Transformation series, inspired by Tangie Baxter’s Symbology workshop (now available as a self-study course). In the workbook, the first three symbols were a bird, a fish, and a butterfly. I am truly amazed at how deeply the workshop exercises have taken my inner process, all from following Tangie’s instructions in the workbook. I would heartily encourage checking out the workshop if you haven’t already done so.
Below is a self-portrait painted on fused silk fibers, then thread painted with various machine threads. Based on the Bird symbol.
This is my vision of my inner dreaming body…the sorceress that lives in a symbolic world.
Title: “An Epiphany of the Moment, a Slice of the Night with Rain”
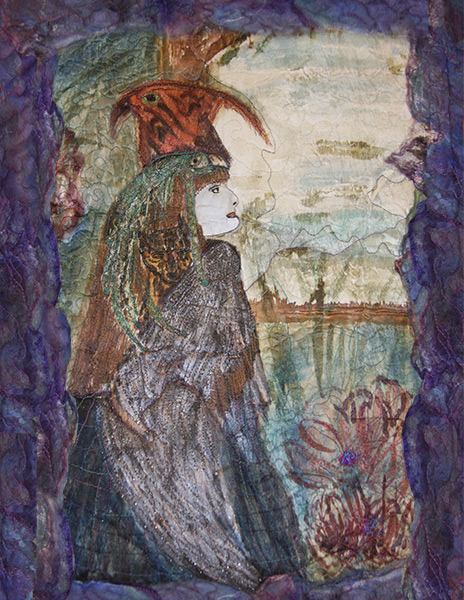
What is thread painting? It is simply using thread to add color, texture, and line to a shape, a drawing, a printed or painted paper or fabric. In the piece above, I used thread painting techniques to shape my wing with metallic thread, and to define the bird headdress with a mix of metallic and rayon threads. My hair is made up of lines of stitching with several shades of brown and auburn threads. There is space between the lines of free motion machine stitching, so my drawing and painting below shows through, which is one technique. This is the place to start if you are new to machine stitching in free motion. Open stitching is also a good option when sewing on paper as the needle is creating holes in the paper with every stitch, literally perforation.
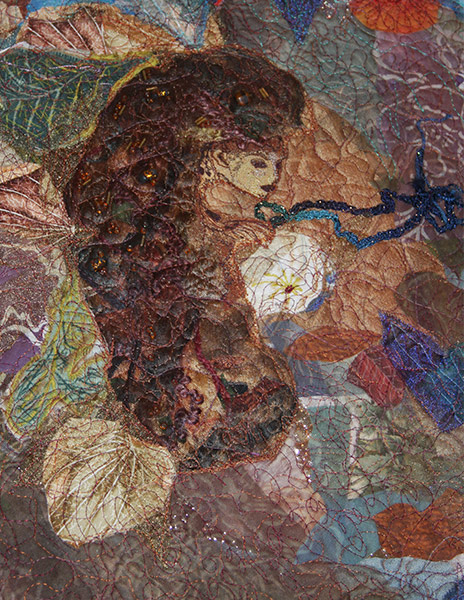
Some artists thread paint so densely, there is absolutely no base fabric visible. This is labor and materials intensive, but creates a beautiful textured surface, and can look just like a hand embroidered piece with far less work. Look closely at the image below of the “Lady of Guadalupe” which is densely stitched, on top of a commercially printed fabric. This is a great way to alter a commercial fabric to make it “your own”, and add it to your page or collage.
Many quilt artists that make art quilt journal pages use this technique, particularly with printed motifs like art dolls, flowers, houses, vegetables, etc., cutting the element from the background fabric and fusing to a base just like I showed you in Lesson 2 with some of Tangie’s collage pages. Suddenly it doesn’t matter if you feel skilled at drawing and painting in a realistic manner! Simply fuse the motif, then keep stitching free motion as close as possible, or on top of previous stitches until you have the look you want. Changes of thread colors and weights will add to the hand stitched look.
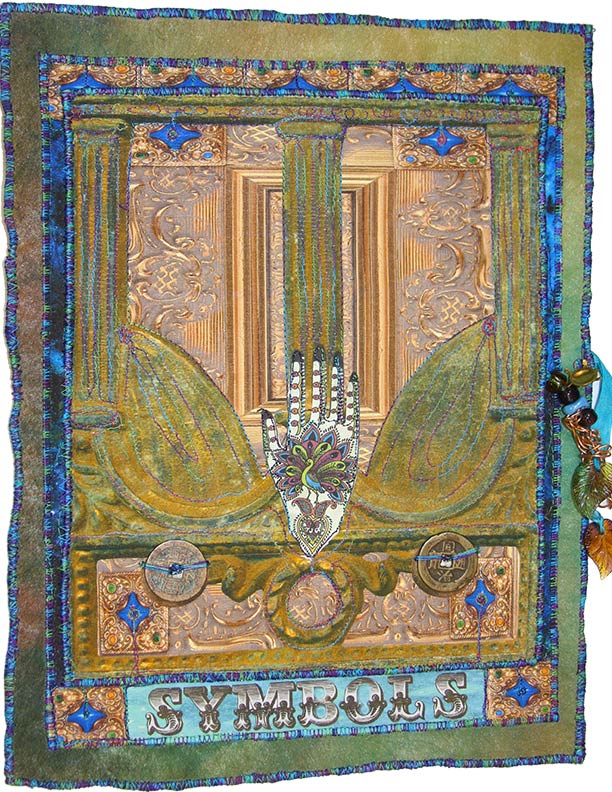
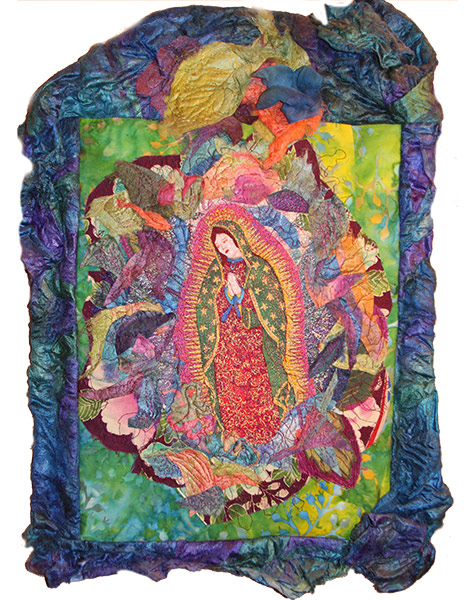 Title: “Overcoming the Transformation Blues”
Also part of the series on Transformation inspired by the Symbology project…Thread painted commercial fabric, “Our Lady of Guadalupe”, collage of dyed, printed, stenciled, fused papers, fiber, and fabric, all thread painted. The outer frame is dyed silk brick that I fused with acrylic gloss medium in a shape, then allowed to dry and harden.
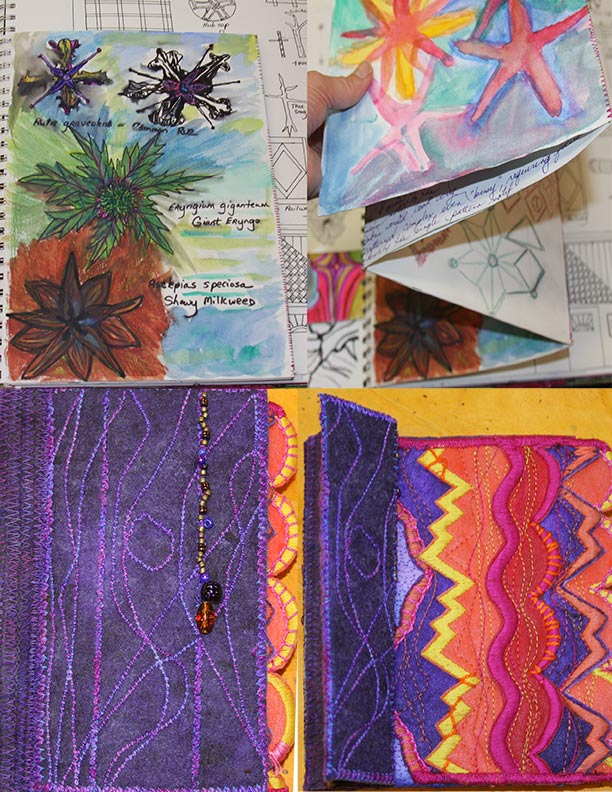
If you want to densely stitch paper, fuse it to a backing paper or fabric to help stabilize, and consider using hand stitches on top of the machine stitching without passing the thread through the paper each time. Below are some examples of hand stitching on top of machining on paper from my sketchbook, using a variety of thread and yarn weights. Next week I will explore lacing, pierced paper, and some fabulous tricks for edges on paper.
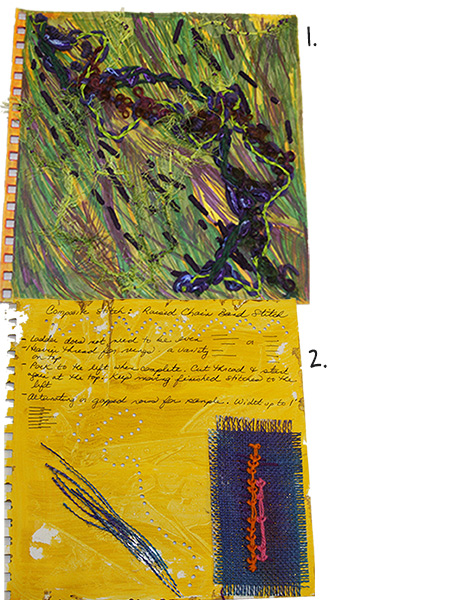
1. Machine automatic straight stitch with a 5mm basting stitch length, then various weights of threads and yarns chain stitched, looped, overcast, and laced onto the machine stitches without passing through the paper.
2. Burlap threads that have been drawn from the fabric edges, then tack stitched onto the paper on the left bottom. On the right bottom, raised chain band hand stitching on top of horizontal “ladder rungs” made using free motion “beads”: sew in a tight circle, jump horizontally to the side, sew again in a tight circle, forming a rung. This is the same technique I used in Lesson One to attach the Chinese coins to the front of the Symbology Project sketchbook wrap cover, basically sewing in place to anchor, then jump, anchor, back and forth until enough thread has built up to be sturdy for the next step.
Another page of examples of hand stitching on machine stitches, below:

1. Automatic straight stitching in lines and circles, various stitch lengths of 3mm-5mm, than variations on hand Buttonhole stitch using the machine stitches to anchor, while not passing the thread through the paper
2. First I did machine straight stitching at 3mm or longer using a large 110N size needle and a heavy 30 weight thread onto a monoprinted sketchbook page, then added embroidery threads by passing a needle through the previously pierced needle holes. Various weights of threads and yarns were then laced and interlaced through the embellished machine stitches.
3. A page in a book using painted Timtex interfacing as the base, hand interlaced embroidery threads through the machine stitched edges. More about this next week!
Another thread painting option: Creating a densely stitched face or other motif on dissolving stabilizer, netting, tulle, or a lightweight organza, etc, then stitching into your piece. Below is an example of another page in the Transformation series inspired by Tangie’s Symbology Project workshop: Chrysalis. The face is all thread, densely thread painted onto a piece of tulle netting, then stitched onto the background collage.
Title: “Chrysalis”
My piece based on the butterfly symbol, again transformation, the beauty of the butterfly rising out of the pupa, birth out of the Earth, the magic of changing form.
This piece is layered paper, dyed, painted, printed and stenciled fabric, thread painted face, trapped fibers and beads below the netting form the “hair”, fused dyed silk fibers to make paper.
Below: Title: “Camouflage”
A second piece based on the bird symbol and the concept of camouflage…how do I hide to survive? Blend in to flourish? This piece is also about that moment of transformation when energy becomes physical form, and back again, just like the electrons in the zooming shells around the nucleus of an atom, sometimes physical, sometimes just energy. This is my science-geek coming out…I have always been fascinated by the transformation of energy into matter, and the growth and disintegration that can be observed in nature, in our bodies, in all structure and form around us. I am intrigued by rust, by dandelions becoming seed heads and blowing away, by the teeny germination of a pea seed that becomes flowers and food then disintegrates to withered vines. I watch every spring to try and catch that moment of transformation from seed to plant bursting through the soil, but I blink, and miss it again and again. The birds become leaves in the trees in the fall, then suddenly leaf out into form in the spring. Awesome. Just to be alive to witness and feel these moments.
Director Font, thread painting on dyed silk fibers and papers, fused, then stitched. The first symbols of bird, fish, and butterfly have been all about transformation for me, and are inspiring this series.
The red leaves and the “bird” are all densely thread painted onto a piece of silk organza where I had drawn the basic shape in outline with marker, then free motion layered threads in various shades of red and red orange. I added the darker line accents afterwards, and tack-stitched to the background. The “branch” is a rolled piece of dyed silk chiffon, free motion stitched in places to a paper backing.
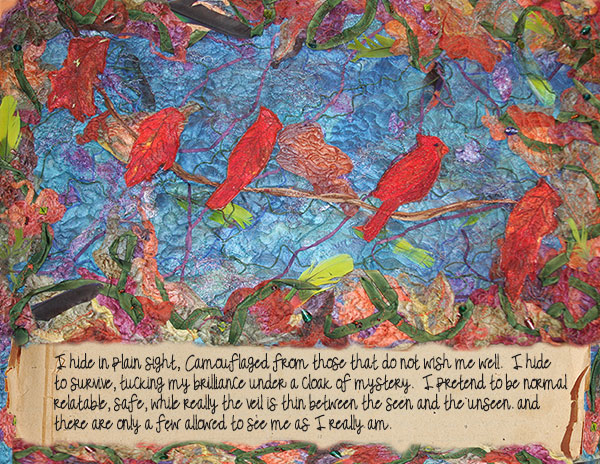
Journaling: I hide in plain sight, Camouflaged from those that do not wish me well. I hide to survive, tucking my brilliance under a cloak of mystery. I pretend to be normal, relatable, safe, while really the veil is thin between the seen and the unseen and there are only a few allowed to see me as I really am.
Next week, we will continue with Thread painting, piercing, lacing, edges, and look closely at stitching the flower motifs I have been teasing you with for the last two posts. Until then, take care!
Rain
~~~~~
"The Symbology Project"

"The Symbology Project No. 2"
"The Symbology Workshop No. 3"

Please join us next Flashback Friday for another Art Journaling Sewing Lessons installment.
Have a great weekend!
[Posted by: Joy]

A few years back we had a feature called "Art Travels with Rain". Rain did a wonderful series on sewing that we are reposting in our Flashback Fridays segments. Please note these may be altered from the original posts to update links, provide information on newer programs, etc.
In case you missed earlier posts in the series:
Art Journaling Sewing Lessons 101
Lesson One: Making Borders and Pockets Using Automatic Machine Stitching
Enjoy!
Hello!
On into Lesson 2, to learn about using fusible interfacings, and the magic possible when combining these handy products with paper, fabric, and stitch for your art journal or other projects.
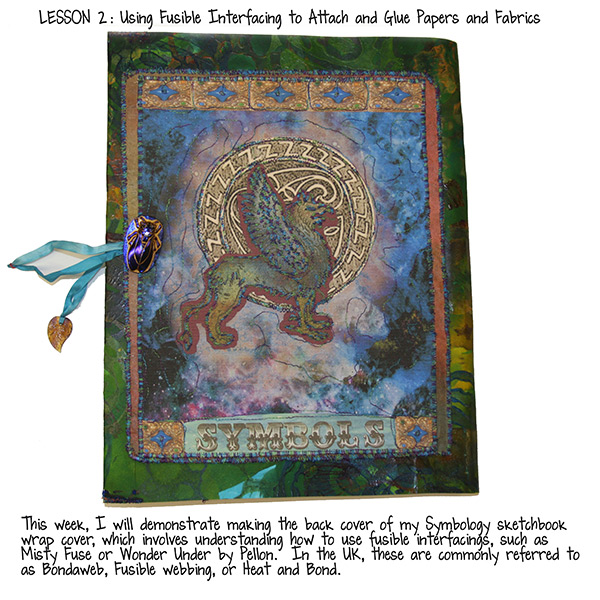
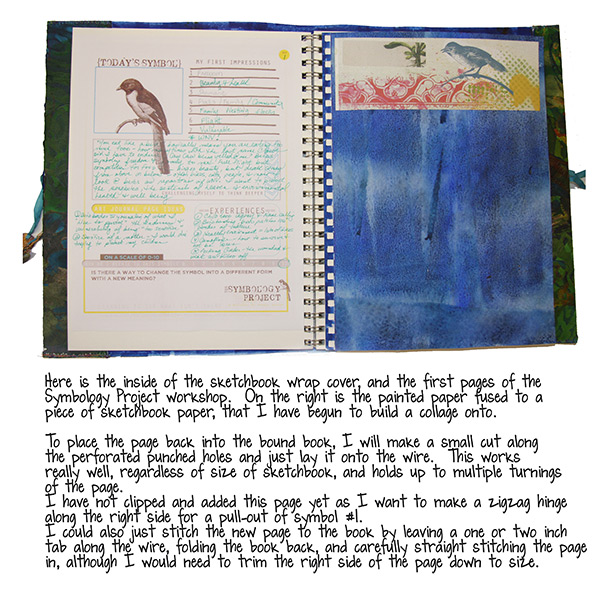
I have already stitched my back cover decoration, using the same page as the inner flap from last week’s Lesson 1, this time printed on a canvas paper. I have mounted the back cover panel to a piece of Lutrador interfacing that was previously painted, and free motion zigzag stitched all the edges. Above is the finished sketchbook wrap cover for my Symbology Project workbook (part of Tangie Baxter’s Symbology workshop now available as a self-study course), and below is an image of the inner cover and page one of the workshop. Let’s take a look at the specifics of using fusible interfacing for this type of project, and then I will demonstrate how to make up the wrap cover.
What exactly is fusible interfacing? Over on Planet Quilt, fusibles have been used for years to hold applique’ or other pieces in place while stitching. There are one-sided and two-sided fusibles, and for the art journal and book artist, the two-sided products are the most useful. I often fuse paper to other paper or fabric, as well as ephemera, postcards, print outs, paintings, etc., but I avoid fusing photos that are precious or need archival treatment. Since free motion embroidery by machine is a bit uncontrolled, fusing first can feel like having a third hand, holding elements in place while sewing. Also, as we venture in the future into machine stitched cords and trims, dissolvable stabilizer lace and writing, and other fabulous embellishment tricks, fusible interfacing will become a close friend and ally! These products have transformed my ability to create collages with paper and fabrics mixed together, easily and quickly.
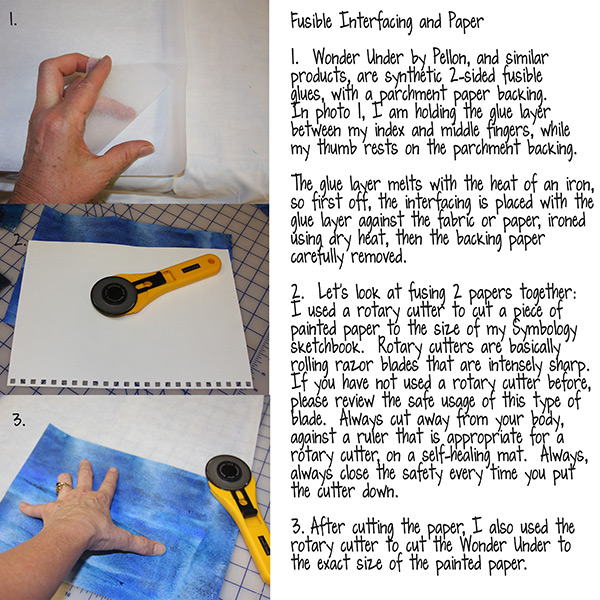
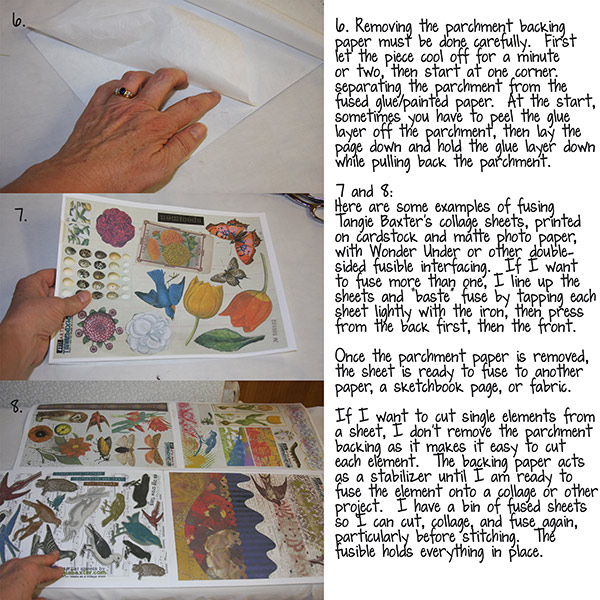
There are a lot of two-sided products, and in the U.S. Pellon company’s Wonder Under is probably the best known. Most box stores have half-off coupons regularly, and this is when I buy Wonder Under, Misty Fuse, or other “glue” fusibles. For our purposes today, I want to focus on the paper-backed two sided products like Wonder Under. After fusing the exposed glue layer to a paper or fabric, the backing parchment paper is removed, exposing the second glue layer…this can then be fused to a base or whatever I’d like, hence gluing with an iron rather than a wet glue.
Let’s look at two pieces of mine where I used fusible interfacing:
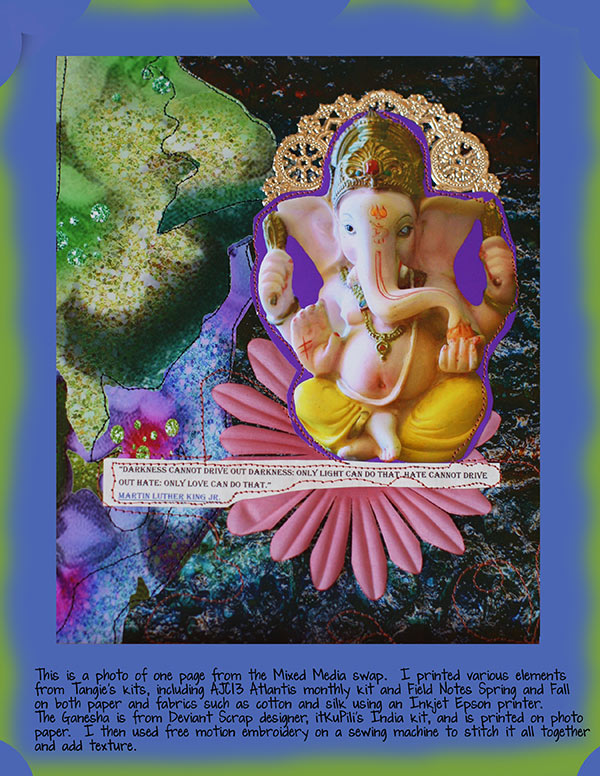
This page is from Tangie’s mixed media swap that took place back in May for the Art Journal Caravan participants. I first printed various papers, elements, and the Ganesha onto fabrics and papers using an inkjet printer. Then I fused Wonder Under to the back of each page before cutting apart borders, elements, etc. Each was then pressed with a dry, hot iron onto a base paper and free motion stitched.
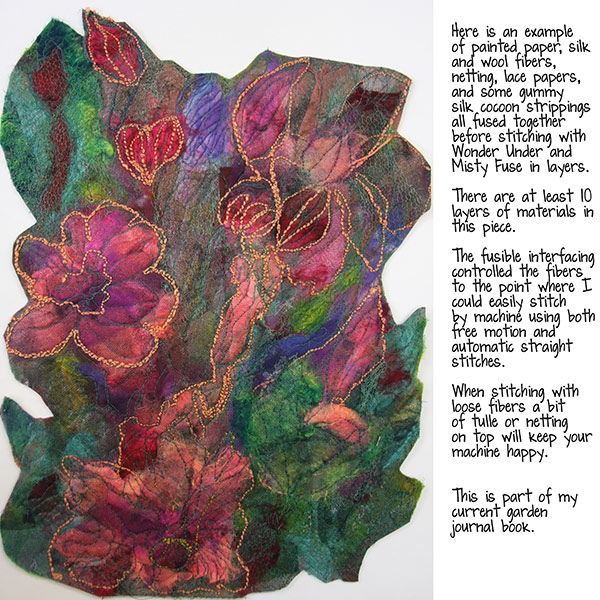
The above floral image is an example of many layers fused one on top of the other as I created the piece from various dyed fibers and painted papers. This is part of my current garden journal.
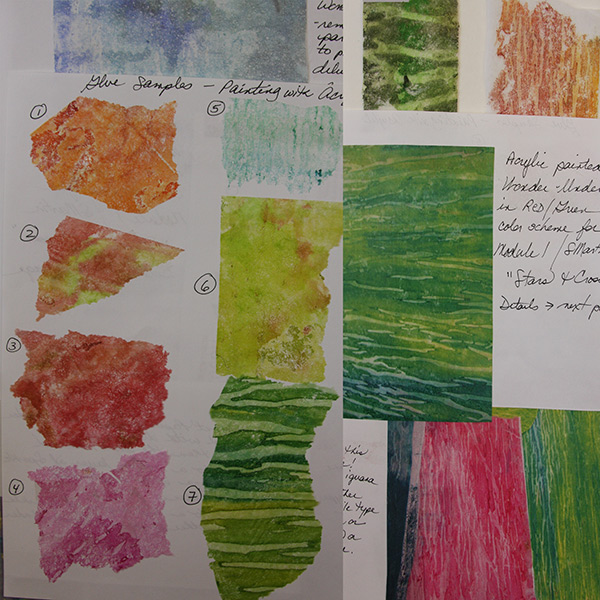
Are you getting excited yet? Ok, well fasten your seat belt because there is another entire level of art and design possible with fusible interfacing: it can be painted and still function as a two-sided glue! The possibilities of creating backgrounds, foregrounds, embellishments, book covers, clothing, on and on, are just endless.
The easiest method is using an old metal tray or one of those horrible styrofoam cooler lids or other packing material as a paint board. I have covered larger pieces of styrofoam packing with muslin fabric, duct taping the back. After I’ve painted on the boards for awhile the muslin becomes an amazing piece of fabric itself, so I remove it and heat set. Sometimes I give the fabric a wash of dye or fabric paint to unify the markings, but honestly, without any planning at all most of the muslin comes out terrific. Or, you could use large sheets of drawing paper to do the same thing, basically doubling your stash with the same amount of materials.
I first gently remove the glue layer from the parchment backing, then lay it back down on top of the backing. Acrylic paints work best, although I have gotten good effects with watercolor paints. If the end piece will be sprayed with water or other mediums, the watercolor can reconstitute and run, so I usually stick to acrylics. Dilute the paint if using heavy body or thicker acrylics, then all options are open: dribble, brush, brayer, etc. Until the layer is covered.
Allow to dry, then separate the layers if you haven’t already done so. Now just use the glue layer as before. Voila’! Instant lovely.
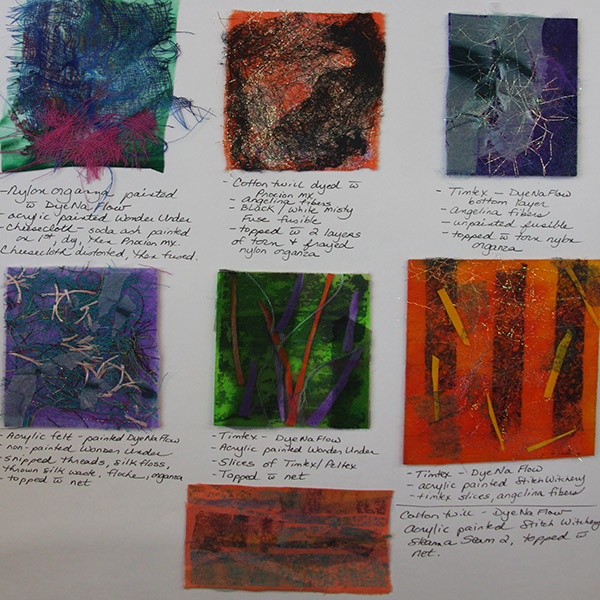
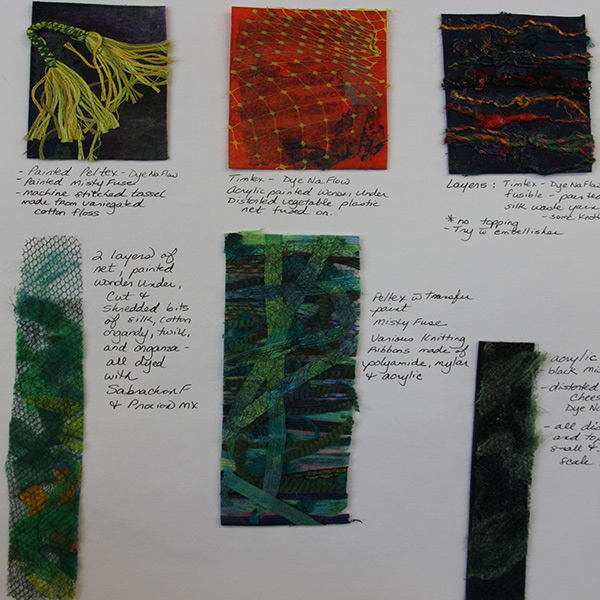
Here are some examples from my “Experiments with Media” sketchbook:
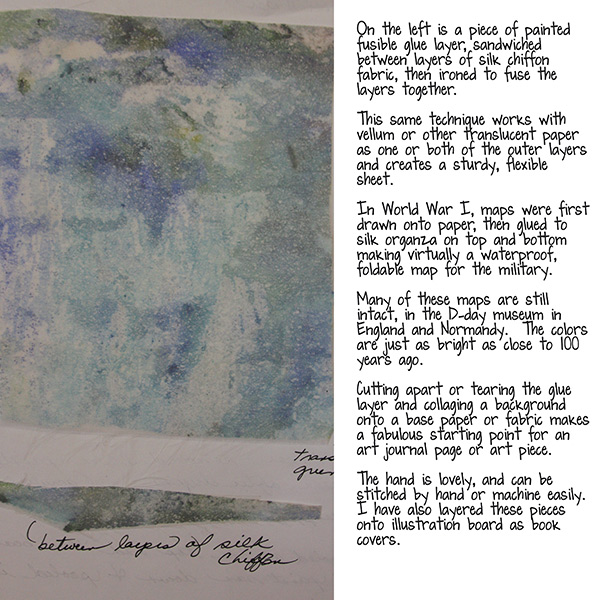
When the glue layer is painted, both sides are gorgeous, and fusing between transparent fabrics or paper will give you a double sided fabric or page to work with.
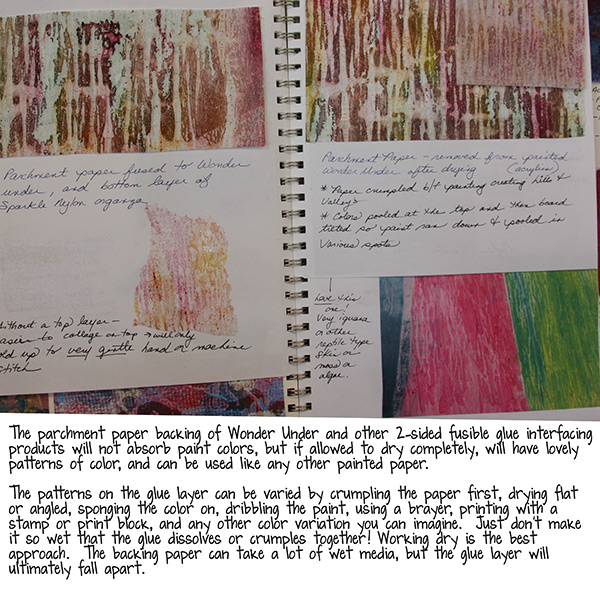 The backing paper becomes usable in its own right! Below are three pages of experiments with fusible interfacing and a variety of items I have glued down:

Now let’s look at how I used fusible interfacing to make the Symbology Project workshop sketchbook wrap cover: first I made a painted large piece of 100 pound paper using acrylic paints and stamps. I dried one side, then fused some thinner copy paper printed with basic color. Any combination you desire will work for a paper cover, including brown Kraft paper or bags, drawing paper painted or decorated on both sides, scrapbook larger sheets of paper, etc., whatever your heart desires. Since I made a stitched front with pockets and flaps, and a back that forms a pocket, I made the paper wrap coordinate with the stitched pieces.
First, complete any machine or hand stitching on the front and back decorative covers. Then lay down your paper for the cover wrap, outer side down, and follow the instructions in the image below: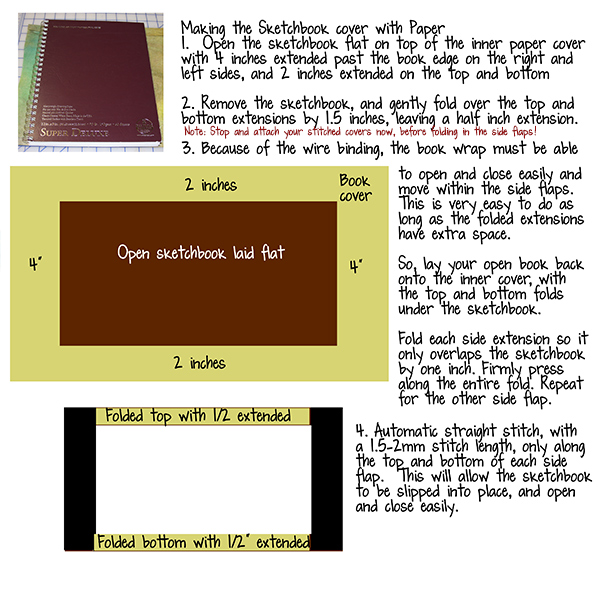
~~~~~
Please join us next Flashback Friday for another Art Journaling Sewing Lessons installment.
Have a great weekend!
[Posted by: Joy]
A few years back we had a feature called "Art Travels with Rain". Rain did a wonderful series on sewing that we are reposting in our Flashback Fridays segments. Please note these may be altered from the original posts to update links, provide information on newer programs, etc.
In case you missed earlier posts in the series:
Art Journaling Sewing Lessons 101
Enjoy!
Lesson One: Making Borders and Pockets Using Automatic Machine Stitching
***Note: please read through “Sewing 101: The Prequel” for the basics of sewing on paper!
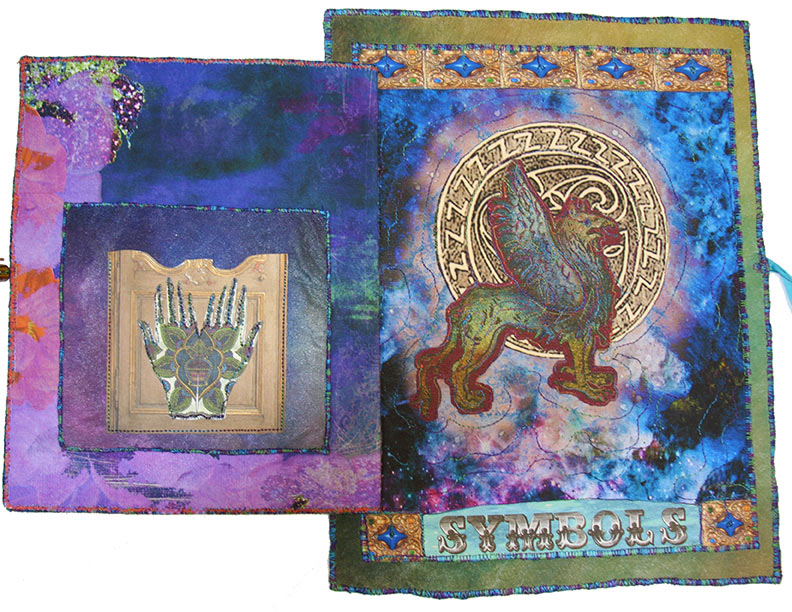
In this lesson, I will explore using automatic straight and zigzag stitching to create pockets for your art journal pages. I am demonstrating pockets and borders using my new sketchbook wrap cover for Tangie Baxter’s Symbology workshop (now available as a self-study course), pictured below.

And the inner cover and pockets:

On the left, the inner cover has two pockets stitched:
Let’s get started with creating your own book cover or other pockets for a page:
Attaching a border and a pocket to a base page is a fabulous first step in sewing on paper.
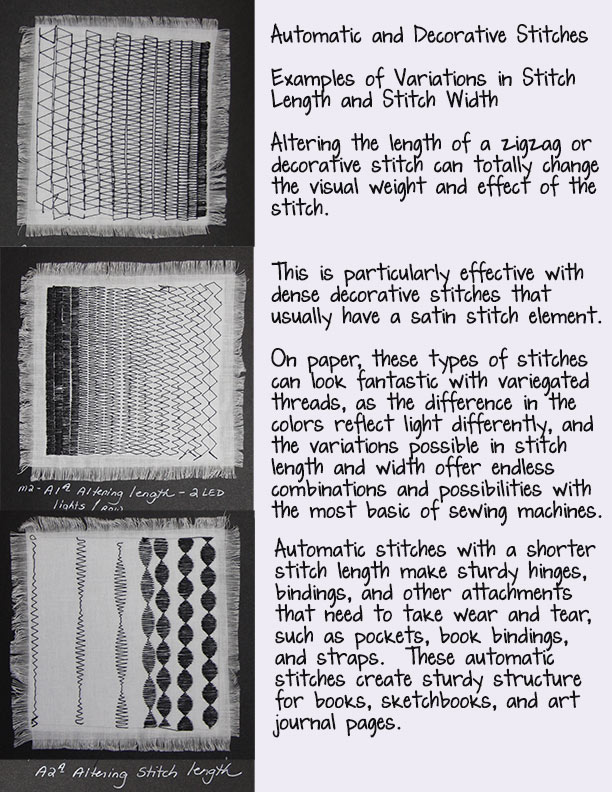
First, have a look at a few examples of straight and zigzag stitching on my pages below. Then have some fun with stitching various pieces together. Tangie has many options in her shop at TB&CO of borders, pages, and other printables, including in the Collage Mania Grab Bags from 2010 and 2011 (Collage Mania 2013 is available at TB&CO). It is also easy to use software such as Photoshop or Photoshop Elements to create a printable page with various elements and papers, then save as a jpeg file, and print at home on whatever type of paper you desire. For pockets and hinges, index or cardstock is sturdy enough, but copier paper is not. Some home printers need cardstock fed one sheet at a time. Also consider painted or other mixed media papers made at home, just be cautious if a lot of glues, gel mediums, acrylic paints, or other thick polymers have been used, as you will not want to stitch through these on a machine. Bits of glue are not safe for the bobbin area.

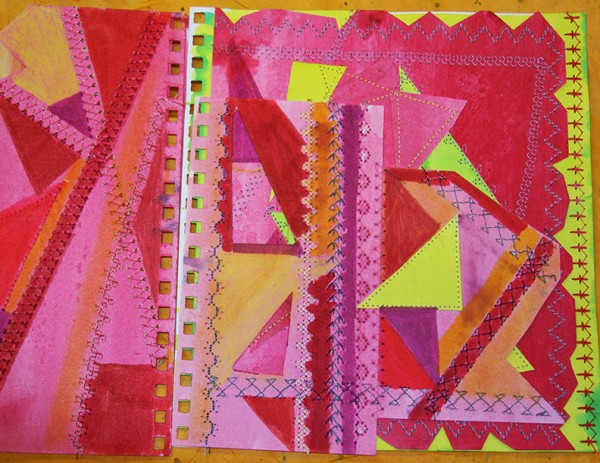
Various decorative stitches hold bits and pieces of the collage above together. Some straight stitching also holds down some pieces. This is part of a larger group of pages experimenting with sewing on paper, and is a terrific resource that I return to regularly. Consider spending some time exploring the various utility and decorative stitches your machine may make, with different colors of thread and background papers. Many of these examples are from a sketchbook of sewing options that includes both hand and machine stitch, where I have opened the wire binding to work on the pages individually, then rebinding. Other pages include notes on stitch length, stitch width, the numbers and variations of decorative stitches, paper and thread samples, etc. and form a valuable resource manual.
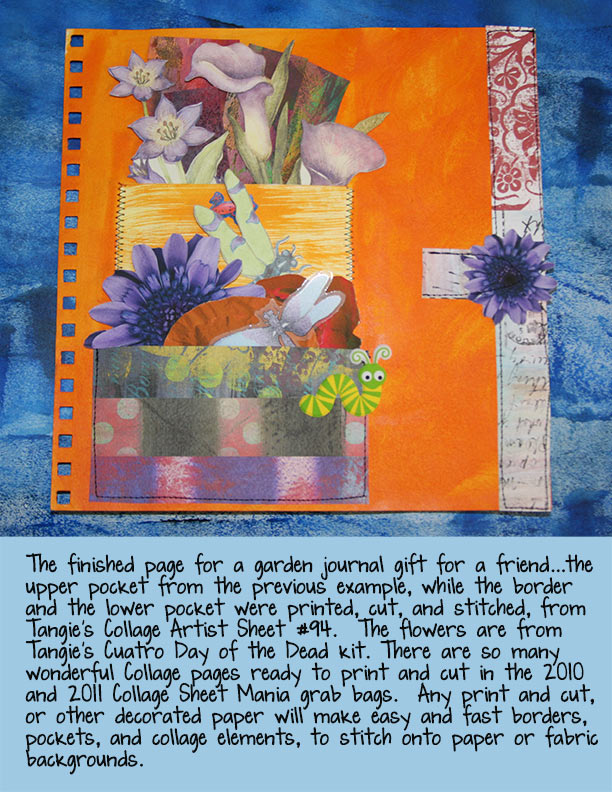
Above is an example of pockets that I filled with garden stickers and die cuts as a Garden Journal gift for an elderly friend that sadly can no longer hold tools. There are large and small pockets throughout the journal with bits of paper, seed packets, pressed flowers, scrapbook elements, and quotes/poetry for her to make pages or play with. Some of the pockets hold her writing, too private to have on view, so safely tucked away in the pocket.

I have also hand stitched papers, seed packets, little paintings, and other bits of garden ephemera onto the pages by first piercing the page with a large machine needle, on the machine. Some of these areas were planned, while others were added here and there for later use. It is far easier to stick a brad or other fastener through a hole that is already punched, and also offers attachment options of thicker ribbons, knitting yarns, or other novelty items to be laced through the holes.
More examples of hinges: on top, many sketchbook pages zigzag stitched together as a pull-out, bound into a larger sketchbook. Below left, painted Timtex stabilizer with fused paper, free motion and automatic stitched, with zigzag panels as the cover of a book. On the lower right, the cover hinges are opened, revealing the first page of satin stitched edge options.
For hinges, the zigzag stitch must be wide enough for the two pages or elements to lay flat next to each other, with a shorter stitch length of 2.0mm depending on the thickness you are sewing, so there is enough thread to support the opening and closing of the hinge. Always try a small sample first, before stitching your art work together! Ask me how I know…seriously try a sample first!
MAKING MY BOOK COVER
So, now let’s look at my Symbology cover starting points: the first image below is the flap on the outer cover as a jpg Photoshop file, combined from various elements of Tangie’s “Thoughts of Thee” and “Luminescence” kits. I printed this on Epson Premium matte photo paper before adding a lot of stitch both automatic and free motion using a variegated thread. The central hand motif is from Orchid Elixir, although I used the Collage Mania Grab bag sheet, ready to print at high resolution, then cut, and sewn on.
I added two old Chinese coins from my stash, and again used free motion to attach the coins to the page by making small stitches in one spot, gently pulling the thread over to the inner coin, more small anchoring stitches, then reversed, back and forth on both sides of the coin. In the center of the coin, I sewed a free motion teeny circle of stitches to look like a bead, and repeated this on the blue “beaded elements” at the corners of the page. The very top of this flap has the letter “e” scrolled along the top bar, which you will remember from the Prequel free motion exercises. This is called Garnet or Granite stitch in free machine embroidery parlance.
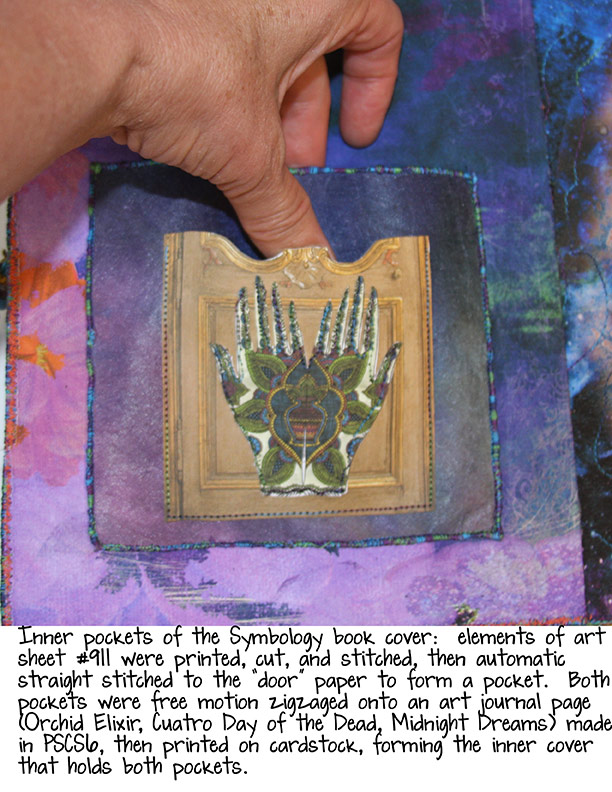
Before free motion zigzag stitching the edges together, I made the inner flap and pockets, and made a ribbon beaded tie that was slipped between the outer and inner flap to anchor the ribbon while stitching the edges. The image below the starter-flap is the digital file from Photoshop that I again printed onto Epson Premium matte paper. Credits for this page include Field Notes: Fall, Midnight Dreams, and AJC13 Atlantis. I printed off two copies of the inner flap base page, cut one into a pocket, zigzag stitched all around the edges of the square, then straight automatic stitched the paper printout of the door and hand motifs, forming a second pocket. Then the entire pocket piece was straight stitched to the base, and the inner and outer flaps joined by free motion zigzag around the edges.
When edging a page with free motion zigzag, the best end look is achieved by using a 3 step motion: stitch forward about an inch or so, then back over it again, then forward filling in and making the edge look pretty. So, forward, back, forward again, over and over, around the edge. I find this to be far easier than stitching all the way around three times. I use this same 3 step process for raw edge applique’, but that is a future lesson!
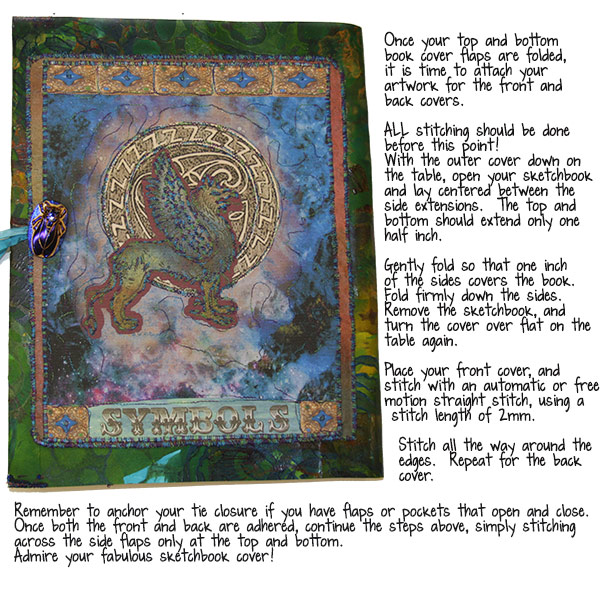
The main cover page started as a digital Photoshop file with elements from the Bestiary of Beasties, Celtic Tradition (now available as part of The Vault), Midnight Dreams, and the Mehndi Caravan (also included in The Vault) part o alpha in white. I printed this page on Epson premium matte photo paper, then added a lot of free motion embellishment embroidery. The edges were zigzag stitched with the same variegated thread as the flap, attaching the cover to a painted piece of canvas paper, 100 weight. The edges of the canvas paper were also free motion zigzag stitched, attaching the other part of the ribbon closure at the same time.
The flap was automatic zigzag stitched to the cover on the left hand side only, using a wide stitch width of 5mm and long stitch length of 4mm, to act as a hinge, however I folded the flap back against the zigzag stitching instead, just because I like it better.
My cover is now complete and ready to attach to the book wrap for the spine and the back cover next week.

NEXT TIME…
Now it’s your turn…have a go at stitching on some paper, make a few pockets, attach a border, start on your own book cover. Next time we will learn about attaching the cover to the wrap for the spine and back cover of the sketchbook, after decorating the page with free motion embroidery. And perhaps a bit of thread painting thrown in! Have a look at my Photoshop jpg page of flowers from Tangie’s kit: Field Notes Fall, one of my favorites, and part of what I printed to thread paint before adding to the back cover.
*****
Please join us next Flashback Friday for another Art Journaling Sewing Lessons installment.
Have a great weekend!
[Posted by: Joy]

A few years back we had a feature called "Art Travels with Rain". Rain did a wonderful series on sewing that we are reposting in our Flashback Fridays segments. Please note these may be altered from the original posts to update links, provide information on newer programs, etc.
Enjoy!

The first project will be hybrid, learning the skills of sewing on paper while making a sketchbook wrap cover. My piece, pictured below, is the cover for the Symbology workshop now available as a self-study course.
My book cover has a central flap that holds two pockets for elements I want to use on my Symbology pages. In Lesson 1, I will show you how to sew pockets, flaps, and hinges. If you are new to sewing on paper, or need a refresher, please continuing reading for the Prequel post for the details of machine set up and exercises to practice stitching on paper using both automatic and free motion stitchery.

The Sewing Prequel: This is the introductory prequel for Sewing Lessons 101: Sewing on Paper. Start here for all the basics of combining automatic and free motion sewing machine stitch into your art journal and scrapbook pages. Below is a primer on machine care and feeding, set up, and accessories that will make your journey of sewing on paper and hybrid pages a delight, opening up new avenues of artistic exploration.

Page credits: Tangie Baxter: Sew Girlie, Wonderland Mad Hatter’s, Perennial Paperie, Shine: You are Brilliant, August AJC12, Font: MaryAnn
The Prequel: The Basics of Understanding Sewing with Paper on a Machine
Before launching into the creation of art journal pages, book covers and bindings, we need to cover the basics of automatic and free motion sewing on a machine, and the steps necessary for success.
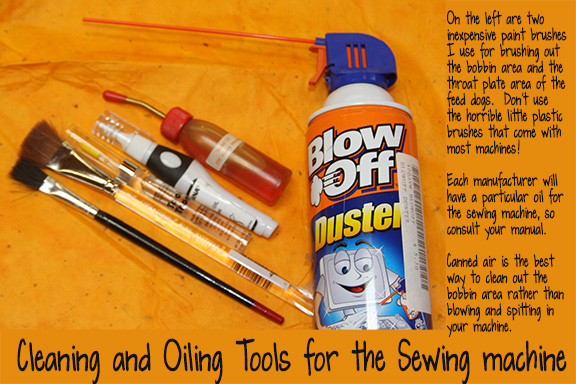
Clean and oil your machine
First of all, stitching on paper creates more dust and bits of fiber falling into the bobbin case of your machine than most fabrics. Well, unless you are sewing with flannel or faux fur! Following your machine’s instruction manual, clean and oil the machine, using a soft brush and canned air. Don’t blow into your machine, especially if it is computerized, as this is basically spitting into your machine!
Needle sizes and storage
Whatever needle used for stitching on paper must now be dedicated to only paper, as it will get very dull very quickly. I have a pincushion that looks like a tomato with sections marked with sizes and “paper” to hold the various needles until they are spent. I will often use a needle that is no longer sharp enough for fabric to stitch on paper. Or, mark a scrap of fabric with the word, “paper” for storage between paper stitching sessions. On cardstock and index paper, or layered copy papers, a dull thudding sound is somewhat “normal” unless it becomes loud, then it is time to change to a newer, sharper needle. Dispose of machine needles carefully as even a dull needle can hurt. I tend to keep an old film canister for discards, emptying into trash packaging for disposal.
The choice of needle size will vary according to the thickness of paper layers, or paper and fabric sandwich that you will be sewing. Think of the range of needle sizes in relation to the hole made in the paper…a smaller needle will make a smaller hole, and vice versa. Do you want the thread and line of stitching to be a design feature? If yes, then choose a larger needle.
Finer needles are generally size 60-80, usually for sewing on quilt cottons or dress fabrics. Larger, heavier needles such as a size 90 jeans needle, or a 100N or 110N, are for heavier fabrics like denim or canvas, and of course, thicker papers like cardstock. Size 90 and above have a larger eye to the needle and can be threaded with 2 threads at once, a fun embellishment technique that we will cover later on.
I sew without thread if I want holes perforated into the paper for lacing, hand stitching, or just a textural element. To begin with, practicing sewing without thread is easier and less expensive.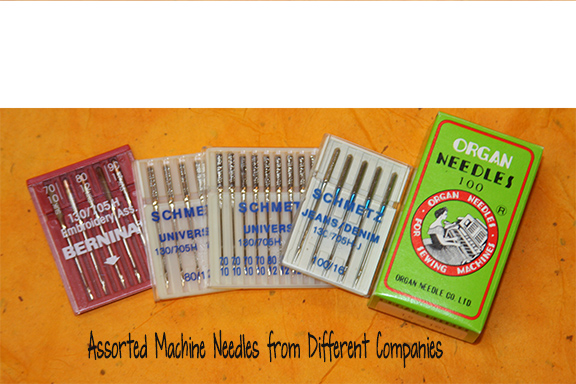
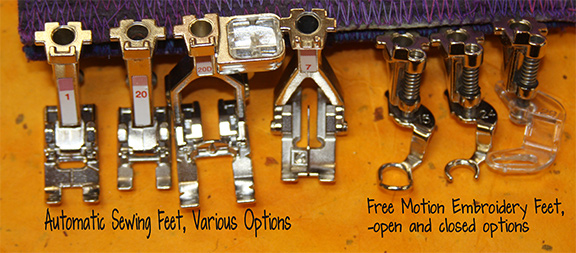
Sewing Feet
There are many choices for automatic sewing feet, and I tend to use a foot that is open in the front for better viewing of the needle, such as a Bernina #20. Any regular sewing foot will be sufficient. For free motion stitching, aka free machining in the UK, an open toe darning or embroidery foot is best. Consult your manual for your machine’s accessories.
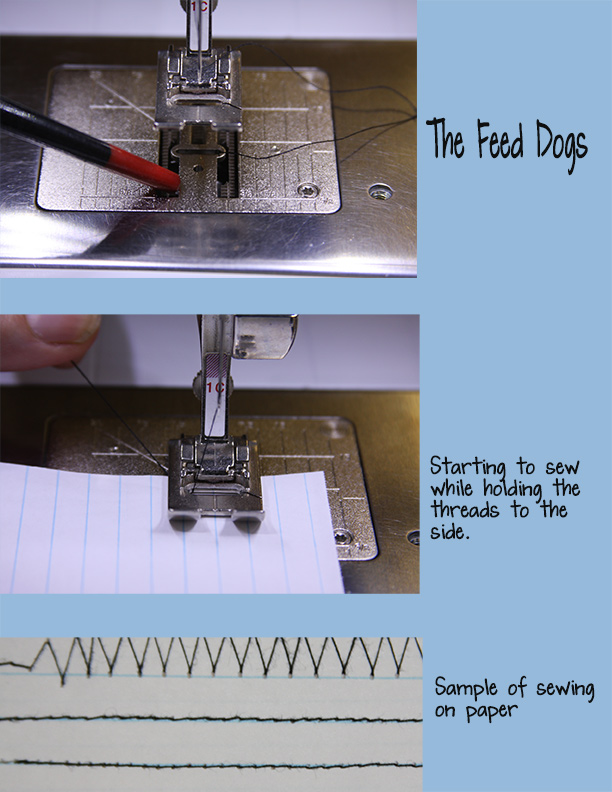
The Feed Dogs
Under the presser foot/needle area, there are “teeth” under the throat plate referred to as feed dogs…these teeth move the fabric along when sewing. The feed dogs can be lowered or covered allowing your hands to move the paper or fabric without the assistance of the machine. Free motion stitching requires dropping the feed dogs. Appropriate method of covering or lowering your feed dogs will be in the manual for your specific model of machine.
Tension, Stitch Length and Width buttons
The top tension governs the speed of thread release, and the bottom, the release of thread from the bobbin. Depending on your machine, normal tension for sewing on fabric is approximately 3.5-4.0. For free machining, I usually lower the top tension a bit, down to 2.5-3, but this is dependent on your machine. Altering bobbin tension is a book unto itself, so will not be covered in these blog posts.
Stitch length button or slider changes the length of the actual stitch, from 1mm, which is tiny and barely moves to 6mm, which is a huge basting stitch. Stitch length settings for paper depend on whether or not the seam will be holding two items together, or are just decorative. I generally use a 3mm stitch length unless I have a good reason not to. Stitch width buttons or sliders are the same, only for width. If your machine can make a zigzag or decorative stitches, the stitch width becomes very important.
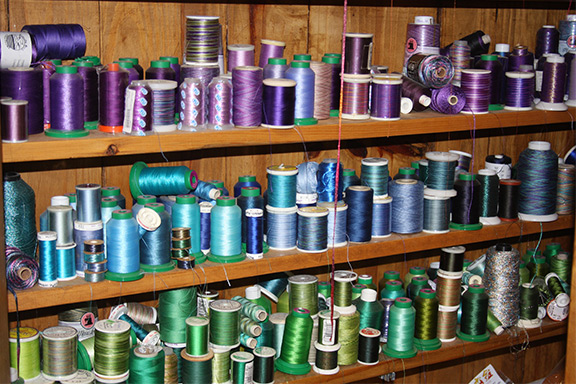
Threads
Another topic worth at least a book or two, so here’s a brief summary to get you sewing: thread is characterized by weight, with numbers from 12-100. For threads, the higher the number, the finer the thread. For sewing with paper, use at least a 40 weight/2ply, or a 50/3. The ply is the numbers of strands wound together. These are strong threads, used in general sewing with fabrics, and freely available. Please don’t buy the “ten zillion for a dollar” threads at your local box store…these tend to be loosely plied and very weak and fuzzy. The amount of time you will spend cleaning out the bobbin area is so not worth it, let alone having things come apart from the thread disintegrating.
I organize my threads by color, in a shallow cabinet. I live in Colorado at 6000 feet in elevation, so the climate is very dry. For rayon threads, I keep the spools in a plastic bag in a cool, dark place…seems weird to those of you in a humid climate, I know, however rayon threads will literally shatter if dried out to the point of being brittle. So for me, it is worth the extra step.
First Exercise with Automatic Straight Stitching:
Let’s start with straight, automatic stitching before moving on to free motion. Unthread your machine on top and remove the bobbin, leaving the case in place. We will start with straight stitch, set at 3mm, with normal top and bottom tension.
Ok, grab a piece of lined scrap paper. Start sewing with the unthreaded needle, following up and down the lines printed on the paper, punching holes. Experiment with pressing the foot peddle so the machine runs faster and slower, lifting your hands away from the paper to see how it moves without guidance, starting and stopping, and occasionally reversing. My machine will sink the needle if I press my heel down on the foot peddle, but you may have to lower the needle into the paper using the hand wheel on the side of the machine. With the needle depressed, you can lift the presser foot and turn the paper in any direction without losing your place. This is very handy for turning corners. Practice sewing down one line, stopping, sinking the needle, lifting the presser foot, turning the page 90 degrees, then dropping the presser foot down and continuing. Develop comfort with starting, stopping, and turning corners.
Second Exercise with Automatic ZigZag
Ok, now if your machine has a zigzag stitch, practice with various stitch widths to see where the needle punches the hole in the paper on the zig vs. the zag…try lining up the zigzag between the lines on your paper. Experiment with changing the stitch length as well as the width. When the stitch length is dropped to .5-1mm, thread will form a dense satin stitch. This is hard to accomplish unless the paper is pretty sturdy, or the thread very thin. Without thread, a very low stitch length can perforate paper to the point of tearing a big hole, so beware unless that is what you are after.
Third Exercise: Automatic Stitching Practice with Thread
Thread the top of your machine and insert a full bobbin. Using a new piece of lined paper, start stitching by holding both the top and bobbin thread off to the left behind the foot so the end threads won’t get tangled in your first stitches. This is an excellent habit to develop. Most machines require holding the top thread and pulling up gently while slowly lowering the needle using the hand wheel or your foot pedal to bring up the bobbin thread when a new bobbin has been inserted.
Repeat Exercise 1 and 2, noticing the difference when stitching with thread.
Free Motion Embroidery
Get ready for a whole new world of possibilities as an artist! Free motion stitching is the overview term for a plethora of techniques, all with the sewing machine’s feed dogs lowered or covered. There are many books that explore the abundance of techniques and uses of FME, so this will be a brief and condensed review of the basics for the art journal/scrapbook artist.
Your sewing machine must be able to drop or cover the feed dogs to sew free motion. Check your manual or local dealer if you have questions. Without this capacity, the following techniques will not work. For some older machines, setting the stitch length to zero will disengage the feed dogs, however most modern machines have an override for this approach.
As always, first clean and oil your machine, particularly under the throat plate and the bobbin case area. Repeat this action every few hours of sewing, especially with paper.
Drop, lower, or cover your feed dogs. Set the top tension between 2 and 3 mm, and the stitch length to at least 2mm, despite the fact the stitch length will be determined by how fast your hands move. Machines behave better with a stitch length of 2mm and above. Stitch width depends on whether you choose straight FME or zigzag. A darning or embroidery foot is a necessity, as with the feed dogs lowered, a regular presser foot holding the paper or fabric against the throat plate is not desired. A darning or embroidery foot has a spring in back and does not touch the bed of the machine at all, hence allowing free movement.
Needle choice will depend on the thickness of the “sandwich” of layers, the thread choice, as well as how large of a needle-hole is desired. With extensive thread painting type of stitching, changing the needle often is a good idea.
First Exercise: Coordinating your Hands and Feet
The trick to learning free motion stitching is relaxing your shoulders while moving the fabric or paper around under the needle. Start by running your machine a bit slower than usual, and moving your hands at a speed that appears to make a decent stitch length. Too fast, it will look like a basting stitch, too slow and you may tear your paper.
Start by stitching on paper without the machine threaded again to get the hang of moving the paper around. Then thread up the machine, and go on to the next exercise using a piece or two of scrap fabric first.
Make scrolling movements, like a cursive letter “e”, over and over, experimenting with your hands moving slower and faster, the machine slower and faster, the scrolls bigger and smaller.
On a new piece of fabric, start in a straight line slowly, then fast to see how the stitch length goes from teeny to a long basting stitch, depending on how fast you move the fabric.
Try a zigzag stitch, moving the fabric in scrolls, straight lines both vertical and horizontal, building up areas of thread as a fill stitch, and making jagged lines.
Write your name in cursive, large and small.
Once you have had a chance to experiment, use another piece of fabric and repeat some of these moves without turning the direction of the fabric, just moving your hands front, back, and side to side. Imagine the needle is a pencil that you cannot lift from the paper.
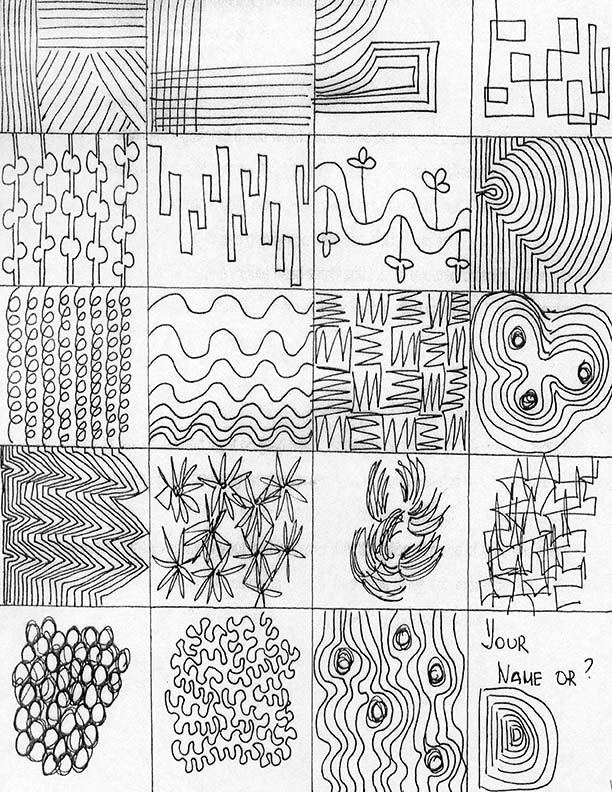
Try stitching M’s, O’s, W’s, jagged lines, meandering lines, spirals, leaf shapes, etc. There are many quilt stitches that are feather, fan, serpentine scrolls, or other elaborate free motion patterns to follow when marked on the quilt top, and these patterns can give a wide variety of options for drawing with a needle.
Below is a sample of marked paper for you to either print off to practice stitching FME, or draw some patterns on paper yourself and sew. Keep practicing until you get comfortable with moving the fabric or paper while sewing.
Please join us next Flashback Friday for another Art Journaling Sewing Lessons 101 installment.
Have a great weekend!
[Posted by: Joy]

Over the years we've been fortunate to have Julie Ann Shahin share some wonderful art journaling series with the TB&CO readers. We will be re-posting some of them here on this blog. Please note these may be altered from the original posts to update links, provide information on newer programs, etc
Because there are so many wonderful photos this post has been separated into several parts. Below is Part Three.
If you missed Part One go here. If you missed Part Two go here.
Enjoy!
This is a photo heavy post. Please be patient while it loads, it’s so worth it!
What comes first? The writing or the art? In art journaling, we’ll explore today the words. If you find that you get stuck after creating the art while transitioning to the words, I believe it’s because the art requires a different part of the brain than the writing requires, one uses the left brain, the other the right. So embrace the process, and relax, give yourself a pat on the back for realizing that there is indeed a transition that needs to be made.
I am pulling from the Art Journal Caravan™ Workshop Expedition 2011 {Self-Study} Gallery examples to illustrate ideas for journaling. Thank you to everyone in the Gallery for sharing your talent. I wish I could feature everyone!
Topic: Change

My Attention by PatsFanGran
Credits: Kits by Tangie Baxter, Lorie Davison, Flergs, Viva Artistry; font~Gridshift
Topic: Taking a Risk

She Jumped by PatsFanGran
Credits: Kits, by Tangie Baxter, Raspberry Road Designs and Soval; Font: Tangie Baxter's Impossible Things
Topic: Continue Where Word Art Leaves Off

Belong by PatsFanGran
Credits: Kits by Tangie Baxter, Lorie Davison, Sussie M; journaliing font~jaques
Topic: I Am Statement

Self-Portrait by PatsFanGran
Credits: Kits by Tangie Baxter, Kimla, Finecrafted Designs, Vinnie Pearce, Sue Cummings and Val C. Designs
Topic: Nature

POETRY by ladynorth
Credits: Kits by Tangie Baxter and Lorie Davision
Topic: Timeline

Map by ladynorth
Credits: Kits by Tangie Baxter; Fonts used Tangie's Mockturtle, Arial Narrow and Antique Type
Topic: Create Your Own Charater and It's Story

Whatever Happens by ladynorth
Credits: Kits by Tangie Baxter; Tangie’s Fonts: Jabberwock, fiveseventen, tweedledee; Other Font: Apple Boy BTN
Topic: List-Making

Self Portrait by ladynorth
Credits: Kits by Tangie Baxter; Font: Smartypants
Topic: Repeat a Word

I AM A COLLECTOR by wombat146
Credits: Kits by Tangie Baxter, Magic Reality Designs
Topic: Lots of Journaling Subtlely Blended into Page

ESCAPE by wombat146
Credits: Kits by Carla Gibson Designs, Joanne Brisebois Designs, Sue Cummings, Ashalee Wall Designs; Fonts: Dymo, Polaroid 22, Burst by Bubble, Pea Jamie
Topic: What Inspires You?

INSPIRATION by wombat146
Credits: Kits by Tangie Baxter, Digiridooscraps; Sarah Barber Designs, MCD Designs, Scrappie Irene Designs, The Urban Fairy.
I hope you enjoyed Part Three and the conclusion of Art Journaling 101: What to Write.
[Posted by: Joy]


Over the years we've been fortunate to have Julie Ann Shahin share some wonderful art journaling series with the TB&CO readers. We will be re-posting some of them here on this blog. Please note these may be altered from the original posts to update links, provide information on newer programs, etc
Because there are so many wonderful photos this post has been separated into several parts. Below is Part Two.
If you missed Part One go here.
Enjoy!
This is a photo heavy post. Please be patient while it loads, it’s so worth it!
What comes first? The writing or the art? In art journaling, we’ll explore today the words. If you find that you get stuck after creating the art while transitioning to the words, I believe it’s because the art requires a different part of the brain than the writing requires, one uses the left brain, the other the right. So embrace the process, and relax, give yourself a pat on the back for realizing that there is indeed a transition that needs to be made.
Topic: Art Journal Manifesto

art journal by Bitte
Topic: Write Your Own Poetry

poetry by Bitte
Topic: Being a Mother

Breaking free by Bitte
Topic: Inspired by a Book

Art saves... by Bitte
Topic: Create Your Own Quote

Treasured Collection by Belinda
Credits: Kits by Tangie Baxter, ZTAMPF!, Beth Rimmer, Holliewood Studios and CryztalRain
Topic: What Bothers You

Fat Bottomed Girls by Balinda
Topic: A Feeling that Needs Healing

Belong by Balinda
Credits: Kits from Maya and font DJB Tweenybopper by Darcy Baldwin
Topic: Self Portrait

Self Portrait by Balinda
Credits: Kits from Studio Bethany, Lauren Reid, TumbleFish Studios, Cryztal Rain, Holliewood Designs, Beth Rimmer and Marta Van Eck
I hope you enjoyed Part Two of Art Journaling 101: What to Write. Join us next Flashback Friday for Part Three.
[Posted by: Joy]
Over the years we've been fortunate to have Julie Ann Shahin share some wonderful art journaling series with the TB&CO readers. We will be re-posting some of them here on this blog. Please note these may be altered from the original posts to update links, provide information on newer programs, etc
Because there are so many wonderful photos this post has been separated into several parts. Below is Part One.
Enjoy!
This is a photo heavy post. Please be patient while it loads,
it’s so worth it! What comes first? The writing or the art? In art journaling, we’ll explore today the words. If you find that you get stuck after creating the art while transitioning to the words, I believe it’s because the art requires a different part of the brain than the writing requires, one uses the left brain, the other the right. So embrace the process, and relax, give yourself a pat on the back for realizing that there is indeed a transition that needs to be made.
I am pulling from the Art Journal Caravan™ Workshop Expedition 2011 {Self-Study} Gallery examples to illustrate ideas for journaling. Thank you to everyone in the Gallery for sharing your talent. I wish I could feature everyone!
Topic: All About Me
by thimbleberrie
Credits: Gal- Artella (i think); green monster-momseveryday ideas freebie;, emily strange; clock- fiddlette; red flower- Ztamp transformation; various kits by
Tangie Baxter
Topic: She
by thimbleberrie
Topic: Health
by thimbleberrie
Credits: far far away pin up gal freebie; strawberries/pepper/asperagus- everydaymomsideas; cupcake- rkd; sweets- bdate sweeties; remember this- SBG connect; various
Tangie Baxter kits
Topic: Art Journaling Process
by thimbleberrie
Credits: various kits by:
Tangie Baxter, Sara Barber, Everydaymom’s ideas, Rosey Posey, RKD, SBG Transformation kit
Topic: Grief

by thimbleberrie
Credits: kits by Tangie Baxter, RKD, Rosey Posey, Deviant Scrap
Topic: Faith

by susan1255
Credits: Elements, mostly Dawn Inskip. Stitched Alpha – Karen Funk,
DHD, Sewing elements – Emeto
Topic: One of the Five Senses

by susan1255
Credits: Page made from various kits by Dawn Inskip, Brushes by Anna Aspnes, Flower Alpha by Holliewood Studios.
Topic: Beliefs
by susan1255
Topic: Venting
by susan1255
Credits: Lots of contributors –
Tangie Baxter, Cali Designs, Holliewood, Marta Wan Eck, Starlight Designs, Fiddlette.
Topic: Wisdom
Test by susan1255
Topic: Who I Am

by Artgirl
Credits: Crowabout Studios, Lorie Davison, Shabby Princess and
Tangie Baxter:
Topic: One Little Word
by Artgirl
Topic: Family History

by Artgirl
Credits: CreateWings Designs for all elements; the photo frame is from JenU.
Topic: Goals
by bitte
I hope you enjoyed Part One fo Art Journaling 101: What to Write. Join us next Flashback Friday for Part Two.
[Posted by: Joy]


Over the years we've been fortunate to have Julie Ann Shahin share some wonderful art journaling series with the TB&CO readers. We will be re-posting some of them here on this blog. Please note these may be altered from the original posts to update links, provide information on newer programs, etc
Enjoy!
When I started out in mixed media and art journaling, it took me forever to figure out what Gesso is used for. It seemed to me that I heard the term used quite often, but could never figure out quite exactly how and why it was used. Let me put you on the fast track to learning all about Gesso today!
My first word of advice is you do not have to go out and buy Gesso right away! Some artists use Gesso all the time, some artists never use it. If you are a beginner, I suggest take your time just doing art journaling with what you have, but read this and have the knowledge of what Gesso is. You’ll know when you’re ready to buy Gesso. When I was a beginner, the curiousity of Gesso was killing me…I just couldn’t find anyone to explain it to me to my satisfaction. So check out this post, and then put Gesso on your wish list!
This article will also show you a number of projects using gesso. Enjoy!
ALL ABOUT GESSO
In an art journal, one can use Gesso underneath paint, under embellishments, as a support under heavy collage, to keep acrylics and markers from bleeding through to the next page, and to adhere two pages together in an altered book to make them strong enough to art journal on. You can also transform a glossy paper or covering to a matte one with Gesso.
Gesso looks like paint unless it is Clear Gesso. Most often you will see Gesso in white, less often in black, but it does come in many colors
USING GESSO Gesso, unlike paint, creates a rough surface when applied, which allows other mediums to catch to it. It is not as thick as paint, so it can merge into the background.
You can add acrylic paint to Gesso. You will get a muted in color, chalky result when you add a color acrylic to Gesso. However, the acrylic paint will now be thicker. Milliande.com
suggests using Golden Acrylic Paints to mix with Gesso as “as they have a lovely color intensity in their pigment but also don’t alter the fluidity of the gesso too much.” She also suggests, “You can also add concentrated watercolors like Dr PH Martins Watercolors or colored inks. Colored pigments can be added to gesso as well like twinkling H2o’s, Pearl Ex Powders for a shimmering effect.” . You can use just a foam brush with gesso. Or you can use an implement to create a texture, such as a comb to leave ridges.
Let's see some projects using Gesso:

Valentine Postcard Swap Hand stitching, gesso, stamps, and flowers on recycled packing paper. by HagitR All Rights Reserved

Time Is A Circus by itstimetostamp (Kristy C)
Supplies: Black Gesso, layers of ephemera underneath , acrylics, graphite, stamping. Collage image is one artist got a few years back from Bernie Berlin.-she used peerless watercolors to add some color to the image.

Art Journal Page by dearlydee
Supplies: Old envelope, lace, staples, masking tape, gesso, sequins.

by Pringle Hill (Terri Kahrs)
Supplies: Mixed media journal spread created for 2011 calendar project. The background was created with Inktense pencils over gesso and fluid acrylics.

art journal: dreams by Francoise MELZANI

Grace by By Bellah (gabriella travaline)

Journal Pages by By beamahan (Bea Mahan)
If you're interested in Digital Gesso check out these offerings at TB&CO:
Gesso Messy the Truckload {Commercial Use}
Gesso Messy the Truckload {Personal Use}
[Posted by Joy]
Over the years we've been fortunate to have Julie Ann Shahin share some wonderful art journaling series with the TB&CO readers. We will be re-posting some of them here on this blog. Please note these may be altered from the original posts to update links, provide information on newer programs, etc
Enjoy!
This week I’m back to focus again on the September Adventure Quest in the Art Journal Caravan 2011 (still available as a self-study workshop). Tangie suggests creating Zentangle Mandalas aka Zendalas. I thought I would explore Mandalas in general here on the blog.
About Mandala Art:
The word Mandala means “circle” in the Indian Sanskrit language. Within the circle there is a mid-point where the drawing traditionally starts. Mandala art has been tied to the spirituality of Buddhist Tibetans, Navajo sand painters and the Aztecs.
Even Carl Jung recognized the importance of Mandala paintings and kept a journal of Mandala art.Indeed, Jung's discovery of the mandala provided the key to his entire system. "I had to abandon the idea of the superordinate position of the ego. ... I saw that everything, all paths I had been following, all steps I had taken, were leading back to a
single point -- namely, to the mid-point. It became increasingly plain to me that the mandala is the centre. It is the exponent of all paths. It is the path to the centre, to individuation.... I knew that in finding the mandala as an expression of the self I had attained what was for me the ultimate." (from Mandalas. C. G. Jung. trans. from Du (Zurich, 1955))
The Mandala connects us to our imagination, our inner self. It gives us an opportunity to move through the layers of our sub-conscious and grow closer to our full actualization. Mandalas are a tool for self-reflection, a mirror, if you will.“…when we begin to take all of ourselves into account, when we begin to honor and balance the dynamic forces within us, we can act in the world in ways that honor our essential wholeness, get our needs met, and allow us to share with others the very best within us.” (Michael H. Brown)
THE VALUE OF MANDALA ART - Michael H. Brown
- Connect inwardly
- Private process, done at any time, without a therapist or guide
- In visual terms, identify where we are stuck in life as well as where we are accomplished in life
- Chance to learn from our inner wisdom
- Regular practice of mandalas allow us to view what patterns repeat
- Sharing of art with others
“We need to find ways to connect to our inner depths, to heal our wounds, and nurture the growth of new potential within us. Mandala art is one of the most creative, direct, and transformative ways to accomplish these important goals.” – Michael H. Brown
Mandalas from Art Journal Caravan 2011 Members

Imagine by livingoutloud
This was not the entry I had planned for this month’s adventure quest. I am very early in my learning of zentangling – I only learned about it at Tangie’s AJC chat a week or so ago. But I felt so compelled to use my art to express my feelings of this anniversary of September 11, and to emphasize the healing I see, the healing that has already happened, and the healing yet to come. Paper by Beth Rimmer.

September Adventure Quest Mandala by scrappingdax
I started with a free mandala template then placed the finished image on a paper from ACJ parcel 9. This is my first attempt at zentangle and I really enjoyed it. Will definitely do more. more.

Instead of Housework Zendala by tamhanley
Inspired by the Miraculous Mosquito video on the adventure quest page, and using various patterns I found on Flickr (search “zentangle sampler” there are 15 large pictures to study). I discovered that I don’t need a pattern book. I need to LOOK at each pattern and decide which stroke was first, next, etc. It’s exhilarating to see it come to life!

Zentangle~Mandala by tarthur

Mandala Garden by caubin
For these two pages I created the Mandala and then played with using different copies of it in different sizes. For this version I used hue/saturation adjustment layers to change the colours of the Madalas. Products used: Field Notes II: Fall by Tangie Baxter, Balinesia by Ztampf, Colorsplash by Deviant Scrap/Sommerset

Zentangle 2 by Fifi
More diversion from real life issues created with Ruth Page’s Doodlicious. The background paper is from Tale of a Lighthouse from Eena’s Creations at Deviant Scrap.
[Posted by:Joy]

Over the years we've been fortunate to have Julie Ann Shahin share some wonderful art journaling series with the TB&CO readers. We will be re-posting some of them here on this blog. Please note these may be altered from the original posts to update links, provide information on newer programs, etc
Visual/Collage Journaling Focus

I’d love to share with you today my Summer Visual Journal. Inspired by collage, visual journals, and Smash Books – this journal is still a work in progress. My journal is more about using ephemera, photos, and journaling – than it is about using paints, watercolors, and getting your hands messy. Although one can feel free to use digitally painted items!
My Summer Journal
This journal is a hybrid journal with lots of paper + printables. Lots and lots of goodies from
Tangie’s kits, such as the butterfly and clock on the cover above.
Inside Cover and Page 1 by Julie Ann
On the inside cover, the postcard folds down.
The envelope on the right is from a magazine perfume ad.
Dedication for Summer Journal by Julie Ann Shahin
Travel wish list with journaling on reverse side
Contrast large numbers with handwritten journaling
Mix travel ephemera with scrapbooking ephemera
Remember to journal about the weather
Mix in cut images from magazines with printables
Use envelopes for hidden journaling
Feel free to get whimsical
Use photobooth-style photos for memorable events
Capture your love for the beach with printables
Mix real vintage ephemera with printables
Lots of room to add doodling later
Thanks for letting me share my Summer Journal, in progress. It has been really relaxing to work on it while watching T.V. or just sitting in my dining room listening to the sounds of nature through the open windows.
If you are interested in making journals/planners check out these offerings at TB&CO:

[Posted by Joy]


 by thimbleberrie
 by susan1255
 by susan1255


 by Artgirl
  by Artgirl
  by Artgirl