Flashback Fridays - Art Travels with Rain: Lesson One: Making Borders and Pockets Using Automatic Machine Stitching September 02 2016, 4 Comments

A few years back we had a feature called "Art Travels with Rain". Rain did a wonderful series on sewing that we are reposting in our Flashback Fridays segments. Please note these may be altered from the original posts to update links, provide information on newer programs, etc.
In case you missed earlier posts in the series:
Art Journaling Sewing Lessons 101
Enjoy!

Lesson One: Making Borders and Pockets Using Automatic Machine Stitching
***Note: please read through “Sewing 101: The Prequel” for the basics of sewing on paper!
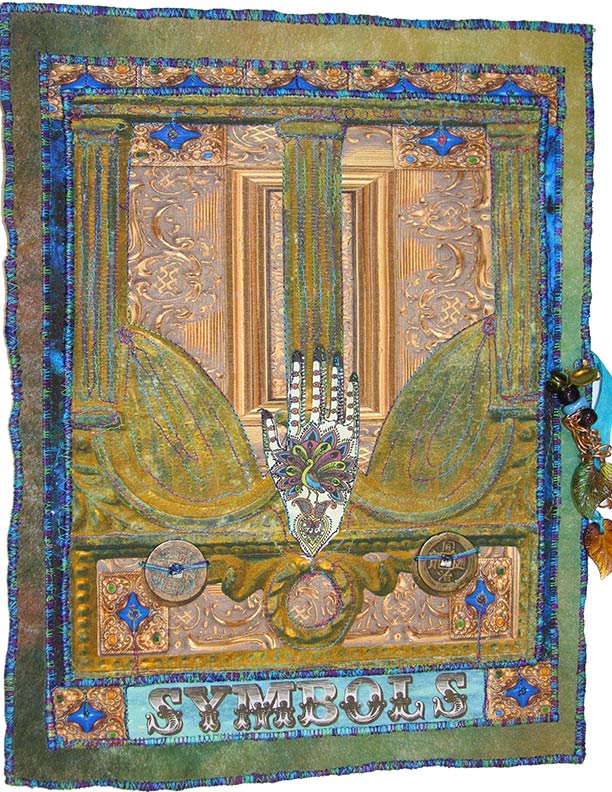
In this lesson, I will explore using automatic straight and zigzag stitching to create pockets for your art journal pages. I am demonstrating pockets and borders using my new sketchbook wrap cover for Tangie Baxter’s Symbology workshop (now available as a self-study course), pictured below.
And the inner cover and pockets:
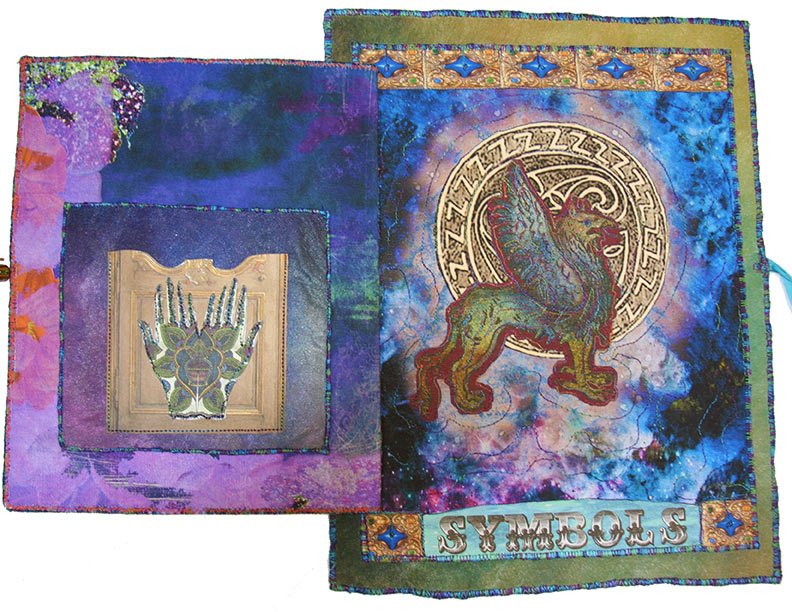
On the left, the inner cover has two pockets stitched:
Let’s get started with creating your own book cover or other pockets for a page:
Attaching a border and a pocket to a base page is a fabulous first step in sewing on paper.
First, have a look at a few examples of straight and zigzag stitching on my pages below. Then have some fun with stitching various pieces together. Tangie has many options in her shop at TB&CO of borders, pages, and other printables, including in the Collage Mania Grab Bags from 2010 and 2011 (Collage Mania 2013 is available at TB&CO). It is also easy to use software such as Photoshop or Photoshop Elements to create a printable page with various elements and papers, then save as a jpeg file, and print at home on whatever type of paper you desire. For pockets and hinges, index or cardstock is sturdy enough, but copier paper is not. Some home printers need cardstock fed one sheet at a time. Also consider painted or other mixed media papers made at home, just be cautious if a lot of glues, gel mediums, acrylic paints, or other thick polymers have been used, as you will not want to stitch through these on a machine. Bits of glue are not safe for the bobbin area.


Various decorative stitches hold bits and pieces of the collage above together. Some straight stitching also holds down some pieces. This is part of a larger group of pages experimenting with sewing on paper, and is a terrific resource that I return to regularly. Consider spending some time exploring the various utility and decorative stitches your machine may make, with different colors of thread and background papers. Many of these examples are from a sketchbook of sewing options that includes both hand and machine stitch, where I have opened the wire binding to work on the pages individually, then rebinding. Other pages include notes on stitch length, stitch width, the numbers and variations of decorative stitches, paper and thread samples, etc. and form a valuable resource manual.
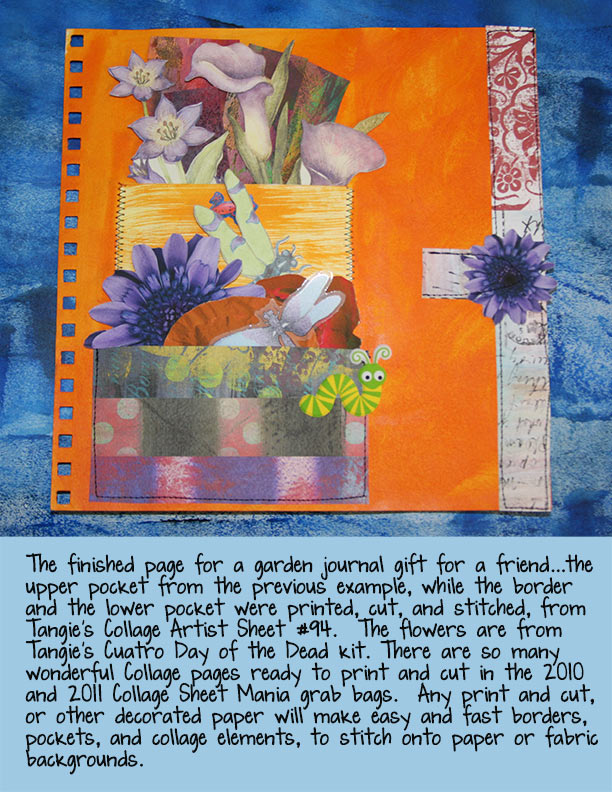
Above is an example of pockets that I filled with garden stickers and die cuts as a Garden Journal gift for an elderly friend that sadly can no longer hold tools. There are large and small pockets throughout the journal with bits of paper, seed packets, pressed flowers, scrapbook elements, and quotes/poetry for her to make pages or play with. Some of the pockets hold her writing, too private to have on view, so safely tucked away in the pocket.
I have also hand stitched papers, seed packets, little paintings, and other bits of garden ephemera onto the pages by first piercing the page with a large machine needle, on the machine. Some of these areas were planned, while others were added here and there for later use. It is far easier to stick a brad or other fastener through a hole that is already punched, and also offers attachment options of thicker ribbons, knitting yarns, or other novelty items to be laced through the holes.
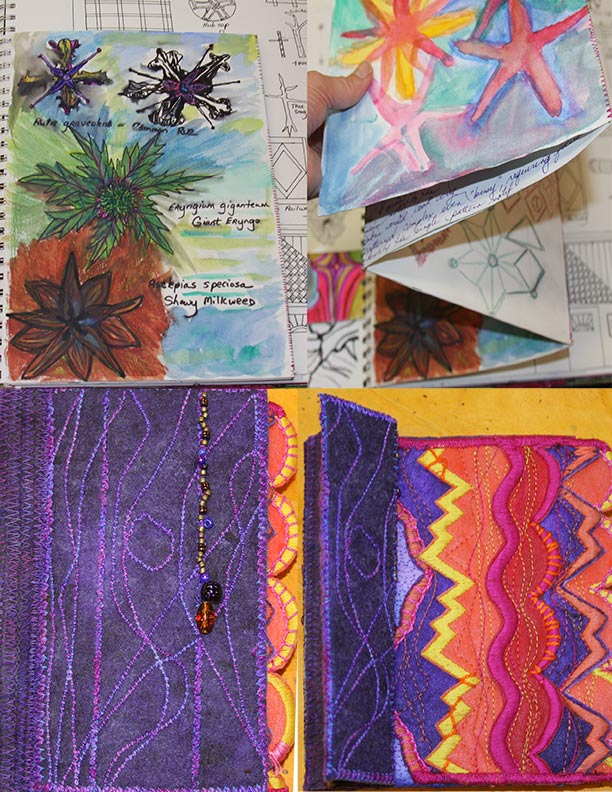
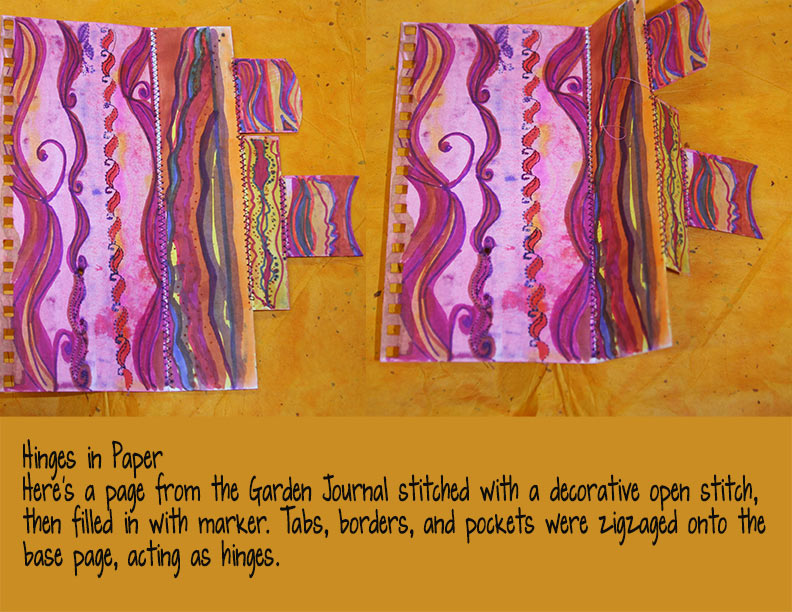
More examples of hinges: on top, many sketchbook pages zigzag stitched together as a pull-out, bound into a larger sketchbook. Below left, painted Timtex stabilizer with fused paper, free motion and automatic stitched, with zigzag panels as the cover of a book. On the lower right, the cover hinges are opened, revealing the first page of satin stitched edge options.
For hinges, the zigzag stitch must be wide enough for the two pages or elements to lay flat next to each other, with a shorter stitch length of 2.0mm depending on the thickness you are sewing, so there is enough thread to support the opening and closing of the hinge. Always try a small sample first, before stitching your art work together! Ask me how I know…seriously try a sample first!
MAKING MY BOOK COVER
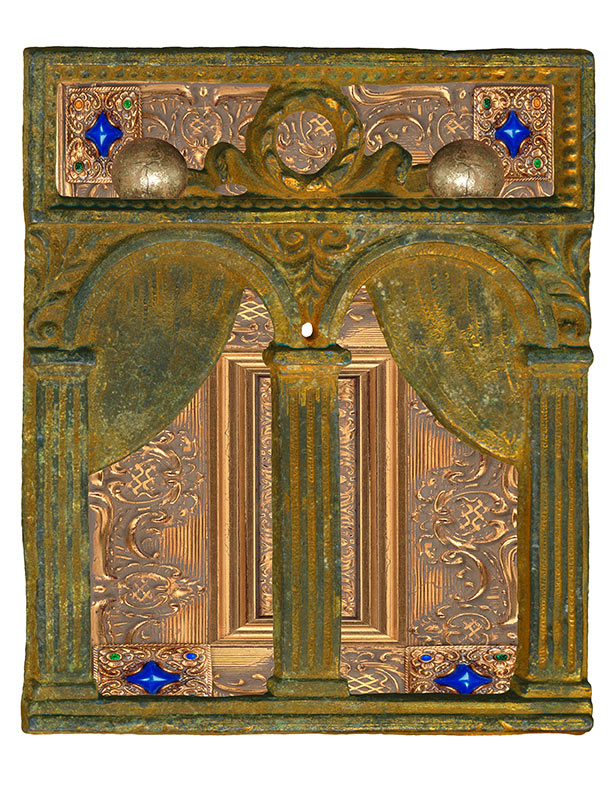
So, now let’s look at my Symbology cover starting points: the first image below is the flap on the outer cover as a jpg Photoshop file, combined from various elements of Tangie’s “Thoughts of Thee” and “Luminescence” kits. I printed this on Epson Premium matte photo paper before adding a lot of stitch both automatic and free motion using a variegated thread. The central hand motif is from Orchid Elixir, although I used the Collage Mania Grab bag sheet, ready to print at high resolution, then cut, and sewn on.
I added two old Chinese coins from my stash, and again used free motion to attach the coins to the page by making small stitches in one spot, gently pulling the thread over to the inner coin, more small anchoring stitches, then reversed, back and forth on both sides of the coin. In the center of the coin, I sewed a free motion teeny circle of stitches to look like a bead, and repeated this on the blue “beaded elements” at the corners of the page. The very top of this flap has the letter “e” scrolled along the top bar, which you will remember from the Prequel free motion exercises. This is called Garnet or Granite stitch in free machine embroidery parlance.
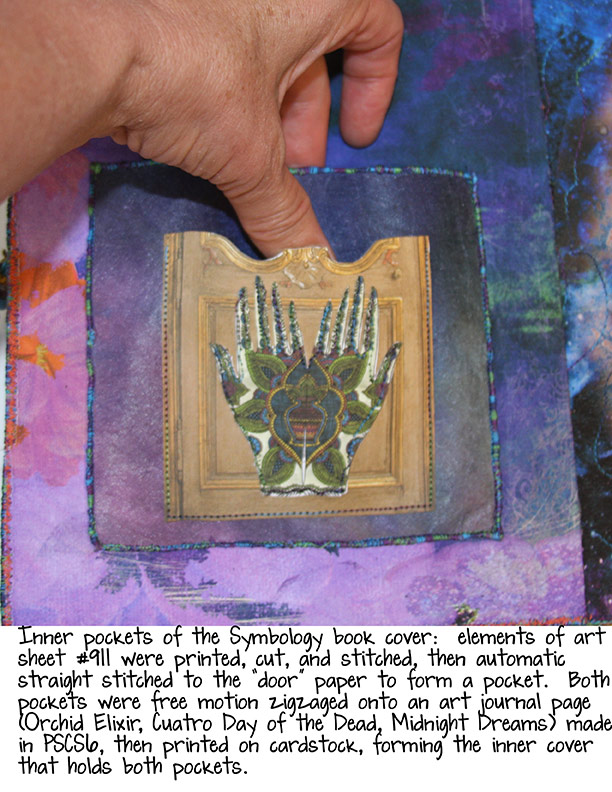
Before free motion zigzag stitching the edges together, I made the inner flap and pockets, and made a ribbon beaded tie that was slipped between the outer and inner flap to anchor the ribbon while stitching the edges. The image below the starter-flap is the digital file from Photoshop that I again printed onto Epson Premium matte paper. Credits for this page include Field Notes: Fall, Midnight Dreams, and AJC13 Atlantis. I printed off two copies of the inner flap base page, cut one into a pocket, zigzag stitched all around the edges of the square, then straight automatic stitched the paper printout of the door and hand motifs, forming a second pocket. Then the entire pocket piece was straight stitched to the base, and the inner and outer flaps joined by free motion zigzag around the edges.
When edging a page with free motion zigzag, the best end look is achieved by using a 3 step motion: stitch forward about an inch or so, then back over it again, then forward filling in and making the edge look pretty. So, forward, back, forward again, over and over, around the edge. I find this to be far easier than stitching all the way around three times. I use this same 3 step process for raw edge applique’, but that is a future lesson!
The main cover page started as a digital Photoshop file with elements from the Bestiary of Beasties, Celtic Tradition (now available as part of The Vault), Midnight Dreams, and the Mehndi Caravan (also included in The Vault) part o alpha in white. I printed this page on Epson premium matte photo paper, then added a lot of free motion embellishment embroidery. The edges were zigzag stitched with the same variegated thread as the flap, attaching the cover to a painted piece of canvas paper, 100 weight. The edges of the canvas paper were also free motion zigzag stitched, attaching the other part of the ribbon closure at the same time.
The flap was automatic zigzag stitched to the cover on the left hand side only, using a wide stitch width of 5mm and long stitch length of 4mm, to act as a hinge, however I folded the flap back against the zigzag stitching instead, just because I like it better.
My cover is now complete and ready to attach to the book wrap for the spine and the back cover next week.

NEXT TIME…
Now it’s your turn…have a go at stitching on some paper, make a few pockets, attach a border, start on your own book cover. Next time we will learn about attaching the cover to the wrap for the spine and back cover of the sketchbook, after decorating the page with free motion embroidery. And perhaps a bit of thread painting thrown in! Have a look at my Photoshop jpg page of flowers from Tangie’s kit: Field Notes Fall, one of my favorites, and part of what I printed to thread paint before adding to the back cover.
*****
Please join us next Flashback Friday for another Art Journaling Sewing Lessons installment.
Have a great weekend!
[Posted by: Joy]

Comments
서울오피 on November 30 2022 at 04:23AM
WhiskeyPeak77@gmail.com 11/30/22
https://opviewer.com/
http://www.erotikplatz.at/redirect.php?id=939&mode=fuhrer&url=https://opviewer.com
http://www.imsnet.at/LangChange.aspx?uri=https://opviewer.com
https://www.kath-kirche-kaernten.at/pfarren/pfarre/C3014?URL=https://opviewer.com
http://gs.matzendorf.at/includes/linkaufruf.asp?art=kapitel&link=https://opviewer.com
http://www.nuttenzone.at/jump.php?url=https://opviewer.com
https://cms.oeav-events.at/wGlobal/nessyEDVapps/layout/fancybox.php?link=https://opviewer.com
https://www.oebb.at/nightjet_newsletter/tc/xxxx?url=https://opviewer.com
https://www.gardensonline.com.au/Global/Players/YouTube.aspx?VideoURL=https://opviewer.com
http://www2.golflink.com.au/out.aspx?frm=gglcmicrosite&target=https://opviewer.com
http://www2.golflink.com.au/out.aspx?frm=logo&target=https://opviewer.com
https://www.golfselect.com.au/redirect?activityType_cd=WEB-LINK&course_id=2568&tgturl=https://opviewer.com
https://www.malcolmturnbull.com.au/?URL=https://opviewer.com
http://march-hare.com.au/library/default.asp?PP=/library/toc/lib-12.xml&tocPath=&URL=https://https://opviewer.com
https://www.oliverhume.com.au/enquiry/thank-you/?redirectTo=https://opviewer.com
http://www.parents-guide-illawarra.com.au/Redirect.aspx?destination=https://https://opviewer.com
https://ramset.com.au/Document/Url/?url=https://opviewer.com
https://ramset.com.au/document/url/?url=https://opviewer.com
http://rubyconnection.com.au/umbraco/newsletterstudio/tracking/trackclick.aspx?url=https://opviewer.com
http://southburnett.com.au/movies/movie.php?url=https://opviewer.com
https://www.vicsport.com.au/analytics/outbound?url=https://opviewer.com
https://www.vwwatercooled.com.au/forums/redirect-to/?redirect=https://https://opviewer.com
http://clients3.weblink.com.au/clients/aluminalimited/priceframe1.aspx?link=https://opviewer.com
https://maps.google.lt/url?sa=t&url=https://opviewer.com
https://ref.gamer.com.tw/redir.php?url=https://opviewer.com
https://images.google.com.sa/url?sa=t&url=https://opviewer.com
https://maps.google.com.sa/url?sa=t&url=https://opviewer.com
https://www.google.com.sa/url?sa=t&url=https://opviewer.com
https://images.google.hr/url?sa=t&url=https://opviewer.com
https://www.google.hr/url?sa=t&url=https://opviewer.com
https://maps.google.hr/url?sa=t&url=https://opviewer.com
https://images.google.com.pe/url?sa=t&url=https://opviewer.com
https://www.google.com.pe/url?sa=t&url=https://opviewer.com
https://maps.google.ae/url?sa=t&url=https://opviewer.com
https://images.google.ae/url?sa=t&url=https://opviewer.com
https://www.google.ae/url?sa=t&url=https://opviewer.com
https://www.google.co.ve/url?sa=t&url=https://opviewer.com
https://maps.google.co.ve/url?sa=t&url=https://opviewer.com
https://images.google.co.ve/url?sa=t&url=https://opviewer.com
http://onlinemanuals.txdot.gov/help/urlstatusgo.html?url=https://opviewer.com
https://www.google.com.pk/url?sa=t&url=https://opviewer.com
https://images.google.com.pk/url?sa=t&url=https://opviewer.com
https://community.rsa.com/t5/custom/page/page-id/ExternalRedirect?url=https://opviewer.com
https://www.google.com.eg/url?sa=t&url=https://opviewer.com
https://maps.google.com.eg/url?sa=t&url=https://opviewer.com
https://images.google.com.eg/url?sa=t&url=https://opviewer.com
https://www.google.si/url?sa=t&url=https://opviewer.com
https://maps.google.si/url?sa=t&url=https://opviewer.com
https://images.google.si/url?sa=t&url=https://opviewer.com
http://www.pickyourown.org/articles.php?NAME=Visit+Us&URL=https://opviewer.com
https://maps.google.lv/url?sa=t&url=https://opviewer.com
https://www.google.lv/url?sa=t&url=https://opviewer.com
https://images.google.lv/url?sa=t&url=https://opviewer.com
https://community.cypress.com/t5/custom/page/page-id/ExternalRedirect?url=https://opviewer.com
https://www.google.ee/url?sa=t&url=https://opviewer.com
https://cms.oeav-events.at/wGlobal/nessyEDVapps/layout/fancybox.php?link=https://opviewer.com
https://www.oebb.at/nightjet_newsletter/tc/xxxx?url=https://opviewer.com
https://www.gardensonline.com.au/Global/Players/YouTube.aspx?VideoURL=https://opviewer.com
http://www2.golflink.com.au/out.aspx?frm=gglcmicrosite&target=https://opviewer.com
http://www2.golflink.com.au/out.aspx?frm=logo&target=https://opviewer.com
https://www.golfselect.com.au/redirect?activityType_cd=WEB-LINK&courseid=2568&tgturl=https://opviewer.com
https://www.malcolmturnbull.com.au/?URL=https://opviewer.com
http://march-hare.com.au/library/default.asp?PP=/library/toc/lib-12.xml&tocPath=&URL=https://https://opviewer.com
https://www.oliverhume.com.au/enquiry/thank-you/?redirectTo=https://opviewer.com
http://www.parents-guide-illawarra.com.au/Redirect.aspx?destination=https://https://opviewer.com
https://ramset.com.au/Document/Url/?url=https://opviewer.com
https://ramset.com.au/document/url/?url=https://opviewer.com
http://rubyconnection.com.au/umbraco/newsletterstudio/tracking/trackclick.aspx?url=https://opviewer.com
http://southburnett.com.au/movies/movie.php?url=https://opviewer.com
https://www.vicsport.com.au/analytics/outbound?url=https://opviewer.com
https://www.vwwatercooled.com.au/forums/redirect-to/?redirect=https://https://opviewer.com
http://clients3.weblink.com.au/clients/aluminalimited/priceframe1.aspx?link=https://opviewer.com
https://clients1.google.ad/url?q=https://opviewer.com
https://cse.google.ad/url?q=https://opviewer.com
https://images.google.ad/url?q=https://opviewer.com
https://maps.google.ad/url?q=https://opviewer.com
https://www.google.ad/url?q=https://opviewer.com
https://emaratyah.ae/new-redirect.php?w=https://opviewer.com
http://mbrf.ae/knowledgeaward/language/ar/?redirecturl=https://opviewer.com
http://rafco.ae/container.asp?url=https://opviewer.com
http://for-css.ucoz.ae/go?https://opviewer.com
https://clients1.google.com.af/url?q=https://opviewer.com
https://cse.google.com.af/url?q=https://opviewer.com
https://images.google.com.af/url?q=https://opviewer.com
http://toolbarqueries.google.com.af/url?sa=t&url=https://opviewer.com
https://www.google.com.af/url?q=https://opviewer.com
https://www.snek.ai/redirect?url=https://opviewer.com
http://www.torrent.ai/lt/redirect.php?url=https://opviewer.com
http://avto.al/az/home/redirect?carId=1639612&url=https://opviewer.com
https://clients1.google.al/url?q=https://opviewer.com
https://cse.google.al/url?q=https://opviewer.com
https://images.google.al/url?q=https://opviewer.com
https://images.google.al/url?q=https://opviewer.com
http://toolbarqueries.google.al/url?q=https://opviewer.com
https://www.google.al/url?q=https://opviewer.com
http://tido.al/vazhdo.php?url=https://opviewer.com
http://smile.wjp.am/link-free/link3.cgi?mode=cnt&no=8&hpurl=https://opviewer.com
https://oxleys.app/friends.php?q=https://opviewer.com
http://www.ain.com.ar/openpop.php?url=https://opviewer.com
http://www.ain.com.ar/openpop.php?url=https://opviewer.com
https://www.google.nl/url?sa=t&url=https://daeguop.weebly.com/blog/how-does-a-hot-stone-massage-respond
https://www.google.mw/url?sa=t&url=https://daeguop.weebly.com/blog/how-does-a-hot-stone-massage-respond
https://www.google.mv/url?sa=t&url=https://daeguop.weebly.com/blog/how-does-a-hot-stone-massage-respond
https://www.google.mu/url?sa=t&url=https://daeguop.weebly.com/blog/how-does-a-hot-stone-massage-respond
https://www.google.ms/url?sa=t&url=https://daeguop.weebly.com/blog/how-does-a-hot-stone-massage-respond
https://www.google.mn/url?sa=t&url=https://daeguop.weebly.com/blog/how-does-a-hot-stone-massage-respond
https://www.google.mk/url?sa=t&url=https://daeguop.weebly.com/blog/how-does-a-hot-stone-massage-respond
https://www.google.mg/url?sa=t&url=https://daeguop.weebly.com/blog/how-does-a-hot-stone-massage-respond
https://www.google.me/url?sa=t&url=https://daeguop.weebly.com/blog/how-does-a-hot-stone-massage-respond
https://www.google.md/url?sa=t&url=https://daeguop.weebly.com/blog/how-does-a-hot-stone-massage-respond
https://www.google.lv/url?sa=t&url=https://daeguop.weebly.com/blog/how-does-a-hot-stone-massage-respond
https://www.google.lu/url?sa=t&url=https://daeguop.weebly.com/blog/how-does-a-hot-stone-massage-respond
https://www.google.lt/url?sa=t&url=https://daeguop.weebly.com/blog/how-does-a-hot-stone-massage-respond
https://www.google.lk/url?sa=t&url=https://daeguop.weebly.com/blog/how-does-a-hot-stone-massage-respond
https://www.google.li/url?sa=t&url=https://daeguop.weebly.com/blog/how-does-a-hot-stone-massage-respond
https://www.google.la/url?sa=t&url=https://daeguop.weebly.com/blog/how-does-a-hot-stone-massage-respond
https://www.google.kz/url?sa=t&url=https://daeguop.weebly.com/blog/how-does-a-hot-stone-massage-respond
https://www.google.kg/url?sa=t&url=https://daeguop.weebly.com/blog/how-does-a-hot-stone-massage-respond
https://www.google.jo/url?sa=t&url=https://daeguop.weebly.com/blog/how-does-a-hot-stone-massage-respond
https://www.google.je/url?sa=t&url=https://daeguop.weebly.com/blog/how-does-a-hot-stone-massage-respond
https://www.google.it/url?sa=t&url=https://daeguop.weebly.com/blog/how-does-a-hot-stone-massage-respond
https://www.google.is/url?sa=t&url=https://daeguop.weebly.com/blog/how-does-a-hot-stone-massage-respond
https://www.google.iq/url?sa=t&url=https://daeguop.weebly.com/blog/how-does-a-hot-stone-massage-respond
https://www.google.ie/url?sa=t&url=https://daeguop.weebly.com/blog/how-does-a-hot-stone-massage-respond
https://www.google.hu/url?sa=t&url=https://daeguop.weebly.com/blog/how-does-a-hot-stone-massage-respond
https://www.google.ht/url?sa=t&url=https://daeguop.weebly.com/blog/how-does-a-hot-stone-massage-respond
https://www.google.hr/url?sa=t&url=https://daeguop.weebly.com/blog/how-does-a-hot-stone-massage-respond
https://www.google.hn/url?sa=t&url=https://daeguop.weebly.com/blog/how-does-a-hot-stone-massage-respond
https://www.google.gr/url?sa=t&url=https://daeguop.weebly.com/blog/how-does-a-hot-stone-massage-respond
https://www.google.gp/url?sa=t&url=https://daeguop.weebly.com/blog/how-does-a-hot-stone-massage-respond
https://www.google.gm/url?sa=t&url=https://daeguop.weebly.com/blog/how-does-a-hot-stone-massage-respond
https://www.google.gl/url?sa=t&url=https://daeguop.weebly.com/blog/how-does-a-hot-stone-massage-respond
https://www.google.gg/url?sa=t&url=https://daeguop.weebly.com/blog/how-does-a-hot-stone-massage-respond
https://www.google.ge/url?sa=t&url=https://daeguop.weebly.com/blog/how-does-a-hot-stone-massage-respond
https://www.google.fr/url?sa=t&url=https://daeguop.weebly.com/blog/how-does-a-hot-stone-massage-respond
https://www.google.fm/url?sa=t&url=https://daeguop.weebly.com/blog/how-does-a-hot-stone-massage-respond
https://www.google.fi/url?sa=t&url=https://daeguop.weebly.com/blog/how-does-a-hot-stone-massage-respond
https://www.google.es/url?sa=t&url=https://daeguop.weebly.com/blog/how-does-a-hot-stone-massage-respond
https://www.google.ee/url?sa=t&url=https://daeguop.weebly.com/blog/how-does-a-hot-stone-massage-respond
https://www.google.dz/url?sa=t&url=https://daeguop.weebly.com/blog/how-does-a-hot-stone-massage-respond
https://www.google.dk/url?sa=t&url=https://daeguop.weebly.com/blog/how-does-a-hot-stone-massage-respond
https://www.google.dj/url?sa=t&url=https://daeguop.weebly.com/blog/how-does-a-hot-stone-massage-respond
https://www.google.de/url?sa=t&url=https://daeguop.weebly.com/blog/how-does-a-hot-stone-massage-respond
https://www.google.cz/url?sa=t&url=https://daeguop.weebly.com/blog/how-does-a-hot-stone-massage-respond
https://www.google.com/url?sa=t&url=https://daeguop.weebly.com/blog/how-does-a-hot-stone-massage-respond
https://www.google.com.vn/url?sa=t&url=https://daeguop.weebly.com/blog/how-does-a-hot-stone-massage-respond
https://www.google.com.uy/url?sa=t&url=https://daeguop.weebly.com/blog/how-does-a-hot-stone-massage-respond
https://www.google.com.ua/url?sa=t&url=https://daeguop.weebly.com/blog/how-does-a-hot-stone-massage-respond
https://www.google.com.tw/url?sa=t&url=https://daeguop.weebly.com/blog/how-does-a-hot-stone-massage-respond
https://www.google.com.tr/url?sa=t&url=https://daeguop.weebly.com/blog/how-does-a-hot-stone-massage-respond
https://www.google.com.sv/url?sa=t&url=https://daeguop.weebly.com/blog/how-does-a-hot-stone-massage-respond
https://www.google.com.sg/url?sa=t&url=https://daeguop.weebly.com/blog/how-does-a-hot-stone-massage-respond
https://www.google.com.sa/url?sa=t&url=https://daeguop.weebly.com/blog/how-does-a-hot-stone-massage-respond
https://www.google.com.qa/url?sa=t&url=https://daeguop.weebly.com/blog/how-does-a-hot-stone-massage-respond
https://www.google.com.py/url?sa=t&url=https://daeguop.weebly.com/blog/how-does-a-hot-stone-massage-respond
https://www.google.com.pr/url?sa=t&url=https://daeguop.weebly.com/blog/how-does-a-hot-stone-massage-respond
https://www.google.com.pk/url?sa=t&url=https://daeguop.weebly.com/blog/how-does-a-hot-stone-massage-respond
https://www.google.com.ph/url?sa=t&url=https://daeguop.weebly.com/blog/how-does-a-hot-stone-massage-respond
https://www.google.com.pe/url?sa=t&url=https://daeguop.weebly.com/blog/how-does-a-hot-stone-massage-respond
https://www.google.com.pa/url?sa=t&url=https://daeguop.weebly.com/blog/how-does-a-hot-stone-massage-respond
https://www.google.com.om/url?sa=t&url=https://daeguop.weebly.com/blog/how-does-a-hot-stone-massage-respond
https://www.google.com.ni/url?sa=t&url=https://daeguop.weebly.com/blog/how-does-a-hot-stone-massage-respond
https://www.google.com.ng/url?sa=t&url=https://daeguop.weebly.com/blog/how-does-a-hot-stone-massage-respond
https://www.google.com.na/url?sa=t&url=https://daeguop.weebly.com/blog/how-does-a-hot-stone-massage-respond
https://www.google.com.mz/url?sa=t&url=https://daeguop.weebly.com/blog/how-does-a-hot-stone-massage-respond
https://www.google.com.my/url?sa=t&url=https://daeguop.weebly.com/blog/how-does-a-hot-stone-massage-respond
https://www.google.com.mx/url?sa=t&url=https://daeguop.weebly.com/blog/how-does-a-hot-stone-massage-respond
https://www.google.com.mt/url?sa=t&url=https://daeguop.weebly.com/blog/how-does-a-hot-stone-massage-respond
https://www.google.com.ly/url?sa=t&url=https://daeguop.weebly.com/blog/how-does-a-hot-stone-massage-respond
https://www.google.com.lb/url?sa=t&url=https://daeguop.weebly.com/blog/how-does-a-hot-stone-massage-respond
https://www.google.com.kw/url?sa=t&url=https://daeguop.weebly.com/blog/how-does-a-hot-stone-massage-respond
https://www.google.com.kh/url?sa=t&url=https://daeguop.weebly.com/blog/how-does-a-hot-stone-massage-respond
https://www.google.com.jm/url?sa=t&url=https://daeguop.weebly.com/blog/how-does-a-hot-stone-massage-respond
https://www.google.com.hk/url?sa=t&url=https://daeguop.weebly.com/blog/how-does-a-hot-stone-massage-respond
https://www.google.com.gt/url?sa=t&url=https://daeguop.weebly.com/blog/how-does-a-hot-stone-massage-respond
https://www.google.com.gi/url?sa=t&url=https://daeguop.weebly.com/blog/how-does-a-hot-stone-massage-respond
https://www.google.com.gh/url?sa=t&url=https://daeguop.weebly.com/blog/how-does-a-hot-stone-massage-respond
https://www.google.com.fj/url?sa=t&url=https://daeguop.weebly.com/blog/how-does-a-hot-stone-massage-respond
https://www.google.com.et/url?sa=t&url=https://daeguop.weebly.com/blog/how-does-a-hot-stone-massage-respond
https://www.google.com.eg/url?sa=t&url=https://daeguop.weebly.com/blog/how-does-a-hot-stone-massage-respond
https://www.google.com.ec/url?sa=t&url=https://daeguop.weebly.com/blog/how-does-a-hot-stone-massage-respond
https://www.google.com.do/url?sa=t&url=https://daeguop.weebly.com/blog/how-does-a-hot-stone-massage-respond
https://www.google.com.cy/url?sa=t&url=https://daeguop.weebly.com/blog/how-does-a-hot-stone-massage-respond
https://www.google.com.cu/url?sa=t&url=https://daeguop.weebly.com/blog/how-does-a-hot-stone-massage-respond
https://www.google.com.co/url?sa=t&url=https://daeguop.weebly.com/blog/how-does-a-hot-stone-massage-respond
https://www.google.com.bz/url?sa=t&url=https://daeguop.weebly.com/blog/how-does-a-hot-stone-massage-respond
https://www.google.com.br/url?sa=t&url=https://daeguop.weebly.com/blog/how-does-a-hot-stone-massage-respond
https://www.google.com.bo/url?sa=t&url=https://daeguop.weebly.com/blog/how-does-a-hot-stone-massage-respond
https://www.google.com.bn/url?sa=t&url=https://daeguop.weebly.com/blog/how-does-a-hot-stone-massage-respond
https://www.google.com.bh/url?sa=t&url=https://daeguop.weebly.com/blog/how-does-a-hot-stone-massage-respond
https://www.google.com.bd/url?sa=t&url=https://daeguop.weebly.com/blog/how-does-a-hot-stone-massage-respond
https://www.google.com.au/url?sa=t&url=https://daeguop.weebly.com/blog/how-does-a-hot-stone-massage-respond
https://www.google.com.ar/url?sa=t&url=https://daeguop.weebly.com/blog/how-does-a-hot-stone-massage-respond
https://www.google.com.ag/url?sa=t&url=https://daeguop.weebly.com/blog/how-does-a-hot-stone-massage-respond
https://www.google.com.af/url?sa=t&url=https://daeguop.weebly.com/blog/how-does-a-hot-stone-massage-respond
https://www.google.co.za/url?sa=t&url=https://daeguop.weebly.com/blog/how-does-a-hot-stone-massage-respond
https://www.google.co.ve/url?sa=t&url=https://daeguop.weebly.com/blog/how-does-a-hot-stone-massage-respond
https://www.google.co.uk/url?sa=t&url=https://daeguop.weebly.com/blog/how-does-a-hot-stone-massage-respond
https://www.google.co.ug/url?sa=t&url=https://daeguop.weebly.com/blog/how-does-a-hot-stone-massage-respond
https://www.google.co.tz/url?sa=t&url=https://daeguop.weebly.com/blog/how-does-a-hot-stone-massage-respond
https://www.google.co.th/url?sa=t&url=https://daeguop.weebly.com/blog/how-does-a-hot-stone-massage-respond
https://www.google.co.nz/url?sa=t&url=https://daeguop.weebly.com/blog/how-does-a-hot-stone-massage-respond
https://www.google.co.ma/url?sa=t&url=https://daeguop.weebly.com/blog/how-does-a-hot-stone-massage-respond
https://www.google.co.ls/url?sa=t&url=https://daeguop.weebly.com/blog/how-does-a-hot-stone-massage-respond
https://www.google.co.kr/url?sa=t&url=https://daeguop.weebly.com/blog/how-does-a-hot-stone-massage-respond
https://www.google.co.ke/url?sa=t&url=https://daeguop.weebly.com/blog/how-does-a-hot-stone-massage-respond
https://www.google.co.jp/url?sa=t&url=https://daeguop.weebly.com/blog/how-does-a-hot-stone-massage-respond
https://www.google.co.in/url?sa=t&url=https://daeguop.weebly.com/blog/how-does-a-hot-stone-massage-respond
https://www.google.co.il/url?sa=t&url=https://daeguop.weebly.com/blog/how-does-a-hot-stone-massage-respond
https://www.google.co.id/url?sa=t&url=https://daeguop.weebly.com/blog/how-does-a-hot-stone-massage-respond
https://www.google.co.cr/url?sa=t&url=https://daeguop.weebly.com/blog/how-does-a-hot-stone-massage-respond
https://www.google.co.bw/url?sa=t&url=https://daeguop.weebly.com/blog/how-does-a-hot-stone-massage-respond
https://www.google.cm/url?sa=t&url=https://daeguop.weebly.com/blog/how-does-a-hot-stone-massage-respond
https://www.google.cl/url?sa=t&url=https://daeguop.weebly.com/blog/how-does-a-hot-stone-massage-respond
https://www.google.ci/url?sa=t&url=https://daeguop.weebly.com/blog/how-does-a-hot-stone-massage-respond
https://www.google.ch/url?sa=t&url=https://daeguop.weebly.com/blog/how-does-a-hot-stone-massage-respond
https://www.google.cd/url?sa=t&url=https://daeguop.weebly.com/blog/how-does-a-hot-stone-massage-respond
https://www.google.cat/url?sa=t&url=https://daeguop.weebly.com/blog/how-does-a-hot-stone-massage-respond
https://www.google.ca/url?sa=t&url=https://daeguop.weebly.com/blog/how-does-a-hot-stone-massage-respond
https://www.google.by/url?sa=t&url=https://daeguop.weebly.com/blog/how-does-a-hot-stone-massage-respond
https://www.google.bs/url?sa=t&url=https://daeguop.weebly.com/blog/how-does-a-hot-stone-massage-respond
https://www.google.bi/url?sa=t&url=https://daeguop.weebly.com/blog/how-does-a-hot-stone-massage-respond
https://www.google.bg/url?sa=t&url=https://daeguop.weebly.com/blog/how-does-a-hot-stone-massage-respond
https://www.google.bf/url?sa=t&url=https://daeguop.weebly.com/blog/how-does-a-hot-stone-massage-respond
https://www.google.be/url?sa=t&url=https://daeguop.weebly.com/blog/how-does-a-hot-stone-massage-respond
https://www.google.ba/url?sa=t&url=https://daeguop.weebly.com/blog/how-does-a-hot-stone-massage-respond
https://www.google.az/url?sa=t&url=https://daeguop.weebly.com/blog/how-does-a-hot-stone-massage-respond
https://www.google.at/url?sa=t&url=https://daeguop.weebly.com/blog/how-does-a-hot-stone-massage-respond
https://www.google.as/url?sa=t&url=https://daeguop.weebly.com/blog/how-does-a-hot-stone-massage-respond
https://www.google.am/url?sa=t&url=https://daeguop.weebly.com/blog/how-does-a-hot-stone-massage-respond
https://www.google.al/url?sa=t&url=https://daeguop.weebly.com/blog/how-does-a-hot-stone-massage-respond
https://www.google.ae/url?sa=t&url=https://daeguop.weebly.com/blog/how-does-a-hot-stone-massage-respond
https://www.google.ad/url?sa=t&url=https://daeguop.weebly.com/blog/how-does-a-hot-stone-massage-respond
https://plus.google.com/url?q=https://daeguop.weebly.com/blog/how-does-a-hot-stone-massage-respond
https://maps.google.tn/url?sa=t&url=https://daeguop.weebly.com/blog/how-does-a-hot-stone-massage-respond
https://maps.google.sn/url?sa=t&url=https://daeguop.weebly.com/blog/how-does-a-hot-stone-massage-respond
https://maps.google.sk/url?sa=t&url=https://daeguop.weebly.com/blog/how-does-a-hot-stone-massage-respond
https://maps.google.si/url?sa=t&url=https://daeguop.weebly.com/blog/how-does-a-hot-stone-massage-respond
https://maps.google.sh/url?sa=t&url=https://daeguop.weebly.com/blog/how-does-a-hot-stone-massage-respond
https://maps.google.se/url?sa=t&url=https://daeguop.weebly.com/blog/how-does-a-hot-stone-massage-respond
https://maps.google.rw/url?sa=t&url=https://daeguop.weebly.com/blog/how-does-a-hot-stone-massage-respond
https://maps.google.ru/url?sa=t&url=https://daeguop.weebly.com/blog/how-does-a-hot-stone-massage-respond
https://maps.google.rs/url?sa=t&url=https://daeguop.weebly.com/blog/how-does-a-hot-stone-massage-respond
https://maps.google.ro/url?sa=t&url=https://daeguop.weebly.com/blog/how-does-a-hot-stone-massage-respond
https://maps.google.pt/url?sa=t&url=https://daeguop.weebly.com/blog/how-does-a-hot-stone-massage-respond
https://maps.google.pl/url?sa=t&url=https://daeguop.weebly.com/blog/how-does-a-hot-stone-massage-respond
https://maps.google.no/url?sa=t&url=https://daeguop.weebly.com/blog/how-does-a-hot-stone-massage-respond
https://maps.google.nl/url?sa=t&url=https://daeguop.weebly.com/blog/how-does-a-hot-stone-massage-respond
https://maps.google.mw/url?sa=t&url=https://daeguop.weebly.com/blog/how-does-a-hot-stone-massage-respond
https://maps.google.mv/url?sa=t&url=https://daeguop.weebly.com/blog/how-does-a-hot-stone-massage-respond
https://maps.google.mu/url?sa=t&url=https://daeguop.weebly.com/blog/how-does-a-hot-stone-massage-respond
https://maps.google.ms/url?sa=t&url=https://daeguop.weebly.com/blog/how-does-a-hot-stone-massage-respond
https://maps.google.mn/url?sa=t&url=https://daeguop.weebly.com/blog/how-does-a-hot-stone-massage-respond
https://maps.google.mk/url?sa=t&url=https://daeguop.weebly.com/blog/how-does-a-hot-stone-massage-respond
https://maps.google.mg/url?sa=t&url=https://daeguop.weebly.com/blog/how-does-a-hot-stone-massage-respond
https://maps.google.lv/url?sa=t&url=https://daeguop.weebly.com/blog/how-does-a-hot-stone-massage-respond
https://maps.google.lu/url?sa=t&url=https://daeguop.weebly.com/blog/how-does-a-hot-stone-massage-respond
https://maps.google.lt/url?sa=t&url=https://daeguop.weebly.com/blog/how-does-a-hot-stone-massage-respond
https://maps.google.lk/url?sa=t&url=https://daeguop.weebly.com/blog/how-does-a-hot-stone-massage-respond
https://maps.google.li/url?sa=t&url=https://daeguop.weebly.com/blog/how-does-a-hot-stone-massage-respond
https://maps.google.la/url?sa=t&url=https://daeguop.weebly.com/blog/how-does-a-hot-stone-massage-respond
https://maps.google.kz/url?sa=t&url=https://daeguop.weebly.com/blog/how-does-a-hot-stone-massage-respond
https://maps.google.kg/url?sa=t&url=https://daeguop.weebly.com/blog/how-does-a-hot-stone-massage-respond
https://maps.google.jo/url?sa=t&url=https://daeguop.weebly.com/blog/how-does-a-hot-stone-massage-respond
https://maps.google.je/url?sa=t&url=https://daeguop.weebly.com/blog/how-does-a-hot-stone-massage-respond
https://maps.google.it/url?sa=t&url=https://daeguop.weebly.com/blog/how-does-a-hot-stone-massage-respond
https://maps.google.is/url?sa=t&url=https://daeguop.weebly.com/blog/how-does-a-hot-stone-massage-respond
https://maps.google.iq/url?sa=t&url=https://daeguop.weebly.com/blog/how-does-a-hot-stone-massage-respond
https://maps.google.ie/url?sa=t&url=https://daeguop.weebly.com/blog/how-does-a-hot-stone-massage-respond
https://maps.google.hu/url?sa=t&url=https://daeguop.weebly.com/blog/how-does-a-hot-stone-massage-respond
https://maps.google.ht/url?sa=t&url=https://daeguop.weebly.com/blog/how-does-a-hot-stone-massage-respond
https://maps.google.hr/url?sa=t&url=https://daeguop.weebly.com/blog/how-does-a-hot-stone-massage-respond
https://maps.google.hn/url?sa=t&url=https://daeguop.weebly.com/blog/how-does-a-hot-stone-massage-respond
https://maps.google.gr/url?sa=t&url=https://daeguop.weebly.com/blog/how-does-a-hot-stone-massage-respond
https://maps.google.gm/url?sa=t&url=https://daeguop.weebly.com/blog/how-does-a-hot-stone-massage-respond
https://maps.google.gl/url?sa=t&url=https://daeguop.weebly.com/blog/how-does-a-hot-stone-massage-respond
https://maps.google.gg/url?sa=t&url=https://daeguop.weebly.com/blog/how-does-a-hot-stone-massage-respond
https://maps.google.ge/url?sa=t&url=https://daeguop.weebly.com/blog/how-does-a-hot-stone-massage-respond
https://maps.google.fr/url?sa=t&url=https://daeguop.weebly.com/blog/how-does-a-hot-stone-massage-respond
https://maps.google.fm/url?sa=t&url=https://daeguop.weebly.com/blog/how-does-a-hot-stone-massage-respond
https://maps.google.fi/url?sa=t&url=https://daeguop.weebly.com/blog/how-does-a-hot-stone-massage-respond
https://maps.google.es/url?sa=t&url=https://daeguop.weebly.com/blog/how-does-a-hot-stone-massage-respond
https://maps.google.ee/url?sa=t&url=https://daeguop.weebly.com/blog/how-does-a-hot-stone-massage-respond
https://maps.google.dz/url?sa=t&url=https://daeguop.weebly.com/blog/how-does-a-hot-stone-massage-respond
https://maps.google.dk/url?sa=t&url=https://daeguop.weebly.com/blog/how-does-a-hot-stone-massage-respond
https://maps.google.dj/url?sa=t&url=https://daeguop.weebly.com/blog/how-does-a-hot-stone-massage-respond
https://maps.google.de/url?sa=t&url=https://daeguop.weebly.com/blog/how-does-a-hot-stone-massage-respond
https://maps.google.cz/url?sa=t&url=https://daeguop.weebly.com/blog/how-does-a-hot-stone-massage-respond
https://maps.google.com/url?sa=t&url=https://daeguop.weebly.com/blog/how-does-a-hot-stone-massage-respond
https://maps.google.com.uy/url?sa=t&url=https://daeguop.weebly.com/blog/how-does-a-hot-stone-massage-respond
https://maps.google.com.ua/url?sa=t&url=https://daeguop.weebly.com/blog/how-does-a-hot-stone-massage-respond
https://maps.google.com.tw/url?sa=t&url=https://daeguop.weebly.com/blog/how-does-a-hot-stone-massage-respond
https://maps.google.com.tr/url?sa=t&url=https://daeguop.weebly.com/blog/how-does-a-hot-stone-massage-respond
https://maps.google.com.sv/url?sa=t&url=https://daeguop.weebly.com/blog/how-does-a-hot-stone-massage-respond
https://maps.google.com.sg/url?sa=t&url=https://daeguop.weebly.com/blog/how-does-a-hot-stone-massage-respond
https://maps.google.com.sa/url?sa=t&url=https://daeguop.weebly.com/blog/how-does-a-hot-stone-massage-respond
https://maps.google.com.qa/url?sa=t&url=https://daeguop.weebly.com/blog/how-does-a-hot-stone-massage-respond
https://maps.google.com.py/url?sa=t&url=https://daeguop.weebly.com/blog/how-does-a-hot-stone-massage-respond
https://maps.google.com.pr/url?sa=t&url=https://daeguop.weebly.com/blog/how-does-a-hot-stone-massage-respond
https://maps.google.com.ph/url?sa=t&url=https://daeguop.weebly.com/blog/how-does-a-hot-stone-massage-respond
https://maps.google.com.pe/url?sa=t&url=https://daeguop.weebly.com/blog/how-does-a-hot-stone-massage-respond
https://maps.google.com.pa/url?sa=t&url=https://daeguop.weebly.com/blog/how-does-a-hot-stone-massage-respond
https://maps.google.com.om/url?sa=t&url=https://daeguop.weebly.com/blog/how-does-a-hot-stone-massage-respond
https://maps.google.com.ni/url?sa=t&url=https://daeguop.weebly.com/blog/how-does-a-hot-stone-massage-respond
https://maps.google.com.ng/url?sa=t&url=https://daeguop.weebly.com/blog/how-does-a-hot-stone-massage-respond
https://maps.google.com.na/url?sa=t&url=https://daeguop.weebly.com/blog/how-does-a-hot-stone-massage-respond
https://maps.google.com.mz/url?sa=t&url=https://daeguop.weebly.com/blog/how-does-a-hot-stone-massage-respond
https://maps.google.com.my/url?sa=t&url=https://daeguop.weebly.com/blog/how-does-a-hot-stone-massage-respond
https://maps.google.com.mx/url?sa=t&url=https://daeguop.weebly.com/blog/how-does-a-hot-stone-massage-respond
https://maps.google.com.mt/url?sa=t&url=https://daeguop.weebly.com/blog/how-does-a-hot-stone-massage-respond
https://maps.google.com.ly/url?sa=t&url=https://daeguop.weebly.com/blog/how-does-a-hot-stone-massage-respond
https://maps.google.com.lb/url?sa=t&url=https://daeguop.weebly.com/blog/how-does-a-hot-stone-massage-respond
https://maps.google.com.kw/url?sa=t&url=https://daeguop.weebly.com/blog/how-does-a-hot-stone-massage-respond
https://maps.google.com.kh/url?sa=t&url=https://daeguop.weebly.com/blog/how-does-a-hot-stone-massage-respond
https://maps.google.com.jm/url?sa=t&url=https://daeguop.weebly.com/blog/how-does-a-hot-stone-massage-respond
https://maps.google.com.hk/url?sa=t&url=https://daeguop.weebly.com/blog/how-does-a-hot-stone-massage-respond
https://maps.google.com.gt/url?sa=t&url=https://daeguop.weebly.com/blog/how-does-a-hot-stone-massage-respond
https://maps.google.com.gi/url?sa=t&url=https://daeguop.weebly.com/blog/how-does-a-hot-stone-massage-respond
https://maps.google.com.gh/url?sa=t&url=https://daeguop.weebly.com/blog/how-does-a-hot-stone-massage-respond
https://maps.google.com.fj/url?sa=t&url=https://daeguop.weebly.com/blog/how-does-a-hot-stone-massage-respond
https://maps.google.com.et/url?sa=t&url=https://daeguop.weebly.com/blog/how-does-a-hot-stone-massage-respond
https://maps.google.com.eg/url?sa=t&url=https://daeguop.weebly.com/blog/how-does-a-hot-stone-massage-respond
https://maps.google.com.ec/url?sa=t&url=https://daeguop.weebly.com/blog/how-does-a-hot-stone-massage-respond
https://maps.google.com.do/url?sa=t&url=https://daeguop.weebly.com/blog/how-does-a-hot-stone-massage-respond
https://maps.google.com.cu/url?sa=t&url=https://daeguop.weebly.com/blog/how-does-a-hot-stone-massage-respond
https://maps.google.com.co/url?sa=t&url=https://daeguop.weebly.com/blog/how-does-a-hot-stone-massage-respond
https://maps.google.com.bz/url?sa=t&url=https://daeguop.weebly.com/blog/how-does-a-hot-stone-massage-respond
https://maps.google.com.br/url?sa=t&url=https://daeguop.weebly.com/blog/how-does-a-hot-stone-massage-respond
https://maps.google.com.bo/url?sa=t&url=https://daeguop.weebly.com/blog/how-does-a-hot-stone-massage-respond
https://maps.google.com.bn/url?sa=t&url=https://daeguop.weebly.com/blog/how-does-a-hot-stone-massage-respond
https://maps.google.com.bh/url?sa=t&url=https://daeguop.weebly.com/blog/how-does-a-hot-stone-massage-respond
https://maps.google.com.bd/url?sa=t&url=https://daeguop.weebly.com/blog/how-does-a-hot-stone-massage-respond
https://maps.google.com.au/url?sa=t&url=https://daeguop.weebly.com/blog/how-does-a-hot-stone-massage-respond
https://maps.google.com.ar/url?sa=t&url=https://daeguop.weebly.com/blog/how-does-a-hot-stone-massage-respond
https://maps.google.com.ag/url?sa=t&url=https://daeguop.weebly.com/blog/how-does-a-hot-stone-massage-respond
https://maps.google.co.za/url?sa=t&url=https://daeguop.weebly.com/blog/how-does-a-hot-stone-massage-respond
https://maps.google.co.ve/url?sa=t&url=https://daeguop.weebly.com/blog/how-does-a-hot-stone-massage-respond
https://maps.google.co.uk/url?sa=t&url=https://daeguop.weebly.com/blog/how-does-a-hot-stone-massage-respond
https://maps.google.co.ug/url?sa=t&url=https://daeguop.weebly.com/blog/how-does-a-hot-stone-massage-respond
https://maps.google.co.tz/url?sa=t&url=https://daeguop.weebly.com/blog/how-does-a-hot-stone-massage-respond
https://maps.google.co.th/url?sa=t&url=https://daeguop.weebly.com/blog/how-does-a-hot-stone-massage-respond
https://maps.google.co.nz/url?sa=t&url=https://daeguop.weebly.com/blog/how-does-a-hot-stone-massage-respond
https://maps.google.co.ls/url?sa=t&url=https://daeguop.weebly.com/blog/how-does-a-hot-stone-massage-respond
https://maps.google.co.kr/url?sa=t&url=https://daeguop.weebly.com/blog/how-does-a-hot-stone-massage-respond
https://maps.google.co.ke/url?sa=t&url=https://daeguop.weebly.com/blog/how-does-a-hot-stone-massage-respond
https://maps.google.co.jp/url?sa=t&url=https://daeguop.weebly.com/blog/how-does-a-hot-stone-massage-respond
https://maps.google.co.in/url?sa=t&url=https://daeguop.weebly.com/blog/how-does-a-hot-stone-massage-respond
https://maps.google.co.il/url?sa=t&url=https://daeguop.weebly.com/blog/how-does-a-hot-stone-massage-respond
https://maps.google.co.id/url?sa=t&url=https://daeguop.weebly.com/blog/how-does-a-hot-stone-massage-respond
https://maps.google.co.cr/url?sa=t&url=https://daeguop.weebly.com/blog/how-does-a-hot-stone-massage-respond
https://maps.google.co.bw/url?sa=t&url=https://daeguop.weebly.com/blog/how-does-a-hot-stone-massage-respond
https://maps.google.cm/url?sa=t&url=https://daeguop.weebly.com/blog/how-does-a-hot-stone-massage-respond
https://maps.google.cl/url?sa=t&url=https://daeguop.weebly.com/blog/how-does-a-hot-stone-massage-respond
https://maps.google.ci/url?sa=t&url=https://daeguop.weebly.com/blog/how-does-a-hot-stone-massage-respond
https://maps.google.ch/url?sa=t&url=https://daeguop.weebly.com/blog/how-does-a-hot-stone-massage-respond
https://maps.google.cd/url?sa=t&url=https://daeguop.weebly.com/blog/how-does-a-hot-stone-massage-respond
https://maps.google.cat/url?sa=t&url=https://daeguop.weebly.com/blog/how-does-a-hot-stone-massage-respond
https://maps.google.ca/url?sa=t&url=https://daeguop.weebly.com/blog/how-does-a-hot-stone-massage-respond
https://maps.google.by/url?sa=t&url=https://daeguop.weebly.com/blog/how-does-a-hot-stone-massage-respond
https://maps.google.bs/url?sa=t&url=https://daeguop.weebly.com/blog/how-does-a-hot-stone-massage-respond
https://maps.google.bi/url?sa=t&url=https://daeguop.weebly.com/blog/how-does-a-hot-stone-massage-respond
https://maps.google.bg/url?sa=t&url=https://daeguop.weebly.com/blog/how-does-a-hot-stone-massage-respond
https://maps.google.bf/url?sa=t&url=https://daeguop.weebly.com/blog/how-does-a-hot-stone-massage-respond
https://maps.google.be/url?sa=t&url=https://daeguop.weebly.com/blog/how-does-a-hot-stone-massage-respond
https://maps.google.ba/url?sa=t&url=https://daeguop.weebly.com/blog/how-does-a-hot-stone-massage-respond
https://maps.google.at/url?sa=t&url=https://daeguop.weebly.com/blog/how-does-a-hot-stone-massage-respond
https://maps.google.as/url?sa=t&url=https://daeguop.weebly.com/blog/how-does-a-hot-stone-massage-respond
https://maps.google.ae/url?sa=t&url=https://daeguop.weebly.com/blog/how-does-a-hot-stone-massage-respond
https://maps.google.ad/url?sa=t&url=https://daeguop.weebly.com/blog/how-does-a-hot-stone-massage-respond
https://images.google.tn/url?sa=t&url=https://daeguop.weebly.com/blog/how-does-a-hot-stone-massage-respond
https://images.google.sn/url?sa=t&url=https://daeguop.weebly.com/blog/how-does-a-hot-stone-massage-respond
https://images.google.sk/url?sa=t&url=https://daeguop.weebly.com/blog/how-does-a-hot-stone-massage-respond
https://images.google.si/url?sa=t&url=https://daeguop.weebly.com/blog/how-does-a-hot-stone-massage-respond
https://images.google.sh/url?sa=t&url=https://daeguop.weebly.com/blog/how-does-a-hot-stone-massage-respond
https://images.google.se/url?sa=t&url=https://daeguop.weebly.com/blog/how-does-a-hot-stone-massage-respond
https://images.google.rw/url?sa=t&url=https://daeguop.weebly.com/blog/how-does-a-hot-stone-massage-respond
https://images.google.ru/url?sa=t&url=https://daeguop.weebly.com/blog/how-does-a-hot-stone-massage-respond
https://images.google.rs/url?sa=t&url=https://daeguop.weebly.com/blog/how-does-a-hot-stone-massage-respond
https://images.google.ro/url?sa=t&url=https://daeguop.weebly.com/blog/how-does-a-hot-stone-massage-respond
https://images.google.pt/url?sa=t&url=https://daeguop.weebly.com/blog/how-does-a-hot-stone-massage-respond
https://images.google.ps/url?sa=t&url=https://daeguop.weebly.com/blog/how-does-a-hot-stone-massage-respond
https://images.google.pl/url?sa=t&url=https://daeguop.weebly.com/blog/how-does-a-hot-stone-massage-respond
https://images.google.no/url?sa=t&url=https://daeguop.weebly.com/blog/how-does-a-hot-stone-massage-respond
https://images.google.nl/url?sa=t&url=https://daeguop.weebly.com/blog/how-does-a-hot-stone-massage-respond
https://images.google.mw/url?sa=t&url=https://daeguop.weebly.com/blog/how-does-a-hot-stone-massage-respond
https://images.google.mv/url?sa=t&url=https://daeguop.weebly.com/blog/how-does-a-hot-stone-massage-respond
https://images.google.mu/url?sa=t&url=https://daeguop.weebly.com/blog/how-does-a-hot-stone-massage-respond
https://images.google.ms/url?sa=t&url=https://daeguop.weebly.com/blog/how-does-a-hot-stone-massage-respond
https://images.google.mn/url?sa=t&url=https://daeguop.weebly.com/blog/how-does-a-hot-stone-massage-respond
https://images.google.mk/url?sa=t&url=https://daeguop.weebly.com/blog/how-does-a-hot-stone-massage-respond
https://images.google.mg/url?sa=t&url=https://daeguop.weebly.com/blog/how-does-a-hot-stone-massage-respond
https://images.google.me/url?sa=t&url=https://daeguop.weebly.com/blog/how-does-a-hot-stone-massage-respond
https://images.google.md/url?sa=t&url=https://daeguop.weebly.com/blog/how-does-a-hot-stone-massage-respond
https://images.google.lv/url?sa=t&url=https://daeguop.weebly.com/blog/how-does-a-hot-stone-massage-respond
https://images.google.lu/url?sa=t&url=https://daeguop.weebly.com/blog/how-does-a-hot-stone-massage-respond
https://images.google.lt/url?sa=t&url=https://daeguop.weebly.com/blog/how-does-a-hot-stone-massage-respond
https://images.google.lk/url?sa=t&url=https://daeguop.weebly.com/blog/how-does-a-hot-stone-massage-respond
https://images.google.li/url?sa=t&url=https://daeguop.weebly.com/blog/how-does-a-hot-stone-massage-respond
https://images.google.la/url?sa=t&url=https://daeguop.weebly.com/blog/how-does-a-hot-stone-massage-respond
https://images.google.kz/url?sa=t&url=https://daeguop.weebly.com/blog/how-does-a-hot-stone-massage-respond
https://images.google.kg/url?sa=t&url=https://daeguop.weebly.com/blog/how-does-a-hot-stone-massage-respond
https://images.google.jo/url?sa=t&url=https://daeguop.weebly.com/blog/how-does-a-hot-stone-massage-respond
https://images.google.je/url?sa=t&url=https://daeguop.weebly.com/blog/how-does-a-hot-stone-massage-respond
https://images.google.it/url?sa=t&url=https://daeguop.weebly.com/blog/how-does-a-hot-stone-massage-respond
https://images.google.is/url?sa=t&url=https://daeguop.weebly.com/blog/how-does-a-hot-stone-massage-respond
https://images.google.iq/url?sa=t&url=https://daeguop.weebly.com/blog/how-does-a-hot-stone-massage-respond
https://images.google.ie/url?sa=t&url=https://daeguop.weebly.com/blog/how-does-a-hot-stone-massage-respond
https://images.google.hu/url?sa=t&url=https://daeguop.weebly.com/blog/how-does-a-hot-stone-massage-respond
https://images.google.ht/url?sa=t&url=https://daeguop.weebly.com/blog/how-does-a-hot-stone-massage-respond
https://images.google.hr/url?sa=t&url=https://daeguop.weebly.com/blog/how-does-a-hot-stone-massage-respond
https://images.google.hn/url?sa=t&url=https://daeguop.weebly.com/blog/how-does-a-hot-stone-massage-respond
https://images.google.gr/url?sa=t&url=https://daeguop.weebly.com/blog/how-does-a-hot-stone-massage-respond
https://images.google.gp/url?sa=t&url=https://daeguop.weebly.com/blog/how-does-a-hot-stone-massage-respond
https://images.google.gm/url?sa=t&url=https://daeguop.weebly.com/blog/how-does-a-hot-stone-massage-respond
https://images.google.gl/url?sa=t&url=https://daeguop.weebly.com/blog/how-does-a-hot-stone-massage-respond
https://images.google.gg/url?sa=t&url=https://daeguop.weebly.com/blog/how-does-a-hot-stone-massage-respond
https://images.google.ge/url?sa=t&url=https://daeguop.weebly.com/blog/how-does-a-hot-stone-massage-respond
https://images.google.fr/url?sa=t&url=https://daeguop.weebly.com/blog/how-does-a-hot-stone-massage-respond
https://images.google.fm/url?sa=t&url=https://daeguop.weebly.com/blog/how-does-a-hot-stone-massage-respond
https://images.google.fi/url?sa=t&url=https://daeguop.weebly.com/blog/how-does-a-hot-stone-massage-respond
https://images.google.es/url?sa=t&url=https://daeguop.weebly.com/blog/how-does-a-hot-stone-massage-respond
https://images.google.ee/url?sa=t&url=https://daeguop.weebly.com/blog/how-does-a-hot-stone-massage-respond
https://images.google.dz/url?sa=t&url=https://daeguop.weebly.com/blog/how-does-a-hot-stone-massage-respond
https://images.google.dm/url?sa=t&url=https://daeguop.weebly.com/blog/how-does-a-hot-stone-massage-respond
https://images.google.dk/url?sa=t&url=https://daeguop.weebly.com/blog/how-does-a-hot-stone-massage-respond
https://images.google.dj/url?sa=t&url=https://daeguop.weebly.com/blog/how-does-a-hot-stone-massage-respond
https://images.google.de/url?sa=t&url=https://daeguop.weebly.com/blog/how-does-a-hot-stone-massage-respond
https://images.google.cz/url?sa=t&url=https://daeguop.weebly.com/blog/how-does-a-hot-stone-massage-respond
https://images.google.com/url?sa=t&url=https://daeguop.weebly.com/blog/how-does-a-hot-stone-massage-respond
https://images.google.com.vn/url?sa=t&url=https://daeguop.weebly.com/blog/how-does-a-hot-stone-massage-respond
https://images.google.com.vc/url?sa=t&url=https://daeguop.weebly.com/blog/how-does-a-hot-stone-massage-respond
https://images.google.com.uy/url?sa=t&url=https://daeguop.weebly.com/blog/how-does-a-hot-stone-massage-respond
https://images.google.com.ua/url?sa=t&url=https://daeguop.weebly.com/blog/how-does-a-hot-stone-massage-respond
https://images.google.com.tw/url?sa=t&url=https://daeguop.weebly.com/blog/how-does-a-hot-stone-massage-respond
https://images.google.com.tr/url?sa=t&url=https://daeguop.weebly.com/blog/how-does-a-hot-stone-massage-respond
https://images.google.com.sv/url?sa=t&url=https://daeguop.weebly.com/blog/how-does-a-hot-stone-massage-respond
https://images.google.com.sg/url?sa=t&url=https://daeguop.weebly.com/blog/how-does-a-hot-stone-massage-respond
https://images.google.com.sa/url?sa=t&url=https://daeguop.weebly.com/blog/how-does-a-hot-stone-massage-respond
https://images.google.com.qa/url?sa=t&url=https://daeguop.weebly.com/blog/how-does-a-hot-stone-massage-respond
https://images.google.com.py/url?sa=t&url=https://daeguop.weebly.com/blog/how-does-a-hot-stone-massage-respond
https://images.google.com.pr/url?sa=t&url=https://daeguop.weebly.com/blog/how-does-a-hot-stone-massage-respond
https://images.google.com.pk/url?sa=t&url=https://daeguop.weebly.com/blog/how-does-a-hot-stone-massage-respond
https://images.google.com.ph/url?sa=t&url=https://daeguop.weebly.com/blog/how-does-a-hot-stone-massage-respond
https://images.google.com.pe/url?sa=t&url=https://daeguop.weebly.com/blog/how-does-a-hot-stone-massage-respond
https://images.google.com.pa/url?sa=t&url=https://daeguop.weebly.com/blog/how-does-a-hot-stone-massage-respond
https://images.google.com.om/url?sa=t&url=https://daeguop.weebly.com/blog/how-does-a-hot-stone-massage-respond
https://images.google.com.np/url?sa=t&url=https://daeguop.weebly.com/blog/how-does-a-hot-stone-massage-respond
https://images.google.com.ni/url?sa=t&url=https://daeguop.weebly.com/blog/how-does-a-hot-stone-massage-respond
https://images.google.com.ng/url?sa=t&url=https://daeguop.weebly.com/blog/how-does-a-hot-stone-massage-respond
https://images.google.com.na/url?sa=t&url=https://daeguop.weebly.com/blog/how-does-a-hot-stone-massage-respond
https://images.google.com.mz/url?sa=t&url=https://daeguop.weebly.com/blog/how-does-a-hot-stone-massage-respond
https://images.google.com.my/url?sa=t&url=https://daeguop.weebly.com/blog/how-does-a-hot-stone-massage-respond
https://images.google.com.mx/url?sa=t&url=https://daeguop.weebly.com/blog/how-does-a-hot-stone-massage-respond
https://images.google.com.mt/url?sa=t&url=https://daeguop.weebly.com/blog/how-does-a-hot-stone-massage-respond
https://images.google.com.ly/url?sa=t&url=https://daeguop.weebly.com/blog/how-does-a-hot-stone-massage-respond
https://images.google.com.lb/url?sa=t&url=https://daeguop.weebly.com/blog/how-does-a-hot-stone-massage-respond
https://images.google.com.kw/url?sa=t&url=https://daeguop.weebly.com/blog/how-does-a-hot-stone-massage-respond
https://images.google.com.kh/url?sa=t&url=https://daeguop.weebly.com/blog/how-does-a-hot-stone-massage-respond
https://images.google.com.jm/url?sa=t&url=https://daeguop.weebly.com/blog/how-does-a-hot-stone-massage-respond
https://images.google.com.hk/url?sa=t&url=https://daeguop.weebly.com/blog/how-does-a-hot-stone-massage-respond
https://images.google.com.gt/url?sa=t&url=https://daeguop.weebly.com/blog/how-does-a-hot-stone-massage-respond
https://images.google.com.gi/url?sa=t&url=https://daeguop.weebly.com/blog/how-does-a-hot-stone-massage-respond
https://images.google.com.gh/url?sa=t&url=https://daeguop.weebly.com/blog/how-does-a-hot-stone-massage-respond
https://images.google.com.fj/url?sa=t&url=https://daeguop.weebly.com/blog/how-does-a-hot-stone-massage-respond
https://images.google.com.et/url?sa=t&url=https://daeguop.weebly.com/blog/how-does-a-hot-stone-massage-respond
https://images.google.com.eg/url?sa=t&url=https://daeguop.weebly.com/blog/how-does-a-hot-stone-massage-respond
https://images.google.com.ec/url?sa=t&url=https://daeguop.weebly.com/blog/how-does-a-hot-stone-massage-respond
https://images.google.com.do/url?sa=t&url=https://daeguop.weebly.com/blog/how-does-a-hot-stone-massage-respond
https://images.google.com.cy/url?sa=t&url=https://daeguop.weebly.com/blog/how-does-a-hot-stone-massage-respond
https://images.google.com.cu/url?sa=t&url=https://daeguop.weebly.com/blog/how-does-a-hot-stone-massage-respond
https://images.google.com.co/url?sa=t&url=https://daeguop.weebly.com/blog/how-does-a-hot-stone-massage-respond
https://images.google.com.bz/url?sa=t&url=https://daeguop.weebly.com/blog/how-does-a-hot-stone-massage-respond
https://images.google.com.br/url?sa=t&url=https://daeguop.weebly.com/blog/how-does-a-hot-stone-massage-respond
https://images.google.com.bo/url?sa=t&url=https://daeguop.weebly.com/blog/how-does-a-hot-stone-massage-respond
https://images.google.com.bn/url?sa=t&url=https://daeguop.weebly.com/blog/how-does-a-hot-stone-massage-respond
https://images.google.com.bh/url?sa=t&url=https://daeguop.weebly.com/blog/how-does-a-hot-stone-massage-respond
https://images.google.com.bd/url?sa=t&url=https://daeguop.weebly.com/blog/how-does-a-hot-stone-massage-respond
https://images.google.com.au/url?sa=t&url=https://daeguop.weebly.com/blog/how-does-a-hot-stone-massage-respond
https://images.google.com.ar/url?sa=t&url=https://daeguop.weebly.com/blog/how-does-a-hot-stone-massage-respond
https://images.google.com.ag/url?sa=t&url=https://daeguop.weebly.com/blog/how-does-a-hot-stone-massage-respond
https://images.google.com.af/url?sa=t&url=https://daeguop.weebly.com/blog/how-does-a-hot-stone-massage-respond
https://images.google.co.zm/url?sa=t&url=https://daeguop.weebly.com/blog/how-does-a-hot-stone-massage-respond
https://images.google.co.za/url?sa=t&url=https://daeguop.weebly.com/blog/how-does-a-hot-stone-massage-respond
https://images.google.co.za/url?q=https://daeguop.weebly.com/blog/how-does-a-hot-stone-massage-respond
https://images.google.co.ve/url?sa=t&url=https://daeguop.weebly.com/blog/how-does-a-hot-stone-massage-respond
https://images.google.co.uz/url?sa=t&url=https://daeguop.weebly.com/blog/how-does-a-hot-stone-massage-respond
https://images.google.co.uk/url?sa=t&url=https://daeguop.weebly.com/blog/how-does-a-hot-stone-massage-respond
https://images.google.co.ug/url?sa=t&url=https://daeguop.weebly.com/blog/how-does-a-hot-stone-massage-respond
https://images.google.co.tz/url?sa=t&url=https://daeguop.weebly.com/blog/how-does-a-hot-stone-massage-respond
https://images.google.co.th/url?sa=t&url=https://daeguop.weebly.com/blog/how-does-a-hot-stone-massage-respond
https://images.google.co.th/url?q=https://daeguop.weebly.com/blog/how-does-a-hot-stone-massage-respond
https://images.google.co.nz/url?sa=t&url=https://daeguop.weebly.com/blog/how-does-a-hot-stone-massage-respond
https://images.google.co.ma/url?sa=t&url=https://daeguop.weebly.com/blog/how-does-a-hot-stone-massage-respond
https://images.google.co.ls/url?sa=t&url=https://daeguop.weebly.com/blog/how-does-a-hot-stone-massage-respond
https://images.google.co.kr/url?sa=t&url=https://daeguop.weebly.com/blog/how-does-a-hot-stone-massage-respond
https://images.google.co.kr/url?q=https://daeguop.weebly.com/blog/how-does-a-hot-stone-massage-respond
https://images.google.co.ke/url?sa=t&url=https://daeguop.weebly.com/blog/how-does-a-hot-stone-massage-respond
https://images.google.co.jp/url?sa=t&url=https://daeguop.weebly.com/blog/how-does-a-hot-stone-massage-respond
https://images.google.co.in/url?sa=t&url=https://daeguop.weebly.com/blog/how-does-a-hot-stone-massage-respond
https://images.google.co.il/url?sa=t&url=https://daeguop.weebly.com/blog/how-does-a-hot-stone-massage-respond
https://images.google.co.id/url?sa=t&url=https://daeguop.weebly.com/blog/how-does-a-hot-stone-massage-respond
https://images.google.co.id/url?q=https://daeguop.weebly.com/blog/how-does-a-hot-stone-massage-respond
https://images.google.co.cr/url?sa=t&url=https://daeguop.weebly.com/blog/how-does-a-hot-stone-massage-respond
https://images.google.co.cr/url?q=https://daeguop.weebly.com/blog/how-does-a-hot-stone-massage-respond
https://images.google.co.ck/url?sa=t&url=https://daeguop.weebly.com/blog/how-does-a-hot-stone-massage-respond
https://images.google.co.bw/url?sa=t&url=https://daeguop.weebly.com/blog/how-does-a-hot-stone-massage-respond
https://images.google.cm/url?sa=t&url=https://daeguop.weebly.com/blog/how-does-a-hot-stone-massage-respond
https://images.google.cl/url?sa=t&url=https://daeguop.weebly.com/blog/how-does-a-hot-stone-massage-respond
https://images.google.ci/url?sa=t&url=https://daeguop.weebly.com/blog/how-does-a-hot-stone-massage-respond
https://images.google.ch/url?sa=t&url=https://daeguop.weebly.com/blog/how-does-a-hot-stone-massage-respond
https://images.google.cg/url?sa=t&url=https://daeguop.weebly.com/blog/how-does-a-hot-stone-massage-respond
https://images.google.cd/url?sa?sa=t&url=https://daeguop.weebly.com/blog/how-does-a-hot-stone-massage-respond
https://images.google.ca/url?sa=t&url=https://daeguop.weebly.com/blog/how-does-a-hot-stone-massage-respond
https://images.google.by/url?sa=t&url=https://daeguop.weebly.com/blog/how-does-a-hot-stone-massage-respond
https://images.google.bs/url?sa=t&url=https://daeguop.weebly.com/blog/how-does-a-hot-stone-massage-respond
https://images.google.bi/url?sa=t&url=https://daeguop.weebly.com/blog/how-does-a-hot-stone-massage-respond
https://images.google.bg/url?sa=t&url=https://daeguop.weebly.com/blog/how-does-a-hot-stone-massage-respond
https://images.google.bf/url?sa=t&url=https://daeguop.weebly.com/blog/how-does-a-hot-stone-massage-respond
https://images.google.be/url?sa=t&url=https://daeguop.weebly.com/blog/how-does-a-hot-stone-massage-respond
https://images.google.ba/url?sa=t&url=https://daeguop.weebly.com/blog/how-does-a-hot-stone-massage-respond
https://images.google.ba/url?q=https://daeguop.weebly.com/blog/how-does-a-hot-stone-massage-respond
바카라사이트 on November 29 2022 at 03:17AM
otizjess6@gmail.com 11/29/22
https://bit.ly/36En2s8+
카지노사이트 https://ce-top10.com/
바카라사이트 https://ce-top10.com/
온라인카지노 https://ce-top10.com/
온라인바카라 https://ce-top10.com/
온라인슬롯사이트 https://ce-top10.com/
카지노사이트게임 https://ce-top10.com/
카지노사이트검증 https://ce-top10.com/
카지노사이트추천 https://ce-top10.com/
안전카지노사이트 https://ce-top10.com/
안전카지노사이트도메인 https://ce-top10.com/
안전한 카지노사이트 추천 https://ce-top10.com/
바카라사이트게임 https://ce-top10.com/
바카라사이트검증 https://ce-top10.com/
바카라사이트추천 https://ce-top10.com/
안전바카라사이트 https://ce-top10.com/
안전바카라사이트도메인 https://ce-top10.com/
안전한 바카라사이트 추천 https://ce-top10.com/
http://toolbarqueries.google.com.uy/url?sa=t&url=https://ce-top10.com/
http://toolbarqueries.google.com.tw/url?sa=t&url=https://ce-top10.com/
http://toolbarqueries.google.com.tr/url?sa=t&url=https://ce-top10.com/
http://toolbarqueries.google.com.sa/url?sa=t&url=https://ce-top10.com/
http://toolbarqueries.google.com.py/url?sa=t&url=https://ce-top10.com/
http://toolbarqueries.google.com.pr/url?sa=t&url=https://ce-top10.com/
http://toolbarqueries.google.com.pk/url?sa=t&url=https://ce-top10.com/
http://toolbarqueries.google.com.pe/url?sa=t&url=https://ce-top10.com/
http://toolbarqueries.google.com.my/url?sa=t&url=https://ce-top10.com/
http://toolbarqueries.google.com.hk/url?sa=t&url=https://ce-top10.com/
http://toolbarqueries.google.com.gt/url?sa=t&url=https://ce-top10.com/
http://toolbarqueries.google.com.gh/url?sa=t&url=https://ce-top10.com/
https://clients1.google.com.ar/url?sa=t&url=https://ce-top10.com/
https://clients1.google.com.ag/url?sa=t&url=https://ce-top10.com/
https://clients1.google.co.zm/url?sa=t&url=https://ce-top10.com/
https://clients1.google.co.za/url?sa=t&url=https://ce-top10.com/
https://clients1.google.co.ve/url?sa=t&url=https://ce-top10.com/
https://clients1.google.co.uz/url?sa=t&url=https://ce-top10.com/
https://clients1.google.co.ug/url?sa=t&url=https://ce-top10.com/
https://clients1.google.co.th/url?sa=t&url=https://ce-top10.com/
https://clients1.google.co.nz/url?sa=t&url=https://ce-top10.com/
https://clients1.google.co.kr/url?sa=t&url=https://ce-top10.com/
https://clients1.google.co.ke/url?sa=t&url=https://ce-top10.com/
https://clients1.google.co.il/url?sa=t&url=https://ce-top10.com/
https://clients1.google.co.id/url?sa=t&url=https://ce-top10.com/
https://clients1.google.co.cr/url?sa=t&url=https://ce-top10.com/
https://clients1.google.co.ck/url?sa=t&url=https://ce-top10.com/
https://cse.google.co.ck/url?sa=t&url=https://ce-top10.com/
https://cse.google.co.bw/url?sa=t&url=https://ce-top10.com/
https://cse.google.cm/url?sa=t&url=https://ce-top10.com/
https://cse.google.cl/url?sa=t&url=https://ce-top10.com/
https://cse.google.ci/url?sa=t&url=https://ce-top10.com/
https://cse.google.ch/url?sa=t&url=https://ce-top10.com/
https://cse.google.ch/url?sa=i&url=https://ce-top10.com/
https://cse.google.cg/url?sa=t&url=https://ce-top10.com/
https://cse.google.cd/url?sa=t&url=https://ce-top10.com/
https://cse.google.by/url?sa=t&url=https://ce-top10.com/
https://cse.google.bs/url?sa=t&url=https://ce-top10.com/
https://cse.google.bi/url?sa=t&url=https://ce-top10.com/
https://cse.google.bg/url?sa=t&url=https://ce-top10.com/
https://cse.google.be/url?sa=t&url=https://ce-top10.com/
https://cse.google.be/url?sa=i&url=https://ce-top10.com/
https://cse.google.ba/url?sa=t&url=https://ce-top10.com/
https://cse.google.az/url?sa=t&url=https://ce-top10.com/
https://cse.google.at/url?sa=t&url=https://ce-top10.com/
https://images.google.ca/url?sa=t&url=http://casino1top.xyz/index.php/2022/11/29/mid-states-poker-tour-will-be-held-in-september-at-the-venetian-in-las-vegas/
https://images.google.by/url?sa=t&url=http://casino1top.xyz/index.php/2022/11/29/mid-states-poker-tour-will-be-held-in-september-at-the-venetian-in-las-vegas/
https://images.google.bs/url?sa=t&url=http://casino1top.xyz/index.php/2022/11/29/mid-states-poker-tour-will-be-held-in-september-at-the-venetian-in-las-vegas/
https://images.google.bi/url?sa=t&url=http://casino1top.xyz/index.php/2022/11/29/mid-states-poker-tour-will-be-held-in-september-at-the-venetian-in-las-vegas/
https://images.google.bg/url?sa=t&url=http://casino1top.xyz/index.php/2022/11/29/mid-states-poker-tour-will-be-held-in-september-at-the-venetian-in-las-vegas/
https://images.google.bf/url?sa=t&url=http://casino1top.xyz/index.php/2022/11/29/mid-states-poker-tour-will-be-held-in-september-at-the-venetian-in-las-vegas/
https://images.google.be/url?sa=t&url=http://casino1top.xyz/index.php/2022/11/29/mid-states-poker-tour-will-be-held-in-september-at-the-venetian-in-las-vegas/
https://images.google.ba/url?sa=t&url=http://casino1top.xyz/index.php/2022/11/29/mid-states-poker-tour-will-be-held-in-september-at-the-venetian-in-las-vegas/
https://images.google.ba/url?q=http://casino1top.xyz/index.php/2022/11/29/mid-states-poker-tour-will-be-held-in-september-at-the-venetian-in-las-vegas/
https://images.google.az/url?sa=t&url=http://casino1top.xyz/index.php/2022/11/29/mid-states-poker-tour-will-be-held-in-september-at-the-venetian-in-las-vegas/
https://images.google.at/url?sa=t&url=http://casino1top.xyz/index.php/2022/11/29/mid-states-poker-tour-will-be-held-in-september-at-the-venetian-in-las-vegas/
https://images.google.as/url?sa=t&url=http://casino1top.xyz/index.php/2022/11/29/mid-states-poker-tour-will-be-held-in-september-at-the-venetian-in-las-vegas/
https://images.google.am/url?sa=t&url=http://casino1top.xyz/index.php/2022/11/29/mid-states-poker-tour-will-be-held-in-september-at-the-venetian-in-las-vegas/
https://images.google.al/url?sa=t&url=http://casino1top.xyz/index.php/2022/11/29/mid-states-poker-tour-will-be-held-in-september-at-the-venetian-in-las-vegas/
https://images.google.ae/url?sa=t&url=http://casino1top.xyz/index.php/2022/11/29/mid-states-poker-tour-will-be-held-in-september-at-the-venetian-in-las-vegas/
https://images.google.ae/url?q=http://casino1top.xyz/index.php/2022/11/29/mid-states-poker-tour-will-be-held-in-september-at-the-venetian-in-las-vegas/
https://images.google.ad/url?sa=t&url=http://casino1top.xyz/index.php/2022/11/29/mid-states-poker-tour-will-be-held-in-september-at-the-venetian-in-las-vegas/
https://maps.google.co.ke/url?sa=t&url=http://casino1top.xyz/index.php/2022/11/29/mid-states-poker-tour-will-be-held-in-september-at-the-venetian-in-las-vegas/
https://maps.google.co.jp/url?sa=t&url=http://casino1top.xyz/index.php/2022/11/29/mid-states-poker-tour-will-be-held-in-september-at-the-venetian-in-las-vegas/
https://maps.google.co.in/url?sa=t&url=http://casino1top.xyz/index.php/2022/11/29/mid-states-poker-tour-will-be-held-in-september-at-the-venetian-in-las-vegas/
https://maps.google.co.il/url?sa=t&url=http://casino1top.xyz/index.php/2022/11/29/mid-states-poker-tour-will-be-held-in-september-at-the-venetian-in-las-vegas/
https://maps.google.co.id/url?sa=t&url=http://casino1top.xyz/index.php/2022/11/29/mid-states-poker-tour-will-be-held-in-september-at-the-venetian-in-las-vegas/
https://maps.google.co.cr/url?sa=t&url=http://casino1top.xyz/index.php/2022/11/29/mid-states-poker-tour-will-be-held-in-september-at-the-venetian-in-las-vegas/
https://maps.google.co.bw/url?sa=t&url=http://casino1top.xyz/index.php/2022/11/29/mid-states-poker-tour-will-be-held-in-september-at-the-venetian-in-las-vegas/
https://maps.google.cm/url?sa=t&url=http://casino1top.xyz/index.php/2022/11/29/mid-states-poker-tour-will-be-held-in-september-at-the-venetian-in-las-vegas/
https://maps.google.cl/url?sa=t&url=http://casino1top.xyz/index.php/2022/11/29/mid-states-poker-tour-will-be-held-in-september-at-the-venetian-in-las-vegas/
https://maps.google.ci/url?sa=t&url=http://casino1top.xyz/index.php/2022/11/29/mid-states-poker-tour-will-be-held-in-september-at-the-venetian-in-las-vegas/
https://maps.google.ch/url?sa=t&url=http://casino1top.xyz/index.php/2022/11/29/mid-states-poker-tour-will-be-held-in-september-at-the-venetian-in-las-vegas/
https://maps.google.cd/url?sa=t&url=http://casino1top.xyz/index.php/2022/11/29/mid-states-poker-tour-will-be-held-in-september-at-the-venetian-in-las-vegas/
https://maps.google.cat/url?sa=t&url=http://casino1top.xyz/index.php/2022/11/29/mid-states-poker-tour-will-be-held-in-september-at-the-venetian-in-las-vegas/
https://maps.google.ca/url?sa=t&url=http://casino1top.xyz/index.php/2022/11/29/mid-states-poker-tour-will-be-held-in-september-at-the-venetian-in-las-vegas/
https://www.google.co.tz/url?sa=t&url=http://casino1top.xyz/index.php/2022/11/29/mid-states-poker-tour-will-be-held-in-september-at-the-venetian-in-las-vegas/
https://www.google.co.th/url?sa=t&url=http://casino1top.xyz/index.php/2022/11/29/mid-states-poker-tour-will-be-held-in-september-at-the-venetian-in-las-vegas/
https://www.google.co.nz/url?sa=t&url=http://casino1top.xyz/index.php/2022/11/29/mid-states-poker-tour-will-be-held-in-september-at-the-venetian-in-las-vegas/
https://www.google.co.ma/url?sa=t&url=http://casino1top.xyz/index.php/2022/11/29/mid-states-poker-tour-will-be-held-in-september-at-the-venetian-in-las-vegas/
https://www.google.co.ls/url?sa=t&url=http://casino1top.xyz/index.php/2022/11/29/mid-states-poker-tour-will-be-held-in-september-at-the-venetian-in-las-vegas/
https://www.google.co.kr/url?sa=t&url=http://casino1top.xyz/index.php/2022/11/29/mid-states-poker-tour-will-be-held-in-september-at-the-venetian-in-las-vegas/
https://www.google.co.ke/url?sa=t&url=http://casino1top.xyz/index.php/2022/11/29/mid-states-poker-tour-will-be-held-in-september-at-the-venetian-in-las-vegas/
https://www.google.co.jp/url?sa=t&url=http://casino1top.xyz/index.php/2022/11/29/mid-states-poker-tour-will-be-held-in-september-at-the-venetian-in-las-vegas/
https://www.google.co.in/url?sa=t&url=http://casino1top.xyz/index.php/2022/11/29/mid-states-poker-tour-will-be-held-in-september-at-the-venetian-in-las-vegas/
https://www.google.co.il/url?sa=t&url=http://casino1top.xyz/index.php/2022/11/29/mid-states-poker-tour-will-be-held-in-september-at-the-venetian-in-las-vegas/
https://www.google.co.id/url?sa=t&url=http://casino1top.xyz/index.php/2022/11/29/mid-states-poker-tour-will-be-held-in-september-at-the-venetian-in-las-vegas/
https://www.google.co.cr/url?sa=t&url=http://casino1top.xyz/index.php/2022/11/29/mid-states-poker-tour-will-be-held-in-september-at-the-venetian-in-las-vegas/
https://www.google.co.bw/url?sa=t&url=http://casino1top.xyz/index.php/2022/11/29/mid-states-poker-tour-will-be-held-in-september-at-the-venetian-in-las-vegas/
https://www.google.cm/url?sa=t&url=http://casino1top.xyz/index.php/2022/11/29/mid-states-poker-tour-will-be-held-in-september-at-the-venetian-in-las-vegas/
https://www.google.cl/url?sa=t&url=http://casino1top.xyz/index.php/2022/11/29/mid-states-poker-tour-will-be-held-in-september-at-the-venetian-in-las-vegas/
https://www.google.ci/url?sa=t&url=http://casino1top.xyz/index.php/2022/11/29/mid-states-poker-tour-will-be-held-in-september-at-the-venetian-in-las-vegas/
https://www.google.ch/url?sa=t&url=http://casino1top.xyz/index.php/2022/11/29/mid-states-poker-tour-will-be-held-in-september-at-the-venetian-in-las-vegas/
https://www.google.cd/url?sa=t&url=http://casino1top.xyz/index.php/2022/11/29/mid-states-poker-tour-will-be-held-in-september-at-the-venetian-in-las-vegas/
https://www.google.cat/url?sa=t&url=http://casino1top.xyz/index.php/2022/11/29/mid-states-poker-tour-will-be-held-in-september-at-the-venetian-in-las-vegas/
https://www.google.ca/url?sa=t&url=http://casino1top.xyz/index.php/2022/11/29/mid-states-poker-tour-will-be-held-in-september-at-the-venetian-in-las-vegas/
온라인카지노 on November 28 2022 at 04:25AM
11/28
ks396274@gmail.com
https://casinobulk.com/
https://casinobulk.com/ 카지노사이트
https://casinobulk.com/ 바카라사이트
https://casinobulk.com/ 온라인카지노
https://casinobulk.com/ 온라인바카라
https://casinobulk.com/ 온라인슬롯사이트
https://casinobulk.com/ 카지노사이트게임
https://casinobulk.com/ 카지노사이트검증
https://casinobulk.com/ 카지노사이트추천
https://casinobulk.com/ 안전카지노사이트
https://casinobulk.com/ 안전카지노사이트도메인
https://casinobulk.com/ 안전한 카지노사이트 추천
https://casinobulk.com/ 바카라사이트게임
https://casinobulk.com/ 바카라사이트검증
https://casinobulk.com/ 바카라사이트추천
https://casinobulk.com/ 안전바카라사이트
https://casinobulk.com/ 안전바카라사이트도
https://casinobulk.com/ 안전한 바카라사이트
http://toolbarqueries.google.com.uy/url?sa=t&url=https://casinobulk.com/
http://toolbarqueries.google.com.tw/url?sa=t&url=https://casinobulk.com/
http://toolbarqueries.google.com.tr/url?sa=t&url=https://casinobulk.com/
http://toolbarqueries.google.com.sa/url?sa=t&url=https://casinobulk.com/
http://toolbarqueries.google.com.py/url?sa=t&url=https://casinobulk.com/
http://toolbarqueries.google.com.pr/url?sa=t&url=https://casinobulk.com/
http://toolbarqueries.google.com.pk/url?sa=t&url=https://casinobulk.com/
http://toolbarqueries.google.com.pe/url?sa=t&url=https://casinobulk.com/
http://toolbarqueries.google.com.my/url?sa=t&url=https://casinobulk.com/
http://toolbarqueries.google.com.hk/url?sa=t&url=https://casinobulk.com/
http://toolbarqueries.google.com.gt/url?sa=t&url=https://casinobulk.com/
http://toolbarqueries.google.com.gh/url?sa=t&url=https://casinobulk.com/
https://clients1.google.com.ar/url?sa=t&url=https://casinobulk.com/
https://clients1.google.com.ag/url?sa=t&url=https://casinobulk.com/
https://clients1.google.co.zm/url?sa=t&url=https://casinobulk.com/
https://clients1.google.co.za/url?sa=t&url=https://casinobulk.com/
https://clients1.google.co.ve/url?sa=t&url=https://casinobulk.com/
https://clients1.google.co.uz/url?sa=t&url=https://casinobulk.com/
https://clients1.google.co.ug/url?sa=t&url=https://casinobulk.com/
https://clients1.google.co.th/url?sa=t&url=https://casinobulk.com/
https://clients1.google.co.nz/url?sa=t&url=https://casinobulk.com/
https://clients1.google.co.kr/url?sa=t&url=https://casinobulk.com/
https://clients1.google.co.ke/url?sa=t&url=https://casinobulk.com/
https://clients1.google.co.il/url?sa=t&url=https://casinobulk.com/
https://clients1.google.co.id/url?sa=t&url=https://casinobulk.com/
https://clients1.google.co.cr/url?sa=t&url=https://casinobulk.com/
https://clients1.google.co.ck/url?sa=t&url=https://casinobulk.com/
https://cse.google.co.ck/url?sa=t&url=https://casinobulk.com/
https://cse.google.co.bw/url?sa=t&url=https://casinobulk.com/
https://cse.google.cm/url?sa=t&url=https://casinobulk.com/
https://cse.google.cl/url?sa=t&url=https://casinobulk.com/
https://cse.google.ci/url?sa=t&url=https://casinobulk.com/
https://cse.google.ch/url?sa=t&url=https://casinobulk.com/
https://cse.google.ch/url?sa=i&url=https://casinobulk.com/
https://cse.google.cg/url?sa=t&url=https://casinobulk.com/
https://cse.google.cd/url?sa=t&url=https://casinobulk.com/
https://cse.google.by/url?sa=t&url=https://casinobulk.com/
https://cse.google.bs/url?sa=t&url=https://casinobulk.com/
https://cse.google.bi/url?sa=t&url=https://casinobulk.com/
https://cse.google.bg/url?sa=t&url=https://casinobulk.com/
https://cse.google.be/url?sa=t&url=https://casinobulk.com/
https://cse.google.be/url?sa=i&url=https://casinobulk.com/
https://cse.google.ba/url?sa=t&url=https://casinobulk.com/
https://cse.google.az/url?sa=t&url=https://casinobulk.com/
https://cse.google.at/url?sa=t&url=https://casinobulk.com/
https://images.google.ca/url?sa=t&url=https://blogskorcasino1.blogspot.com/2022/11/restrictive-calculation-slices-bgaming.html
https://images.google.by/url?sa=t&url=https://blogskorcasino1.blogspot.com/2022/11/restrictive-calculation-slices-bgaming.html
https://images.google.bs/url?sa=t&url=https://blogskorcasino1.blogspot.com/2022/11/restrictive-calculation-slices-bgaming.html
https://images.google.bi/url?sa=t&url=https://blogskorcasino1.blogspot.com/2022/11/restrictive-calculation-slices-bgaming.html
https://images.google.bg/url?sa=t&url=https://blogskorcasino1.blogspot.com/2022/11/restrictive-calculation-slices-bgaming.html
https://images.google.bf/url?sa=t&url=https://blogskorcasino1.blogspot.com/2022/11/restrictive-calculation-slices-bgaming.html
https://images.google.be/url?sa=t&url=https://blogskorcasino1.blogspot.com/2022/11/restrictive-calculation-slices-bgaming.html
https://images.google.ba/url?sa=t&url=https://blogskorcasino1.blogspot.com/2022/11/restrictive-calculation-slices-bgaming.html
https://images.google.ba/url?q=https://blogskorcasino1.blogspot.com/2022/11/restrictive-calculation-slices-bgaming.html
https://images.google.az/url?sa=t&url=https://blogskorcasino1.blogspot.com/2022/11/restrictive-calculation-slices-bgaming.html
https://images.google.at/url?sa=t&url=https://blogskorcasino1.blogspot.com/2022/11/restrictive-calculation-slices-bgaming.html
https://images.google.as/url?sa=t&url=https://blogskorcasino1.blogspot.com/2022/11/restrictive-calculation-slices-bgaming.html
https://images.google.am/url?sa=t&url=https://blogskorcasino1.blogspot.com/2022/11/restrictive-calculation-slices-bgaming.html
https://images.google.al/url?sa=t&url=https://blogskorcasino1.blogspot.com/2022/11/restrictive-calculation-slices-bgaming.html
https://images.google.ae/url?sa=t&url=https://blogskorcasino1.blogspot.com/2022/11/restrictive-calculation-slices-bgaming.html
https://images.google.ae/url?q=https://blogskorcasino1.blogspot.com/2022/11/restrictive-calculation-slices-bgaming.html
https://images.google.ad/url?sa=t&url=https://blogskorcasino1.blogspot.com/2022/11/restrictive-calculation-slices-bgaming.html
https://maps.google.co.ke/url?sa=t&url=https://blogskorcasino1.blogspot.com/2022/11/restrictive-calculation-slices-bgaming.html
https://maps.google.co.jp/url?sa=t&url=https://blogskorcasino1.blogspot.com/2022/11/restrictive-calculation-slices-bgaming.html
https://maps.google.co.in/url?sa=t&url=https://blogskorcasino1.blogspot.com/2022/11/restrictive-calculation-slices-bgaming.html
https://maps.google.co.il/url?sa=t&url=https://blogskorcasino1.blogspot.com/2022/11/restrictive-calculation-slices-bgaming.html
https://maps.google.co.id/url?sa=t&url=https://blogskorcasino1.blogspot.com/2022/11/restrictive-calculation-slices-bgaming.html
https://maps.google.co.cr/url?sa=t&url=https://blogskorcasino1.blogspot.com/2022/11/restrictive-calculation-slices-bgaming.html
https://maps.google.co.bw/url?sa=t&url=https://blogskorcasino1.blogspot.com/2022/11/restrictive-calculation-slices-bgaming.html
https://maps.google.cm/url?sa=t&url=https://blogskorcasino1.blogspot.com/2022/11/restrictive-calculation-slices-bgaming.html
https://maps.google.cl/url?sa=t&url=https://blogskorcasino1.blogspot.com/2022/11/restrictive-calculation-slices-bgaming.html
https://maps.google.ci/url?sa=t&url=https://blogskorcasino1.blogspot.com/2022/11/restrictive-calculation-slices-bgaming.html
https://maps.google.ch/url?sa=t&url=https://blogskorcasino1.blogspot.com/2022/11/restrictive-calculation-slices-bgaming.html
https://maps.google.cd/url?sa=t&url=https://blogskorcasino1.blogspot.com/2022/11/restrictive-calculation-slices-bgaming.html
https://maps.google.cat/url?sa=t&url=https://blogskorcasino1.blogspot.com/2022/11/restrictive-calculation-slices-bgaming.html
https://maps.google.ca/url?sa=t&url=https://blogskorcasino1.blogspot.com/2022/11/restrictive-calculation-slices-bgaming.html
https://www.google.co.tz/url?sa=t&url=https://blogskorcasino1.blogspot.com/2022/11/restrictive-calculation-slices-bgaming.html
https://www.google.co.th/url?sa=t&url=https://blogskorcasino1.blogspot.com/2022/11/restrictive-calculation-slices-bgaming.html
https://www.google.co.nz/url?sa=t&url=https://blogskorcasino1.blogspot.com/2022/11/restrictive-calculation-slices-bgaming.html
https://www.google.co.ma/url?sa=t&url=https://blogskorcasino1.blogspot.com/2022/11/restrictive-calculation-slices-bgaming.html
https://www.google.co.ls/url?sa=t&url=https://blogskorcasino1.blogspot.com/2022/11/restrictive-calculation-slices-bgaming.html
https://www.google.co.kr/url?sa=t&url=https://blogskorcasino1.blogspot.com/2022/11/restrictive-calculation-slices-bgaming.html
https://www.google.co.ke/url?sa=t&url=https://blogskorcasino1.blogspot.com/2022/11/restrictive-calculation-slices-bgaming.html
https://www.google.co.jp/url?sa=t&url=https://blogskorcasino1.blogspot.com/2022/11/restrictive-calculation-slices-bgaming.html
https://www.google.co.in/url?sa=t&url=https://blogskorcasino1.blogspot.com/2022/11/restrictive-calculation-slices-bgaming.html
https://www.google.co.il/url?sa=t&url=https://blogskorcasino1.blogspot.com/2022/11/restrictive-calculation-slices-bgaming.html
https://www.google.co.id/url?sa=t&url=https://blogskorcasino1.blogspot.com/2022/11/restrictive-calculation-slices-bgaming.html
https://www.google.co.cr/url?sa=t&url=https://blogskorcasino1.blogspot.com/2022/11/restrictive-calculation-slices-bgaming.html
https://www.google.co.bw/url?sa=t&url=https://blogskorcasino1.blogspot.com/2022/11/restrictive-calculation-slices-bgaming.html
https://www.google.cm/url?sa=t&url=https://blogskorcasino1.blogspot.com/2022/11/restrictive-calculation-slices-bgaming.html
https://www.google.cl/url?sa=t&url=https://blogskorcasino1.blogspot.com/2022/11/restrictive-calculation-slices-bgaming.html
https://www.google.ci/url?sa=t&url=https://blogskorcasino1.blogspot.com/2022/11/restrictive-calculation-slices-bgaming.html
https://www.google.ch/url?sa=t&url=https://blogskorcasino1.blogspot.com/2022/11/restrictive-calculation-slices-bgaming.html
https://www.google.cd/url?sa=t&url=https://blogskorcasino1.blogspot.com/2022/11/restrictive-calculation-slices-bgaming.html
https://www.google.cat/url?sa=t&url=https://blogskorcasino1.blogspot.com/2022/11/restrictive-calculation-slices-bgaming.html
https://www.google.ca/url?sa=t&url=https://blogskorcasino1.blogspot.com/2022/11/restrictive-calculation-slices-bgaming.html
Marna on September 02 2016 at 08:08PM
Awesome! Thanks for sharing the how-to on this! :)