Flashback Fridays - Art Journaling Sewing Lessons 101 August 26 2016, 1 Comment

A few years back we had a feature called "Art Travels with Rain". Rain did a wonderful series on sewing that we are reposting in our Flashback Fridays segments. Please note these may be altered from the original posts to update links, provide information on newer programs, etc.
Enjoy!

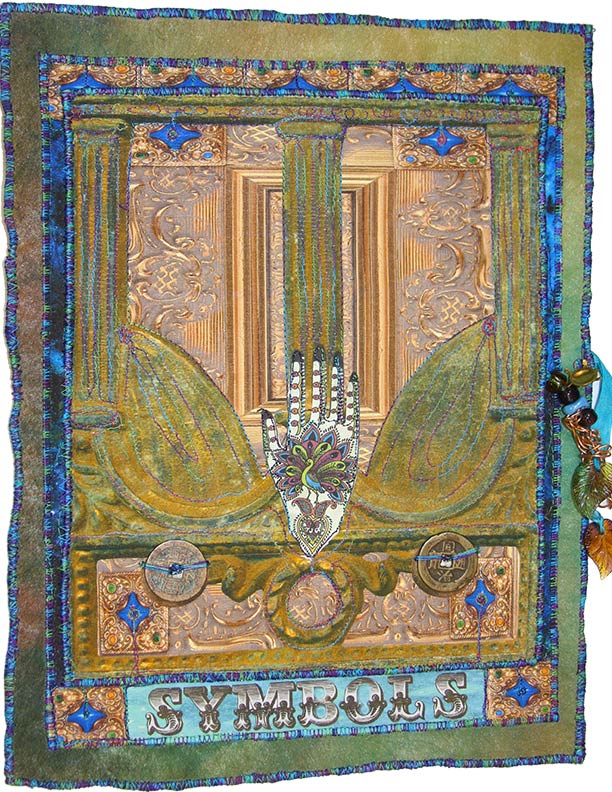
The first project will be hybrid, learning the skills of sewing on paper while making a sketchbook wrap cover. My piece, pictured below, is the cover for the Symbology workshop now available as a self-study course.
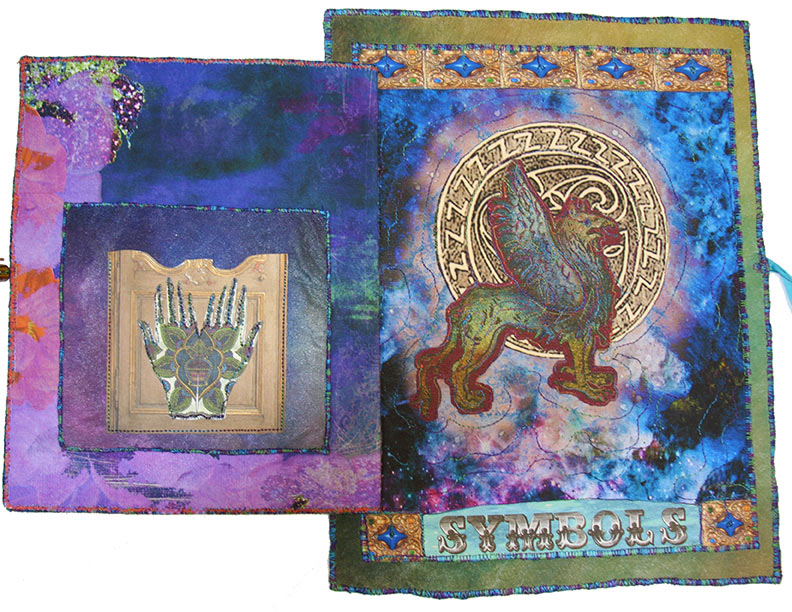
My book cover has a central flap that holds two pockets for elements I want to use on my Symbology pages. In Lesson 1, I will show you how to sew pockets, flaps, and hinges. If you are new to sewing on paper, or need a refresher, please continuing reading for the Prequel post for the details of machine set up and exercises to practice stitching on paper using both automatic and free motion stitchery.
The Sewing Prequel: This is the introductory prequel for Sewing Lessons 101: Sewing on Paper. Start here for all the basics of combining automatic and free motion sewing machine stitch into your art journal and scrapbook pages. Below is a primer on machine care and feeding, set up, and accessories that will make your journey of sewing on paper and hybrid pages a delight, opening up new avenues of artistic exploration.

Page credits: Tangie Baxter: Sew Girlie, Wonderland Mad Hatter’s, Perennial Paperie, Shine: You are Brilliant, August AJC12, Font: MaryAnn
The Prequel: The Basics of Understanding Sewing with Paper on a Machine
Before launching into the creation of art journal pages, book covers and bindings, we need to cover the basics of automatic and free motion sewing on a machine, and the steps necessary for success.
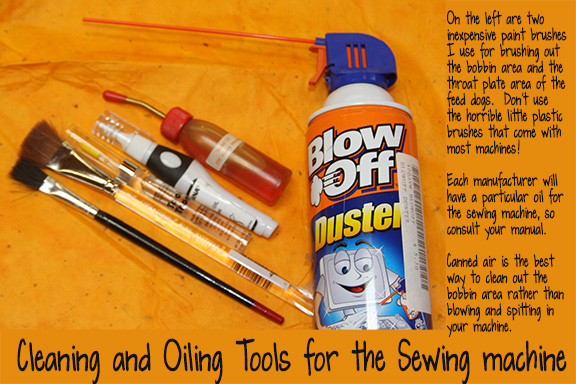
Clean and oil your machine
First of all, stitching on paper creates more dust and bits of fiber falling into the bobbin case of your machine than most fabrics. Well, unless you are sewing with flannel or faux fur! Following your machine’s instruction manual, clean and oil the machine, using a soft brush and canned air. Don’t blow into your machine, especially if it is computerized, as this is basically spitting into your machine!
Needle sizes and storage
Whatever needle used for stitching on paper must now be dedicated to only paper, as it will get very dull very quickly. I have a pincushion that looks like a tomato with sections marked with sizes and “paper” to hold the various needles until they are spent. I will often use a needle that is no longer sharp enough for fabric to stitch on paper. Or, mark a scrap of fabric with the word, “paper” for storage between paper stitching sessions. On cardstock and index paper, or layered copy papers, a dull thudding sound is somewhat “normal” unless it becomes loud, then it is time to change to a newer, sharper needle. Dispose of machine needles carefully as even a dull needle can hurt. I tend to keep an old film canister for discards, emptying into trash packaging for disposal.
The choice of needle size will vary according to the thickness of paper layers, or paper and fabric sandwich that you will be sewing. Think of the range of needle sizes in relation to the hole made in the paper…a smaller needle will make a smaller hole, and vice versa. Do you want the thread and line of stitching to be a design feature? If yes, then choose a larger needle.
Finer needles are generally size 60-80, usually for sewing on quilt cottons or dress fabrics. Larger, heavier needles such as a size 90 jeans needle, or a 100N or 110N, are for heavier fabrics like denim or canvas, and of course, thicker papers like cardstock. Size 90 and above have a larger eye to the needle and can be threaded with 2 threads at once, a fun embellishment technique that we will cover later on.
I sew without thread if I want holes perforated into the paper for lacing, hand stitching, or just a textural element. To begin with, practicing sewing without thread is easier and less expensive.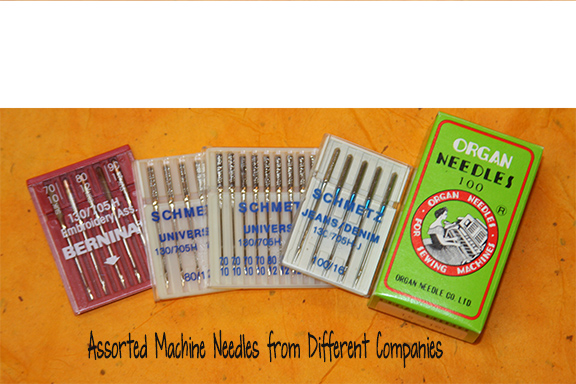
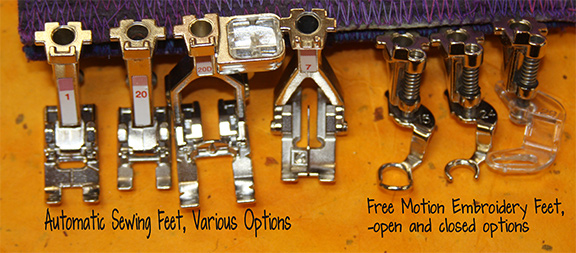
Sewing Feet
There are many choices for automatic sewing feet, and I tend to use a foot that is open in the front for better viewing of the needle, such as a Bernina #20. Any regular sewing foot will be sufficient. For free motion stitching, aka free machining in the UK, an open toe darning or embroidery foot is best. Consult your manual for your machine’s accessories.
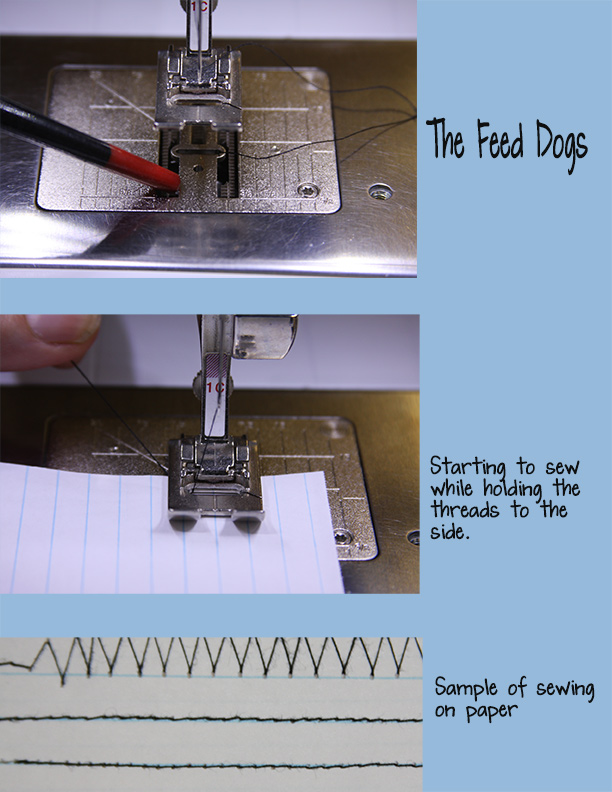
The Feed Dogs
Under the presser foot/needle area, there are “teeth” under the throat plate referred to as feed dogs…these teeth move the fabric along when sewing. The feed dogs can be lowered or covered allowing your hands to move the paper or fabric without the assistance of the machine. Free motion stitching requires dropping the feed dogs. Appropriate method of covering or lowering your feed dogs will be in the manual for your specific model of machine.
Tension, Stitch Length and Width buttons
The top tension governs the speed of thread release, and the bottom, the release of thread from the bobbin. Depending on your machine, normal tension for sewing on fabric is approximately 3.5-4.0. For free machining, I usually lower the top tension a bit, down to 2.5-3, but this is dependent on your machine. Altering bobbin tension is a book unto itself, so will not be covered in these blog posts.
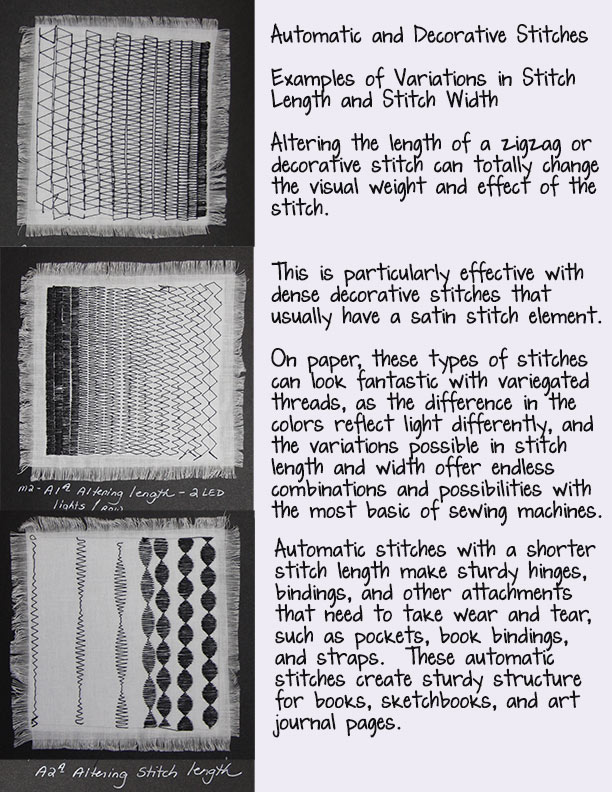
Stitch length button or slider changes the length of the actual stitch, from 1mm, which is tiny and barely moves to 6mm, which is a huge basting stitch. Stitch length settings for paper depend on whether or not the seam will be holding two items together, or are just decorative. I generally use a 3mm stitch length unless I have a good reason not to. Stitch width buttons or sliders are the same, only for width. If your machine can make a zigzag or decorative stitches, the stitch width becomes very important.
Threads
Another topic worth at least a book or two, so here’s a brief summary to get you sewing: thread is characterized by weight, with numbers from 12-100. For threads, the higher the number, the finer the thread. For sewing with paper, use at least a 40 weight/2ply, or a 50/3. The ply is the numbers of strands wound together. These are strong threads, used in general sewing with fabrics, and freely available. Please don’t buy the “ten zillion for a dollar” threads at your local box store…these tend to be loosely plied and very weak and fuzzy. The amount of time you will spend cleaning out the bobbin area is so not worth it, let alone having things come apart from the thread disintegrating.
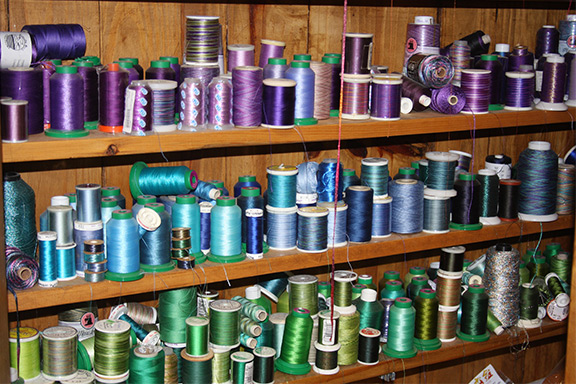
I organize my threads by color, in a shallow cabinet. I live in Colorado at 6000 feet in elevation, so the climate is very dry. For rayon threads, I keep the spools in a plastic bag in a cool, dark place…seems weird to those of you in a humid climate, I know, however rayon threads will literally shatter if dried out to the point of being brittle. So for me, it is worth the extra step.
First Exercise with Automatic Straight Stitching:
Let’s start with straight, automatic stitching before moving on to free motion. Unthread your machine on top and remove the bobbin, leaving the case in place. We will start with straight stitch, set at 3mm, with normal top and bottom tension.
Ok, grab a piece of lined scrap paper. Start sewing with the unthreaded needle, following up and down the lines printed on the paper, punching holes. Experiment with pressing the foot peddle so the machine runs faster and slower, lifting your hands away from the paper to see how it moves without guidance, starting and stopping, and occasionally reversing. My machine will sink the needle if I press my heel down on the foot peddle, but you may have to lower the needle into the paper using the hand wheel on the side of the machine. With the needle depressed, you can lift the presser foot and turn the paper in any direction without losing your place. This is very handy for turning corners. Practice sewing down one line, stopping, sinking the needle, lifting the presser foot, turning the page 90 degrees, then dropping the presser foot down and continuing. Develop comfort with starting, stopping, and turning corners.
Second Exercise with Automatic ZigZag
Ok, now if your machine has a zigzag stitch, practice with various stitch widths to see where the needle punches the hole in the paper on the zig vs. the zag…try lining up the zigzag between the lines on your paper. Experiment with changing the stitch length as well as the width. When the stitch length is dropped to .5-1mm, thread will form a dense satin stitch. This is hard to accomplish unless the paper is pretty sturdy, or the thread very thin. Without thread, a very low stitch length can perforate paper to the point of tearing a big hole, so beware unless that is what you are after.
Third Exercise: Automatic Stitching Practice with Thread
Thread the top of your machine and insert a full bobbin. Using a new piece of lined paper, start stitching by holding both the top and bobbin thread off to the left behind the foot so the end threads won’t get tangled in your first stitches. This is an excellent habit to develop. Most machines require holding the top thread and pulling up gently while slowly lowering the needle using the hand wheel or your foot pedal to bring up the bobbin thread when a new bobbin has been inserted.
Repeat Exercise 1 and 2, noticing the difference when stitching with thread.
Free Motion Embroidery
Get ready for a whole new world of possibilities as an artist! Free motion stitching is the overview term for a plethora of techniques, all with the sewing machine’s feed dogs lowered or covered. There are many books that explore the abundance of techniques and uses of FME, so this will be a brief and condensed review of the basics for the art journal/scrapbook artist.
Your sewing machine must be able to drop or cover the feed dogs to sew free motion. Check your manual or local dealer if you have questions. Without this capacity, the following techniques will not work. For some older machines, setting the stitch length to zero will disengage the feed dogs, however most modern machines have an override for this approach.
As always, first clean and oil your machine, particularly under the throat plate and the bobbin case area. Repeat this action every few hours of sewing, especially with paper.
Drop, lower, or cover your feed dogs. Set the top tension between 2 and 3 mm, and the stitch length to at least 2mm, despite the fact the stitch length will be determined by how fast your hands move. Machines behave better with a stitch length of 2mm and above. Stitch width depends on whether you choose straight FME or zigzag. A darning or embroidery foot is a necessity, as with the feed dogs lowered, a regular presser foot holding the paper or fabric against the throat plate is not desired. A darning or embroidery foot has a spring in back and does not touch the bed of the machine at all, hence allowing free movement.
Needle choice will depend on the thickness of the “sandwich” of layers, the thread choice, as well as how large of a needle-hole is desired. With extensive thread painting type of stitching, changing the needle often is a good idea.
First Exercise: Coordinating your Hands and Feet
The trick to learning free motion stitching is relaxing your shoulders while moving the fabric or paper around under the needle. Start by running your machine a bit slower than usual, and moving your hands at a speed that appears to make a decent stitch length. Too fast, it will look like a basting stitch, too slow and you may tear your paper.
Start by stitching on paper without the machine threaded again to get the hang of moving the paper around. Then thread up the machine, and go on to the next exercise using a piece or two of scrap fabric first.
Make scrolling movements, like a cursive letter “e”, over and over, experimenting with your hands moving slower and faster, the machine slower and faster, the scrolls bigger and smaller.
On a new piece of fabric, start in a straight line slowly, then fast to see how the stitch length goes from teeny to a long basting stitch, depending on how fast you move the fabric.
Try a zigzag stitch, moving the fabric in scrolls, straight lines both vertical and horizontal, building up areas of thread as a fill stitch, and making jagged lines.
Write your name in cursive, large and small.
Once you have had a chance to experiment, use another piece of fabric and repeat some of these moves without turning the direction of the fabric, just moving your hands front, back, and side to side. Imagine the needle is a pencil that you cannot lift from the paper.
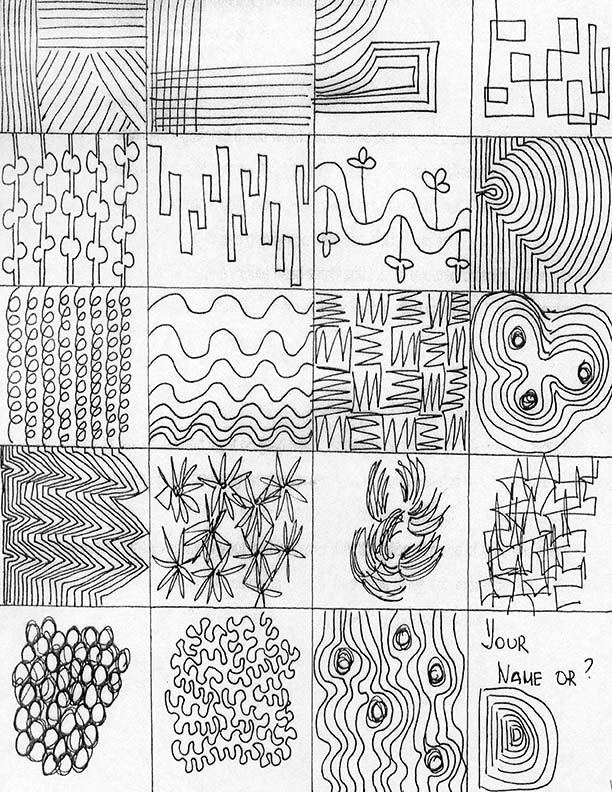
Try stitching M’s, O’s, W’s, jagged lines, meandering lines, spirals, leaf shapes, etc. There are many quilt stitches that are feather, fan, serpentine scrolls, or other elaborate free motion patterns to follow when marked on the quilt top, and these patterns can give a wide variety of options for drawing with a needle.
Below is a sample of marked paper for you to either print off to practice stitching FME, or draw some patterns on paper yourself and sew. Keep practicing until you get comfortable with moving the fabric or paper while sewing.
Please join us next Flashback Friday for another Art Journaling Sewing Lessons 101 installment.
Have a great weekend!
[Posted by: Joy]

Comments
susan on August 27 2016 at 03:24PM
Great article filled with lots of good information!