This is a THRILLING day! We're excited to announce that Rebecca McMeen's products are now available EXCLUSIVELY through The LilyPad! Her store is now open over there so make sure you stop by!
I will also be at the The Lily Pad too! You can find my store [here]. I will keep my store open here at TB&CO but I've got some awesome ideas about where TB&CO is heading and I hope to have more mixed-media products available here. So if you love digital The Lilypad is THE PLACE to be!
Make sure to join our newsletter to get all the latest details (plus you get free Art Journaling Prompts every other Friday)!

Shall we jump right into the blog hop now? This is your lucky stop because you get two freebies! One from Rebecca and one from me! Click on the image below to download.
Tangie's Portion [expired freebie, you can now purchase it over at TLP]

and Rebecca's Portion [expired freebie, you can now purchase it over at TLP]

If you found this post by accident you can start here and follow the blog hop all the way through until you get back here and you'll know you hit them all!
Next you are going to visit Liz from Paislee Press! Click the image below.
**IMPORTANT** If you find a blog hop spot that "breaks" check back soon as this blog hop officially goes "live" at 9:00 AM Eastern 09/23/2016, so not all posts may be up yet!

**IMPORTANT** If you find a blog hop spot that "breaks" check back soon as this blog hop officially goes "live" at 9:00 AM Eastern 09/23/2016, so not all posts may be up yet!

Welcome to Wednesday and a new featured TB & CO Treasure! The TB&CO Treasures Collection will feature some of our all-time favorite products each week. The ones that you may not have seen before, or maybe they've been on your wish list for a while? These kits and workshops are too good not to share again, so we will be highlighting a few of our staff's picks every Wednesday. The really exciting part is that you can shop each week's selections for 50% OFF the original price! Just use coupon code Treasures50 at checkout.
Here is a peek at this week's featured items:
"Gel Transfers No. 1 {Paris}"

"Gel Transfers No. 2 {Circus}"

"Gel Transfers No. 3 {Madame}"

"Gel Transfers No. 4 {Faeries}"

"Gel Transfers No. 5 {Ballet}"

"Gel Transfers No. 6 {Portraits}"

"Gel Transfers No. 7 {Cigar Labels}"

Be sure to check back every Wednesday for a new selection! You can always find the Treasures Collection using our "Shop All" button on the store menu.
[Posted by: Joy]

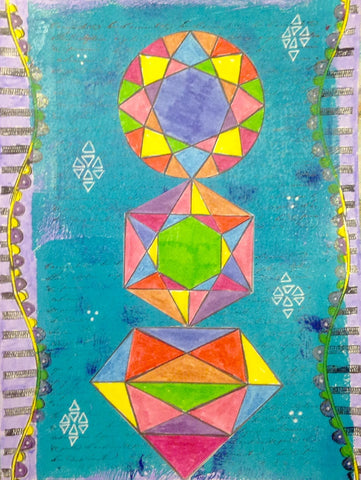
The theme of this month’s Grab Bag, SYMMETRY is so pleasing to me (being a Libra - the scales, I like balance). Symmetry in everyday language refers to a sense of harmonious and beautiful proportion and balance. And the gemstone outlines appealed to my enjoyment in coloring.
First of all I printed three gemstone outlines from the September Grab Bag.

Then, using Tombow markers, I colored the gemstones making sure to color symmetrically.
I prepared a background using a Gelli™ Printing Plate, one main color (Teal) and a secondary color (Cobalt Blue).
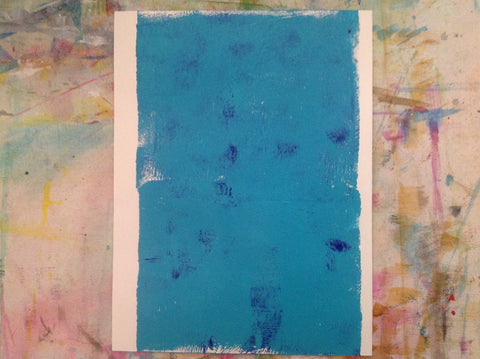
Stamped using an “all over written words” rubber stamp and also a border along the sides with black ink.

Finally, I cut out the colored gemstones and glued along a center axis. Colored in the border and added some doodles.
TB&CO Grab Bags are only available for a limited time and priced on a sliding scale, for more information visit TB&CO Grab Bags.
Tangie Baxter's "{Tangie Bundle No. 25} Symmetry"
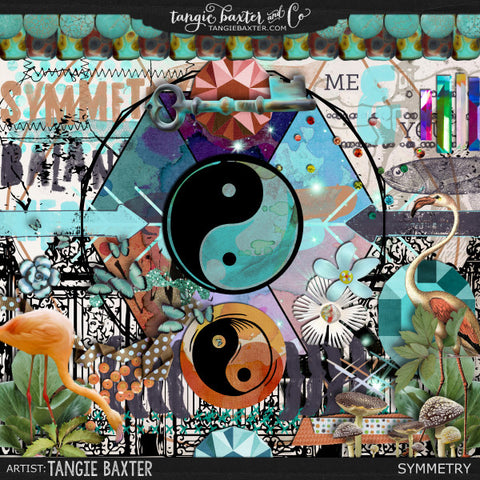
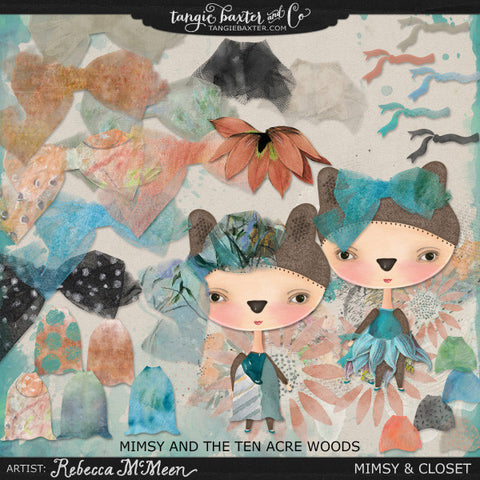
Rebecca McMeen's "{Rebecca Bundle No. 25} Mimsy & Closet"
[Posted by:Jan Nicholas]


A few years back we had a feature called "Art Travels with Rain". Rain did a wonderful series on sewing that we are reposting in our Flashback Fridays segments. Please note these may be altered from the original posts to update links, provide information on newer programs, etc.
In case you missed earlier posts in the series:
Art Journaling Sewing Lessons 101
Lesson One: Making Borders and Pockets Using Automatic Machine Stitching
Lesson 2: Using Fusible Interfacings to Attach and Glue Papers and Fabrics
Enjoy!
Lesson 3: Thread Painting and Interlacing, Part 1 of 2
This is one of my all time favorite techniques with a sewing machine or hand stitching…layers of luminescent threads reflecting light just thrills my soul. For the Art Journal and Mixed Media artist, thread painting is a major part of the tool box, and is so rich with possibilities it will take years to fully explore all the options.
First, let’s look at a few of my new Transformation series, inspired by Tangie Baxter’s Symbology workshop (now available as a self-study course). In the workbook, the first three symbols were a bird, a fish, and a butterfly. I am truly amazed at how deeply the workshop exercises have taken my inner process, all from following Tangie’s instructions in the workbook. I would heartily encourage checking out the workshop if you haven’t already done so.
Below is a self-portrait painted on fused silk fibers, then thread painted with various machine threads. Based on the Bird symbol.
This is my vision of my inner dreaming body…the sorceress that lives in a symbolic world.
Title: “An Epiphany of the Moment, a Slice of the Night with Rain”
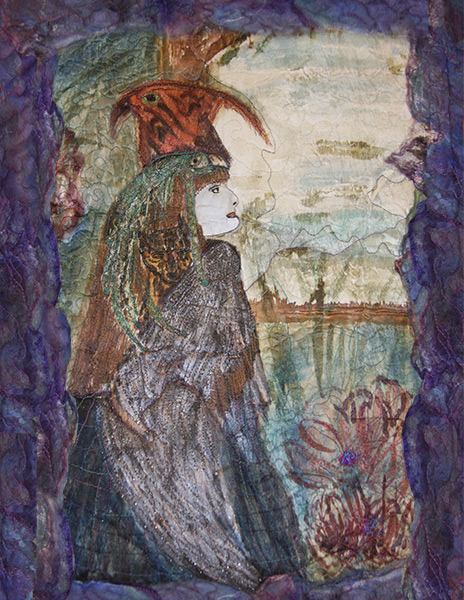
What is thread painting? It is simply using thread to add color, texture, and line to a shape, a drawing, a printed or painted paper or fabric. In the piece above, I used thread painting techniques to shape my wing with metallic thread, and to define the bird headdress with a mix of metallic and rayon threads. My hair is made up of lines of stitching with several shades of brown and auburn threads. There is space between the lines of free motion machine stitching, so my drawing and painting below shows through, which is one technique. This is the place to start if you are new to machine stitching in free motion. Open stitching is also a good option when sewing on paper as the needle is creating holes in the paper with every stitch, literally perforation.
Some artists thread paint so densely, there is absolutely no base fabric visible. This is labor and materials intensive, but creates a beautiful textured surface, and can look just like a hand embroidered piece with far less work. Look closely at the image below of the “Lady of Guadalupe” which is densely stitched, on top of a commercially printed fabric. This is a great way to alter a commercial fabric to make it “your own”, and add it to your page or collage.
Many quilt artists that make art quilt journal pages use this technique, particularly with printed motifs like art dolls, flowers, houses, vegetables, etc., cutting the element from the background fabric and fusing to a base just like I showed you in Lesson 2 with some of Tangie’s collage pages. Suddenly it doesn’t matter if you feel skilled at drawing and painting in a realistic manner! Simply fuse the motif, then keep stitching free motion as close as possible, or on top of previous stitches until you have the look you want. Changes of thread colors and weights will add to the hand stitched look.
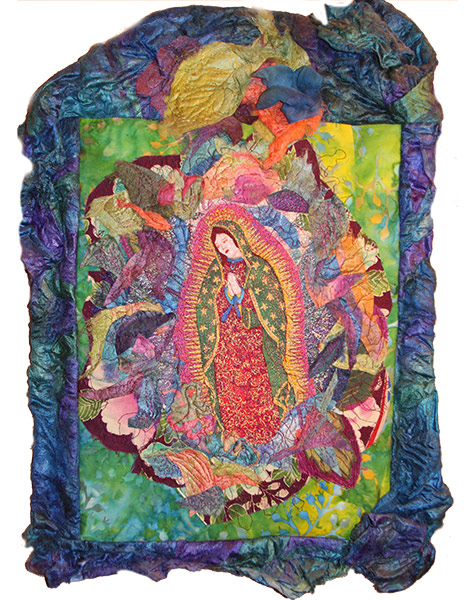 Title: “Overcoming the Transformation Blues”
Also part of the series on Transformation inspired by the Symbology project…Thread painted commercial fabric, “Our Lady of Guadalupe”, collage of dyed, printed, stenciled, fused papers, fiber, and fabric, all thread painted. The outer frame is dyed silk brick that I fused with acrylic gloss medium in a shape, then allowed to dry and harden.
If you want to densely stitch paper, fuse it to a backing paper or fabric to help stabilize, and consider using hand stitches on top of the machine stitching without passing the thread through the paper each time. Below are some examples of hand stitching on top of machining on paper from my sketchbook, using a variety of thread and yarn weights. Next week I will explore lacing, pierced paper, and some fabulous tricks for edges on paper.
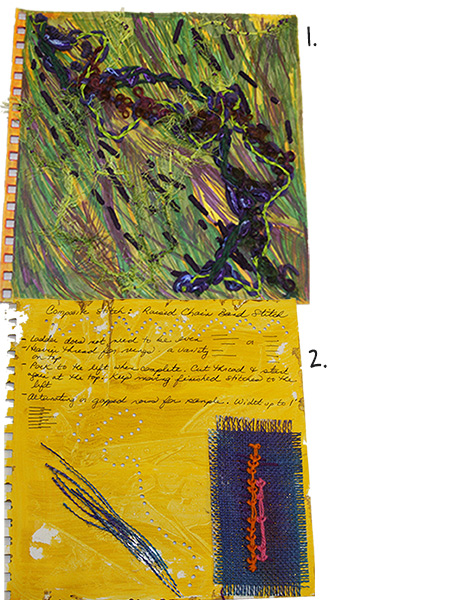
1. Machine automatic straight stitch with a 5mm basting stitch length, then various weights of threads and yarns chain stitched, looped, overcast, and laced onto the machine stitches without passing through the paper.
2. Burlap threads that have been drawn from the fabric edges, then tack stitched onto the paper on the left bottom. On the right bottom, raised chain band hand stitching on top of horizontal “ladder rungs” made using free motion “beads”: sew in a tight circle, jump horizontally to the side, sew again in a tight circle, forming a rung. This is the same technique I used in Lesson One to attach the Chinese coins to the front of the Symbology Project sketchbook wrap cover, basically sewing in place to anchor, then jump, anchor, back and forth until enough thread has built up to be sturdy for the next step.
Another page of examples of hand stitching on machine stitches, below:

1. Automatic straight stitching in lines and circles, various stitch lengths of 3mm-5mm, than variations on hand Buttonhole stitch using the machine stitches to anchor, while not passing the thread through the paper
2. First I did machine straight stitching at 3mm or longer using a large 110N size needle and a heavy 30 weight thread onto a monoprinted sketchbook page, then added embroidery threads by passing a needle through the previously pierced needle holes. Various weights of threads and yarns were then laced and interlaced through the embellished machine stitches.
3. A page in a book using painted Timtex interfacing as the base, hand interlaced embroidery threads through the machine stitched edges. More about this next week!
Another thread painting option: Creating a densely stitched face or other motif on dissolving stabilizer, netting, tulle, or a lightweight organza, etc, then stitching into your piece. Below is an example of another page in the Transformation series inspired by Tangie’s Symbology Project workshop: Chrysalis. The face is all thread, densely thread painted onto a piece of tulle netting, then stitched onto the background collage.
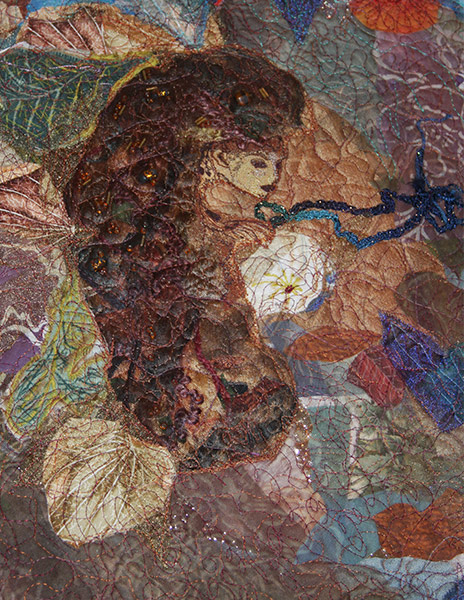
Title: “Chrysalis”
My piece based on the butterfly symbol, again transformation, the beauty of the butterfly rising out of the pupa, birth out of the Earth, the magic of changing form.
This piece is layered paper, dyed, painted, printed and stenciled fabric, thread painted face, trapped fibers and beads below the netting form the “hair”, fused dyed silk fibers to make paper.
Below: Title: “Camouflage”
A second piece based on the bird symbol and the concept of camouflage…how do I hide to survive? Blend in to flourish? This piece is also about that moment of transformation when energy becomes physical form, and back again, just like the electrons in the zooming shells around the nucleus of an atom, sometimes physical, sometimes just energy. This is my science-geek coming out…I have always been fascinated by the transformation of energy into matter, and the growth and disintegration that can be observed in nature, in our bodies, in all structure and form around us. I am intrigued by rust, by dandelions becoming seed heads and blowing away, by the teeny germination of a pea seed that becomes flowers and food then disintegrates to withered vines. I watch every spring to try and catch that moment of transformation from seed to plant bursting through the soil, but I blink, and miss it again and again. The birds become leaves in the trees in the fall, then suddenly leaf out into form in the spring. Awesome. Just to be alive to witness and feel these moments.
Director Font, thread painting on dyed silk fibers and papers, fused, then stitched. The first symbols of bird, fish, and butterfly have been all about transformation for me, and are inspiring this series.
The red leaves and the “bird” are all densely thread painted onto a piece of silk organza where I had drawn the basic shape in outline with marker, then free motion layered threads in various shades of red and red orange. I added the darker line accents afterwards, and tack-stitched to the background. The “branch” is a rolled piece of dyed silk chiffon, free motion stitched in places to a paper backing.
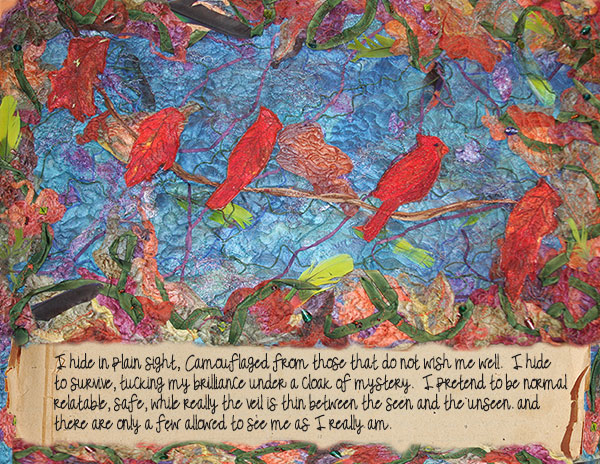
Journaling: I hide in plain sight, Camouflaged from those that do not wish me well. I hide to survive, tucking my brilliance under a cloak of mystery. I pretend to be normal, relatable, safe, while really the veil is thin between the seen and the unseen and there are only a few allowed to see me as I really am.
Next week, we will continue with Thread painting, piercing, lacing, edges, and look closely at stitching the flower motifs I have been teasing you with for the last two posts. Until then, take care!
Rain
~~~~~
"The Symbology Project"

"The Symbology Project No. 2"
"The Symbology Workshop No. 3"

Please join us next Flashback Friday for another Art Journaling Sewing Lessons installment.
Have a great weekend!
[Posted by: Joy]


Welcome to Wednesday and a new featured TB & CO Treasure! The TB&CO Treasures Collection will feature some of our all-time favorite products each week. The ones that you may not have seen before, or maybe they've been on your wish list for a while? These kits and workshops are too good not to share again, so we will be highlighting a few of our staff's picks every Wednesday. The really exciting part is that you can shop each week's selections for 50% OFF the original price! Just use coupon code Treasures50 at checkout.
Here is a peek at this week's featured items:
"TAD {Tangie Bundle No. 08} Everyday Courage"

"TAD {Rebecca Bundle No. 08} Kendra"

"ARTist Collage Sheet #675"

Be sure to check back every Wednesday for a new selection! You can always find the Treasures Collection using our "Shop All" button on the store menu.
[Posted by: Joy]

I'm THRILLED to be teaching at Pinner's Conference in Arizona this October! I'll be teaching my Junque Journal class "live", it would be so fun to have fun you there!
You can use coupon code: tangie
to get 10% off your ticket or you can use code: freeshopping
which will give you free access to the trade show floor, but no classes.
I'm so excited to see all the booths (we'll have one too!) and there are some amazing classes, I can't wait for all the inspiration! YAY!


A few years back we had a feature called "Art Travels with Rain". Rain did a wonderful series on sewing that we are reposting in our Flashback Fridays segments. Please note these may be altered from the original posts to update links, provide information on newer programs, etc.
In case you missed earlier posts in the series:
Art Journaling Sewing Lessons 101
Lesson One: Making Borders and Pockets Using Automatic Machine Stitching
Enjoy!

Hello!
On into Lesson 2, to learn about using fusible interfacings, and the magic possible when combining these handy products with paper, fabric, and stitch for your art journal or other projects.
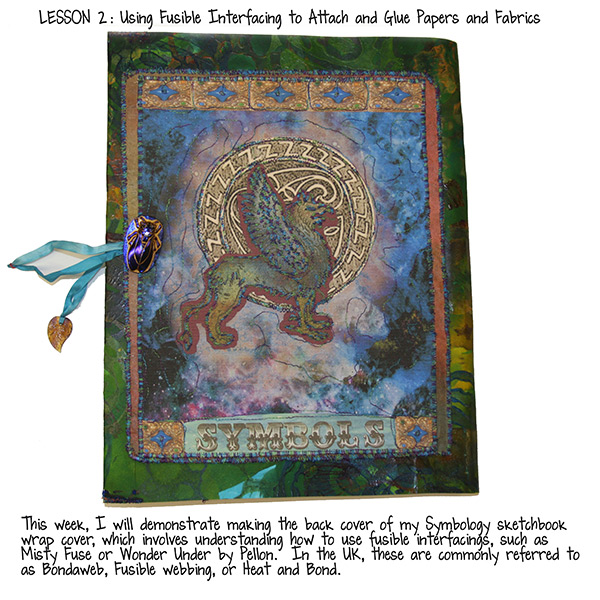
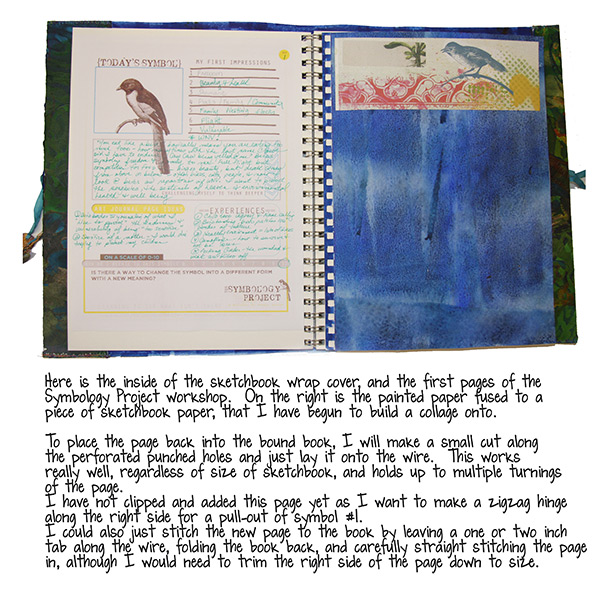
I have already stitched my back cover decoration, using the same page as the inner flap from last week’s Lesson 1, this time printed on a canvas paper. I have mounted the back cover panel to a piece of Lutrador interfacing that was previously painted, and free motion zigzag stitched all the edges. Above is the finished sketchbook wrap cover for my Symbology Project workbook (part of Tangie Baxter’s Symbology workshop now available as a self-study course), and below is an image of the inner cover and page one of the workshop. Let’s take a look at the specifics of using fusible interfacing for this type of project, and then I will demonstrate how to make up the wrap cover.
What exactly is fusible interfacing? Over on Planet Quilt, fusibles have been used for years to hold applique’ or other pieces in place while stitching. There are one-sided and two-sided fusibles, and for the art journal and book artist, the two-sided products are the most useful. I often fuse paper to other paper or fabric, as well as ephemera, postcards, print outs, paintings, etc., but I avoid fusing photos that are precious or need archival treatment. Since free motion embroidery by machine is a bit uncontrolled, fusing first can feel like having a third hand, holding elements in place while sewing. Also, as we venture in the future into machine stitched cords and trims, dissolvable stabilizer lace and writing, and other fabulous embellishment tricks, fusible interfacing will become a close friend and ally! These products have transformed my ability to create collages with paper and fabrics mixed together, easily and quickly.
There are a lot of two-sided products, and in the U.S. Pellon company’s Wonder Under is probably the best known. Most box stores have half-off coupons regularly, and this is when I buy Wonder Under, Misty Fuse, or other “glue” fusibles. For our purposes today, I want to focus on the paper-backed two sided products like Wonder Under. After fusing the exposed glue layer to a paper or fabric, the backing parchment paper is removed, exposing the second glue layer…this can then be fused to a base or whatever I’d like, hence gluing with an iron rather than a wet glue.
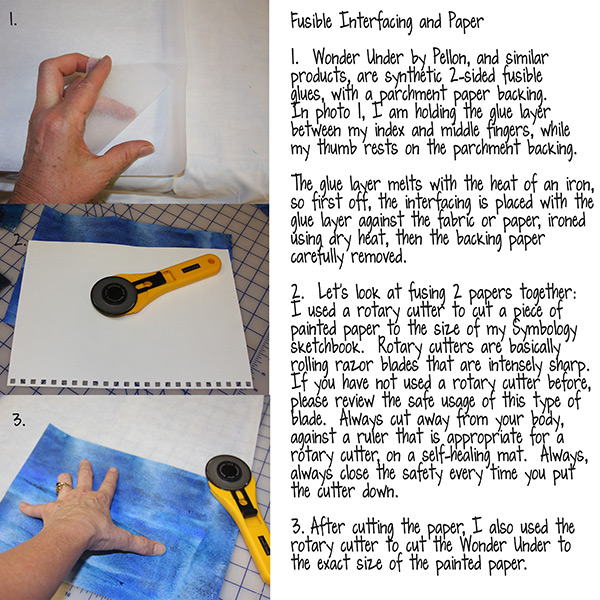
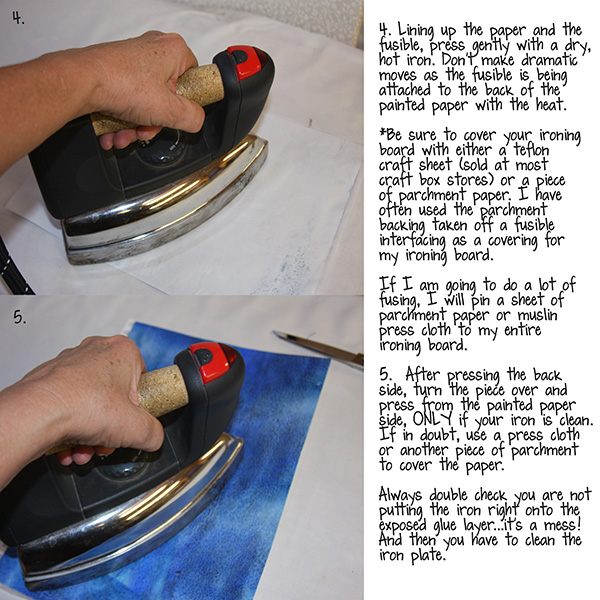
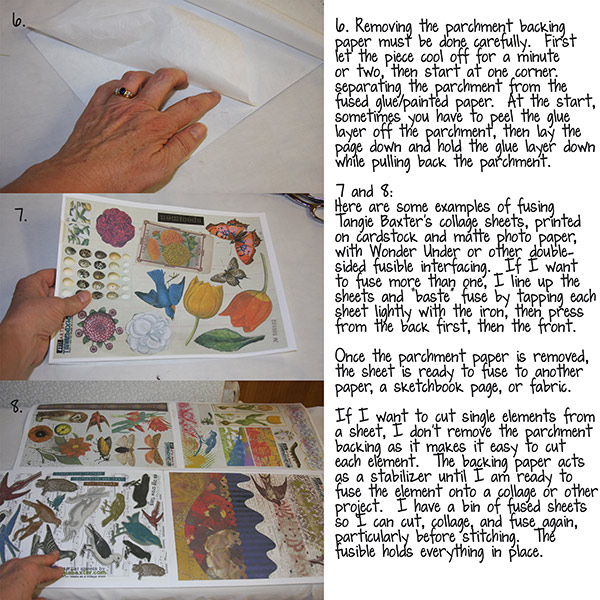
Let’s look at two pieces of mine where I used fusible interfacing:
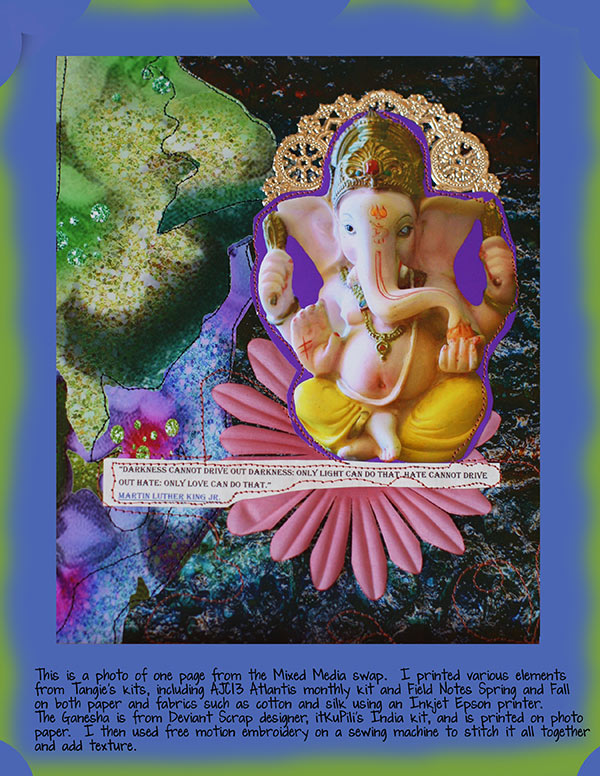
This page is from Tangie’s mixed media swap that took place back in May for the Art Journal Caravan participants. I first printed various papers, elements, and the Ganesha onto fabrics and papers using an inkjet printer. Then I fused Wonder Under to the back of each page before cutting apart borders, elements, etc. Each was then pressed with a dry, hot iron onto a base paper and free motion stitched.
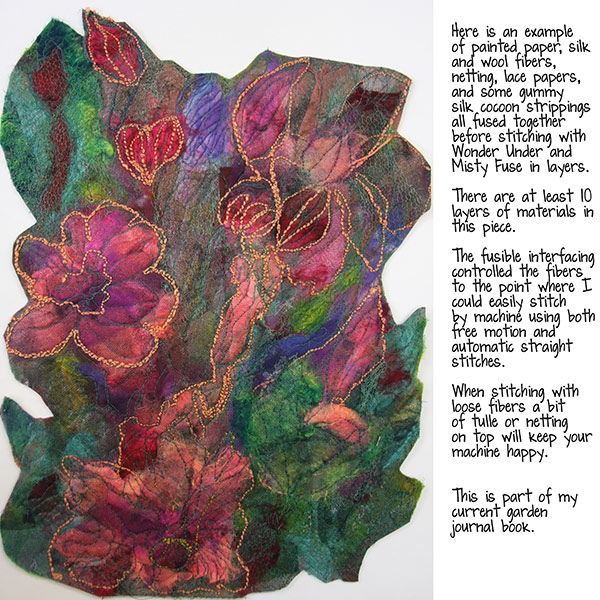
The above floral image is an example of many layers fused one on top of the other as I created the piece from various dyed fibers and painted papers. This is part of my current garden journal.
Are you getting excited yet? Ok, well fasten your seat belt because there is another entire level of art and design possible with fusible interfacing: it can be painted and still function as a two-sided glue! The possibilities of creating backgrounds, foregrounds, embellishments, book covers, clothing, on and on, are just endless.
The easiest method is using an old metal tray or one of those horrible styrofoam cooler lids or other packing material as a paint board. I have covered larger pieces of styrofoam packing with muslin fabric, duct taping the back. After I’ve painted on the boards for awhile the muslin becomes an amazing piece of fabric itself, so I remove it and heat set. Sometimes I give the fabric a wash of dye or fabric paint to unify the markings, but honestly, without any planning at all most of the muslin comes out terrific. Or, you could use large sheets of drawing paper to do the same thing, basically doubling your stash with the same amount of materials.
I first gently remove the glue layer from the parchment backing, then lay it back down on top of the backing. Acrylic paints work best, although I have gotten good effects with watercolor paints. If the end piece will be sprayed with water or other mediums, the watercolor can reconstitute and run, so I usually stick to acrylics. Dilute the paint if using heavy body or thicker acrylics, then all options are open: dribble, brush, brayer, etc. Until the layer is covered.
Allow to dry, then separate the layers if you haven’t already done so. Now just use the glue layer as before. Voila’! Instant lovely.
Here are some examples from my “Experiments with Media” sketchbook:
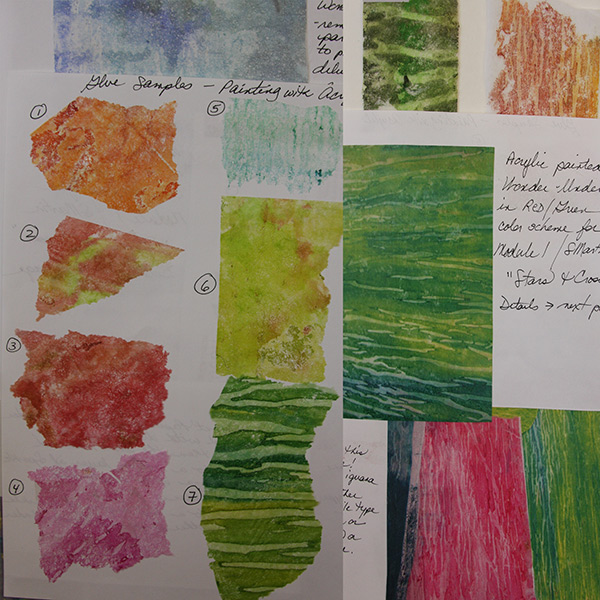
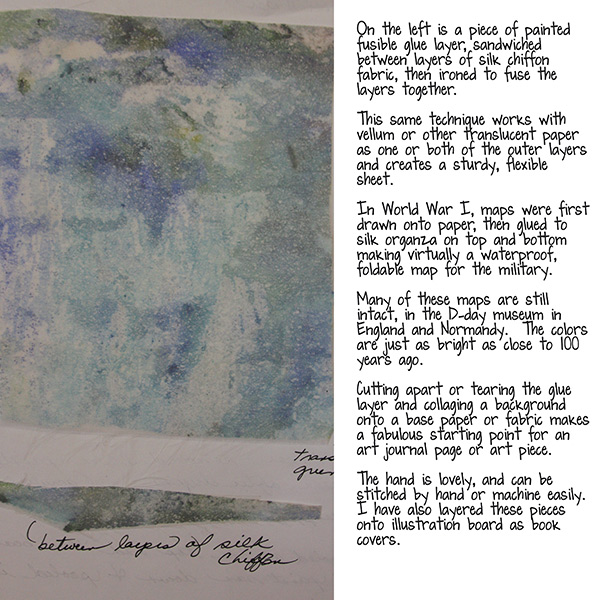
When the glue layer is painted, both sides are gorgeous, and fusing between transparent fabrics or paper will give you a double sided fabric or page to work with.
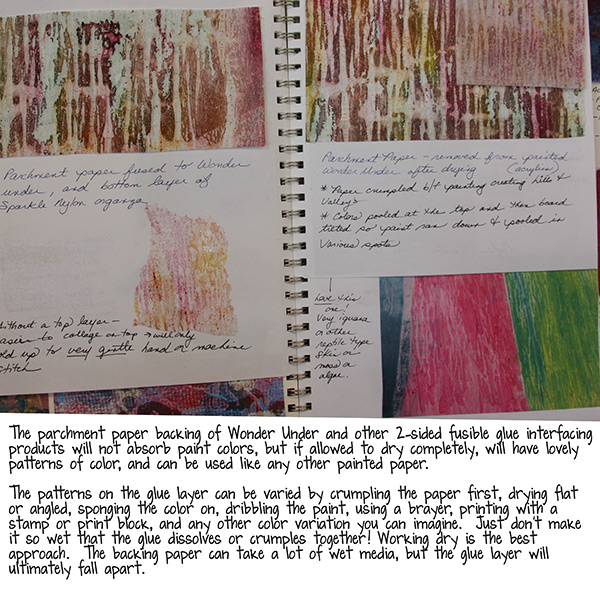 The backing paper becomes usable in its own right! Below are three pages of experiments with fusible interfacing and a variety of items I have glued down:

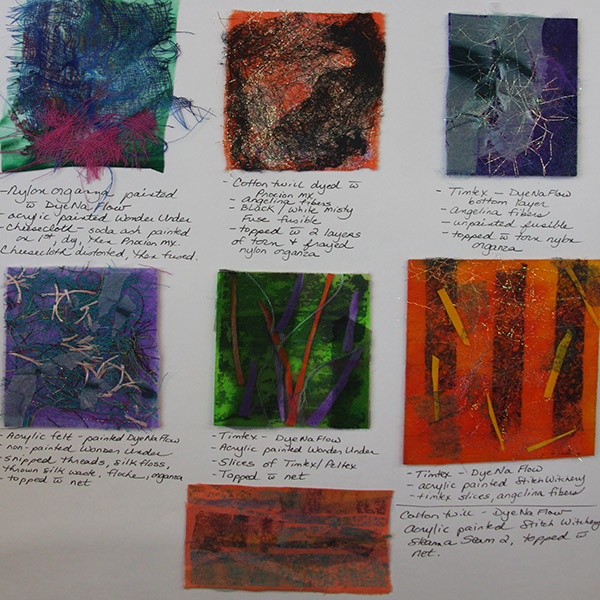
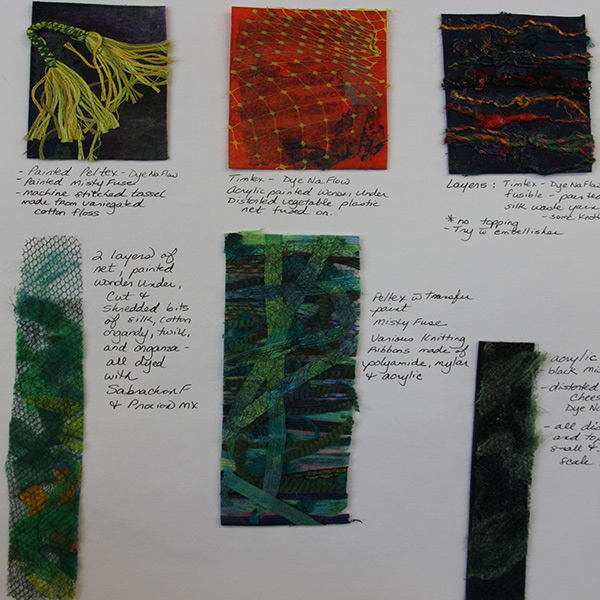
Now let’s look at how I used fusible interfacing to make the Symbology Project workshop sketchbook wrap cover: first I made a painted large piece of 100 pound paper using acrylic paints and stamps. I dried one side, then fused some thinner copy paper printed with basic color. Any combination you desire will work for a paper cover, including brown Kraft paper or bags, drawing paper painted or decorated on both sides, scrapbook larger sheets of paper, etc., whatever your heart desires. Since I made a stitched front with pockets and flaps, and a back that forms a pocket, I made the paper wrap coordinate with the stitched pieces.
First, complete any machine or hand stitching on the front and back decorative covers. Then lay down your paper for the cover wrap, outer side down, and follow the instructions in the image below: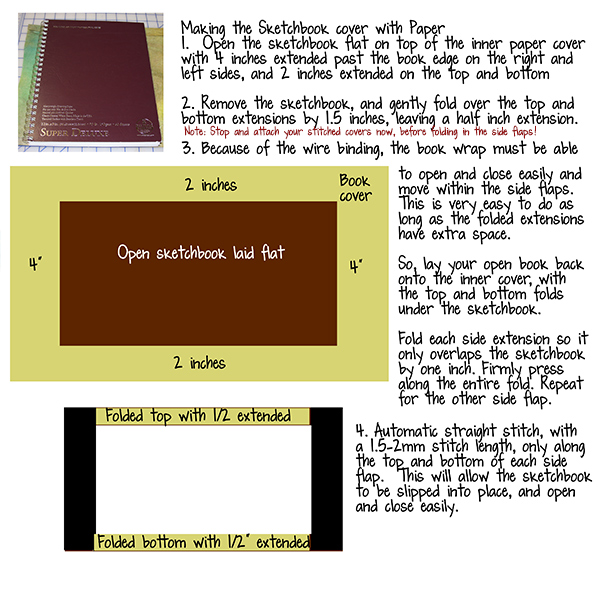
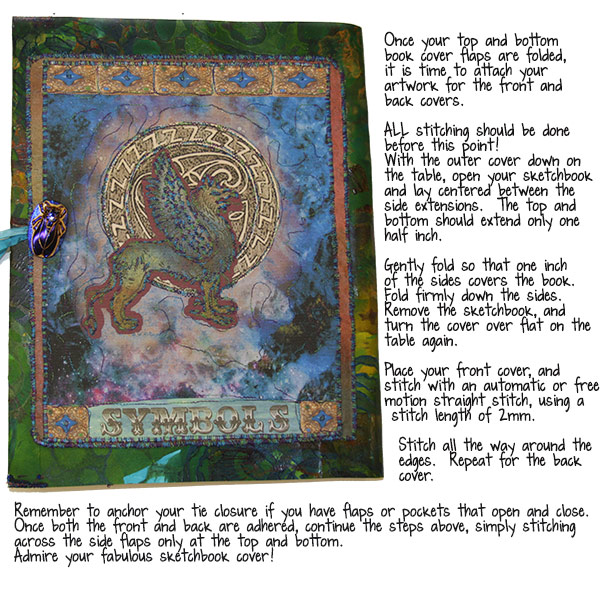
~~~~~
Please join us next Flashback Friday for another Art Journaling Sewing Lessons installment.
Have a great weekend!
[Posted by: Joy]


Welcome to Wednesday and a new featured TB & CO Treasure! The TB&CO Treasures Collection will feature some of our all-time favorite products each week. The ones that you may not have seen before, or maybe they've been on your wish list for a while? These kits and workshops are too good not to share again, so we will be highlighting a few of our staff's picks every Wednesday. The really exciting part is that you can shop each week's selections for 50% OFF the original price! Just use coupon code Treasures50 at checkout.
Here is a peek at this week's featured items:
"TAD {Tangie Bundle No. 01} Oli and Phaunt"

"TAD {Rebecca Bundle No. 01} Em"
"Collage Sheet Workshop #03 {Sept '14 Delivery}"

Be sure to check back every Wednesday for a new selection! You can always find the Treasures Collection using our "Shop All" button on the store menu.
[Posted by: Joy]

The theme for this monthly Grab Bag is “SYMMETRY” and is chock a block full of lines and angles and edges. The color palette of shades of aquamarine and copper evokes images of Italy’s Cinque Terre. Then there’s Rebecca’s art doll - “Mimsy” a teensy tiny bear with sassy clothes. The pieces of this collection can be used in both digital and mixed media formats.
TB&CO Grab Bag #25 {September 2016} is only available for a limited time and is priced on a sliding scale, so act fast for the best deal! For more information visit TB&CO Grab Bags.
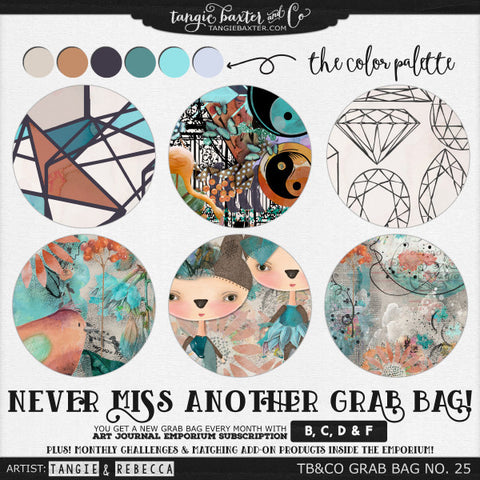
Following are some examples of the creative things you can do with the bits and pieces included in the TB&CO Grab Bag #25 {September 2016}.

Stay Calm

Me & You

Asymmetrical
All examples are 100% September Grab Bag papers and elements. I hope you enjoy these examples and are inspired to get the monthly Grab Bag to design your own unique art.
[Posted by: Jan Nicholas]


Hi, Everyone! Welcome to the Weekend! And what's a better way to enjoy the weekend than with the newest grab bag release from TB&CO.
September's Grab Bag has been released. Sneak peek pictured below.
TB&CO Grab Bags are available on a sliding scale so act fast for the best deal! If you are FAST you can get the grab bag for only $6 the first 24 hours.
The grab bag then goes up by $1 each day.$7 the next day (we will reveal full previews on this day)
$8 the next day
$9 the next day
$10 the next day
Then it will be broken up into our individual stores for FULL PRICE. Never miss another grab bag at the $6 price! You can purchase a subscription, where you automatically get the grab bag every month at the $6 price! (If you purchase a new subscription which includes grab bags any time in September 2016 you will get the September 2016 grab bag even if it is no longer available to the public!).


[Posted by Joy]


