Flashback Friday - Art Travels with Rain: Making a Paperback Book into a Card Base February 03 2017, 0 Comments

A few years back we had a feature called "Art Travels with Rain". Please note these may be altered from the original posts to update links, provide information on newer programs, etc.
Enjoy!

Hello all,
Today I am going to post for both this week and next as 11/27 is the day before Thanksgiving here in the US…our daughter’s family is coming from Hawaii tomorrow to spend the week with us in western Colorado and are all hoping for snow. Yes, my sweet almost 2 month old grandson is coming with Mom and Dad for Grandma Rain to take a few thousand more photos of his beautiful baby-ness! Maybe I will recover from overwhelming grandparent mania, by oh, age 18 or so, but then again, maybe not. It will just be another phase.
These two lessons are about using a paperback book to make a 3-D card or desk topper. There are so many paperback books available at library and tag sales for practically nothing…I have a small box of books I’ve picked up at the library sales for 5-10 cents, along with some hardbacks to make altered books for less than $1. I occasionally match the topic of the book to the actual card recipient, but more about this later.
Here are two images of finished paperbacks, one is a card for a dear friend and colleague battling fourth stage breast cancer, and the other lives on my desk in my studio:


Let’s first look at the mechanics of making the paperback into a card base.
This is all about folding. First step, using a craft knife, cut off both the front and back covers of the book. I often save these to use as backing for some of the tidbits I push between the pages later, or you can just toss into your recycling bin.

This particular book is about playing Scrabble, and has special meaning for my friend as playing online while receiving chemotherapy infusions has helped her keep her sanity. I loved the paper of this book, but honestly it was such a lousy Scrabble guide I had no qualms about tearing the covers off and folding the pages into my card base.

When every page is folded in half to the center of the book spine, the base will form as a gentle arc. There are many variations to this shape that are easily folded, including:
*Folding each page at a different height for a stair step look, starting over again with the smallest size every 5 or so pages
*Cutting and Folding in a stairstep from small to large, then continuing from the peak, folding back to the smallest.
*Folding partial pages into triangles, rectangles, squares, or any other shape desired.
*Folding and cutting to form an organic or geometric pattern
*Folding and cutting to create a landscape or cityscape
*The sky is the limit!
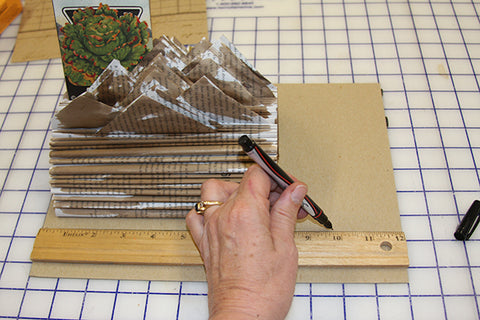
The photo of my desk topper above was made by making triangle folds moving from the right, across the middle, to the left, and back in reverse:..I started with a center triangle by folding the outer corner into the center on both sides of the page. In between each triangular fold, I folded the page in half, towards the center gutter of the spine. The half page folds increase the stability of the overall base.


In the photo above, I am showing a center triangle. In the image below, my fingers are lifting the small right side folded into the center, while the left bulk portion of the page is folded into a left-sided triangle top. In between are the folded in half pages.

For this particular desk topper, I painted Walnut Ink onto the pages in a rather haphazard way…the pages could be sprayed with inks or paints, painted first, or after folding. I have a friend that can’t make anything without glitter glue, so of course, her books are heaped with lines of various colors of glitter. Gesso or other base could be applied to the pages, other pages glued on or stuck in, then sprayed or painted or ? There are a lot of options!
I brushed on Walnut Ink with a basic cheapo brush, going for a mottled look. I actually painted on the ink on the first third and kept on folding, cutting and folding until I reached the peak of the base. Then I folded groups of 6-8 pages in half, then 4 pages, then 10, just random numbers of half folds without triangular tops. These will hold up the triangles, making it easier to put the bits and pieces in between the pages.


In the image above, I have already started to tuck in pieces of painted, stamped, stenciled papers and cards.
Since my studio desk is over one hundred years old, made by Gary’s grandfather, I am super careful of anything touching the wood surface that isn’t absolutely soft. I made a felt base for the desk topper with a piece of cardboard attached with double-stick carpet tape to craft felt, then trimmed to size. I keep all sorts of card around, backs of sketchbooks, watercolor pads, paper tablets, etc. I love the thin card used to pack shirts or sheets. If I am the least bit concerned about archival quality, I will seal the cardboard with a Golden GAC 100, to prevent acid drift.

I attach the base of the paperback book to the cardboard using either double-stick carpet tape or some type of glue.

Once the base is adhered to the cardboard/felt base, I paint on Walnut Ink all around the visible area.

Obviously, there are so many different ways I could choose to decorate the folded pages! Or, just leave the pages alone and just fold. The card for my friend battling illness is a Scrabble book, kind of a joke between us about 7 letter Bingo plays, and I wanted the pages to be visible. In the next lesson I will show you some different types of insertions, including floral wire, seed packets, notes and journal cards, word poems, etc.
Optional Items to Make for Your Paperback Book Base:
Once again, I am so totally in love with Tangie’s Collage Sheet collections for so many reasons, and for this particular project, the printed sheets are an easy and fun way to give a set of variations as a gift with the card base. I tend to print off a batch of collage sheets, my own art journal layouts, photos, or other pages, and keep a stack by the computer or TV or anywhere that time is spent listening to a video or tutorial. I cut out bits and keep them all in a tray for the next project, many times first fusing the printed sheet to another paper or thin index paper or cardstock to stiffen, as this makes fussy cutting so much easier.

I also keep paper edge trimmings, little squares of card, photo trimmings, and other edge bits in a box as possible “attachments” for my collage pieces. Sometimes I glue, sometimes I use double-sided tape, or even permanent soft gel medium, to attach the printed cutout to the floral wire or card. I have a lot of covered floral wire from some mythical project lost in the mists of the past that I love to use for this type of insert as I can bend and bend over and over again without breaking the wire. I often attach little stitch samples leftover from a project, or a City and Guilds sample set, or whatever, and attach it to the floral wire with Golden High Gloss gel medium, Soft or Hard Gel, laid out flat to fully dry over at least 24 hours. The first image below is the front piece of free motion stitching on a piece of blue dupioni silk, glued to a spiraled floral wire. The second image is the dried Hard Gel. Once dry, all the Golden gel mediums can be cut or trimmed with a scissor.


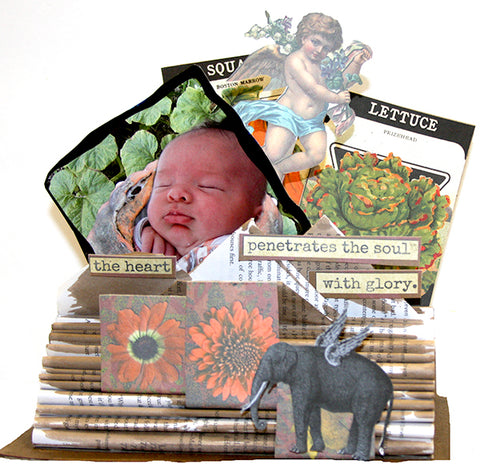
Below is an image from my friend’s card, where I have glued a batch of bits together. The wire or card or other bottom portion is tucked right between the folded book pages, and voila’, instant interactive card.

I have a large and wonderful base that I use to organize which seeds I will plant next in my greenhouse this time of year. I found this paper from a now defunct shop in Colorado of vintage seed packets and decided to fuse each one to cardboard as spacers for my large seed collection. Once late fall arrives, I like to stick one or two into a base book with the seeds so I remember to go toss a few rows into the greenhouse beds for winter eating. In the spring, I would need a table top for all the varieties that I plant! Now, not so much, so the art work is a much appreciated reminder of all the gifts that gardening brings to my soul. The paper had been crushed and rolled badly, so first I pressed the back with a dry iron to take out some of the crinkles, then fused Wonder Under two-sided glue to the back.
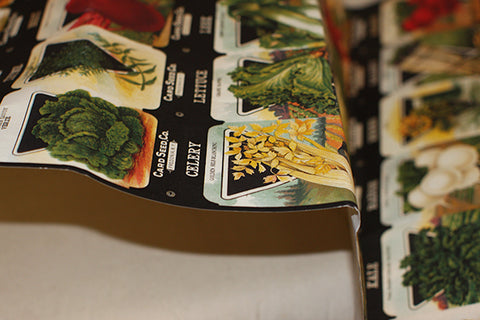

Once the fusible cooled off, I used a rotary cutter to slice through each row, then each individual packet. Some of these I fused to card, others to scrapbook or Kraft paper.

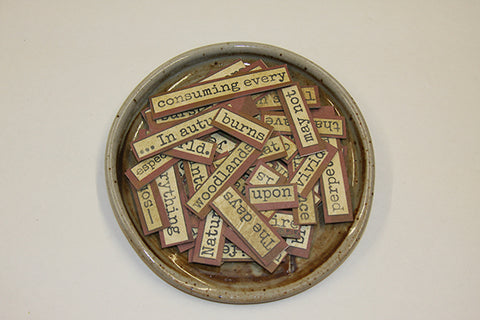
Word Art is another fabulously fun option for an insert. Here is an image of another collage sheet of Tangie’s from the latest collection that I fused to Wonder Under, then after peeling off the backing paper, fused to a piece of thin card. I used the rotary cutter to cut between the lines, then either rotary cutter or scissors to separate the words. I keep a bowl of words on my desk and make little poems, affirmations, card greetings, or whatever with them. Sometimes I just line up words on my desk then sweep all back into the bowl.


So here again is an image of my desktopper:
I wish to you all a very safe and happy Thanksgiving…this holiday is always about gratitude for me. I feel so blessed on every level of my being, and I thank God for a long list every day. This month in my art journal I have been celebrating this incredible community of artists, the Art Journal Caravan, and our very own Tangie Baxter. So for all of you, I hope there are some moments in this holiday season to make art, to express yourself in color and form, even if just for a few moments here and there.
take good care,
Rain
~~~~~
Please join us next Flashback Friday as we continue our journey with Rain.
Have a great weekend!
[Posted by: Joy]