Art Journal Emporium - Concertina Tag Journal October 17 2016, 0 Comments
Hello and welcome to my October Mixed Media blog post. My name is Katrina Rollings and I am a member of Tangie's Art Journal Emporium Creative Crew. Each month I create a Mixed Media cut and paste project to show you the versatility of digital kits.
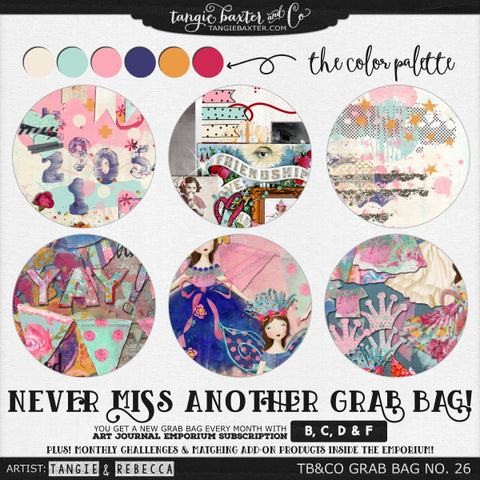
This time I have used TB&CO Grab Bag #26:
I have not worked in my journal this month but made a concertina Tag journal.
This is a very easy little journal to make. I thought it would be ideal for a travel journal, if you were only away for a few days, a cute way of passing on your family recipes at Christmas or if a family member is off to university or just as a special card, you could include inspirational quotes or have the tags as places for lots of people to sign their name. So lots of ideas and I am sure you can add to the list too.
So lets get started.
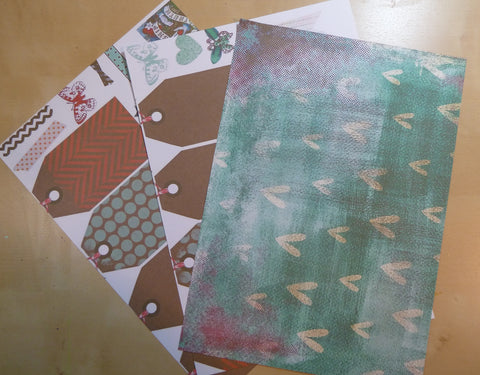
The first thing you need to do is print off one of the beautiful papers from the kit onto a piece of A4 printable cardstock (comparable to 8.5 x 11 inch cardstock). You will need to do this through which ever photo editing software you use as they are 12 x 12 inch papers in the kit so you need to make them into A4. It is very easy to do, just shrink them down to fit your paper. Remember also to set your printer to borderless. If your printer doesn't do that not to worry just trim off the white borders, your journal will just be slightly smaller.
Print one side, then turn that piece of printed card over and put it back through your printer and print a different paper from the kit onto the reverse side. You will then end up with a piece of cardstock with printed paper on both sides. This sheet of cardstock will become your little journal.
You then need to print out 4 of the tags (they need to be around 4 inches high) Then copy, paste and flip horizontally so you have the same tags but flipped over so they can become the backs of your finished tags when they are stuck together with the original ones.
You will also need to print out some of the embellishments you'd like to decorate your little journal.
Now we are ready to make up our journal.
Take your printed cardstock and place it on your table with the longest sides top and bottom.The pattern facing you will be the pattern that is inside the journal, so choose your favourite.
- Fold your card in half from left to right. Crease well. Unfold.
- Then fold from left to the central fold. Crease well and unfold.
- Then fold again from right to the central fold. Crease well and unfold.
- To make the pockets you need to fold the bottom edge up about 2 inches. Crease well.
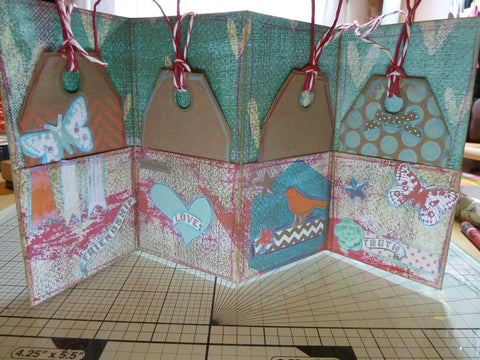
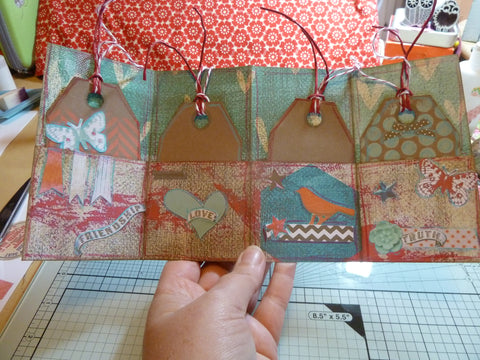
You then should have something that looks like this

I then inked around all the edges using a Tim Holtz® Distress Ink Pad but if you don't like that look then you can leave this step out.
Now for the tags:
Cut them all out so you have 8 tags in all. Cut or punch the holes of your tags out now before you stick then together, it makes life easier believe me!!

You then need to stick them together to make 4 tags. If they don't quite fit not to worry, just trim off the white parts that show and no one will ever know!
I then inked around each tag, again you needn't do that if you don't want to.
You also need to add some ribbon or string to the tops of your tags so they look like this

So going back to our Journal all we need to do now is add some glue to the open sides of the pockets and to the folds to form the other pockets and we can then decorate it with the embellishments we printed out earlier.

Don't forget the front cover too!

Well, there we are, your Concertina Tag Journal all finished.
I hoped you enjoyed my project and will think about using your digital kits in other ways.
Join me again next month for another Mixed Media cut and paste project, I would love your company.
Love Katrina
TB&CO Grab Bag #26 {October 2016} is only available for a limited time and is priced on a sliding scale, so act fast for the best deal! For more information visit TB&CO Grab Bags.
[Posted by: Katrina Rollings]


